EN User manual ZWC 1301
Contents Safety information _ _ _ _ _ _ _ _ _ _ _ _ _ _ 2 Product description _ _ _ _ _ _ _ _ _ _ _ _ _ 3 Control panel _ _ _ _ _ _ _ _ _ _ _ _ _ _ _ _ _ 5 Before first use _ _ _ _ _ _ _ _ _ _ _ _ _ _ _ _ 7 Daily use _ _ _ _ _ _ _ _ _ _ _ _ _ _ _ _ _ _ _ 7 Helpful hints and tips _ _ _ _ _ _ _ _ _ _ _ _ _ 9 International wash code symbols _ _ _ _ _ _ 12 Washing programmes _ _ _ _ _ _ _ _ _ _ _ Care and cleaning _ _ _ _ _ _ _ _ _ _ _ _ _ What to do if… _ _ _ _ _ _ _ _ _ _ _ _ _ _ _ Technical data _ _ _ _ _ _
• Always unplug the appliance and turn off the water supply after use, cleaning and maintenance. • Under no circumstances should you attempt to repair the machine yourself. Repairs carried out by inexperienced people may cause injury or serious malfunctioning. Contact your local Service Centre. Always insist on genuine spare parts. Installation • This appliance is heavy. Care should be taken when moving it. • When unpacking the appliance, check that it is not damaged.
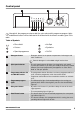
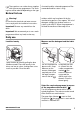
Machine front Machine rear 2 1 1 2 3 4 3 4 1 Detergent dispenser drawer 2 Control panel 1 Transit locking devices 2 Drain hose 3 Door opening handle 4 Adjustable feet (front) 3 Electrical lead 4 Inlet hose Detergent dispenser drawer Compartment for powder or liquid detergent used for main wash. If using liquid detergent pour it just before starting the programme. Compartment for liquid additives (fabric softener, starch).
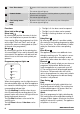
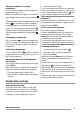
Control panel 1 2 3 Spin Cottons 90° 1300 Quick 60° eco Drain 8h Daily Time Prewash Extra Rinse Start Pause Delay Start 900 4h 60° Rinses 2h Washing 40° eco Mini 30 End 700 Door Wool Cold 30° Wool 40° 500 Specials Handwash 30° Delicate 40° 40° 30° Synthetics 9 8 7 6 5 4 Henceforth, the programme selector dial, the spin selector dial, programme progress lights and different buttons will be indicated in all the book with the relevant numbers given in this table.
7 Extra Rinse button • By means of this button, the machine performs some additional rinses. • The relevant light will light up. 8 Prewash button • By means of this button, the machine performs a prewash cycle before the main wash phase. • The relevant light will light up. 9 Time Saving button Quick Daily • By means of this button, you can select only one of the options. • The relevant light will light up.
These options can not be chosen together with the economy programmes. The washing time will be reduced depending on the type of material and the selected temperature. Recommended load for cotton is 2 kg. Before first use Warning! Ensure that the electrical and water connections comply with the installation instructions. Important! Remove any material from the drum. residues which may have been left by the manufacturing process. Pour approx.
At the end of the programme the selector to dial must be turned to position switch the machine off. Important! If you turn the programme selector dial to another programme when the machine is working, the lights in the programme progress display will start to flash to indicate a wrong selection. The machine will not perform the new selected programme. Select the spin speed, Rinse Hold or No spin option ( 2 ) Select the spin speed, Rinse Hold option or No Spin option by turning the spin speed selector.
Altering an option or a running programme It is possible to change any option before the programme carries it out. Before you make any change, you must pause the washing machine by pressing the button 6 . The programme can be changed as long as the button 6 has not been pressed. Changing a running programme is possible only by resetting it. Turn the programme selector dial to and then to the new programme position. Start the new programme by pressing the button 6 again.
Temperatures 95° or 90° 60°/50° 40°-30°- Cold The following weights are indicative: for normally soiled white cottons and linen (e.g. tea cloths, towels, tablecloths, sheets...) for normally soiled, colour fast garments (e.g. shirts, night dresses, pyjamas....) in linen, cotton or synthetic fibres and for lightly soiled white cotton (e.g. underwear) for delicate items (e.g.
Tar stains: first treat with stain remover, methylated spirits or benzine, then rub with detergent paste. Detergents and additives Good washing results also depend on the choice of detergent and use of the correct quantities to avoid waste and protect the environment. Although biodegradable, detergents contain substances which, in large quantities, can upset the delicate balance of nature. The choice of detergent will depend on the type of fabric (delicates, woollens, cottons, etc.
International wash code symbols Energetic wash Max. wash temperature 95°C Max. wash temperature 60°C Max. wash temperature 40°C Max.
Washing programmes Programme/ Temperature Description of the programme Type of laundry Options COTTONS 90° - 60° - 30° White and coloured cotton (heavily and normally soiled cotton items) SPIN REDUCTION/ RINSE HOLD/NO SPIN QUICK/DAILY PREWASH EXTRA RINSE DELAY START Main wash Rinses Long spin max. 1300 rpm Max load 3 kg COTTONS ECO 1) 60° - 40° White cotton economy This programme can be selected for normally soiled cotton items. The temperature will decrease and the washing time will be extended.
Programme/ Temperature Type of laundry Options RINSES With this programme it is possible to rinse and spin cotton garments which have been washed by hand. The machine performs 3 rinses, followed by a final long spin. The spin speed can be reduced. SPIN REDUCTION/ RINSE HOLD/NO SPIN EXTRA RINSE DELAY START DRAIN For emptying out the water of the last rinse in programmes with the Rinse Hold option selected.
• Select the hottest cotton wash programme. • Use a normal measure of detergent, must be a powder with biological properties. External cleaning Clean the exterior cabinet of the appliance with soap and water only, and then dry thoroughly. Cleaning the dispenser drawer The washing powder and additive dispenser drawer should be cleaned regularly. If necessary, the whole detergent drawer can be taken out of the machine for cleaning. You need to pull it firmly outwards, so that it comes free of retaining stop.
solved easily without calling out an engineer. Before contacting your local Service Centre, please carry out the checks listed below. During machine operation it is possible that the End pilot light blinks to indicate that the machine is not working: • 1 flash: problem with the water supply. Problem • 2 flashes: problem with the water draining. • 4 flashes: door open. Once the problem has been eliminated, press the button START to restart the programme.
Problem Possible cause/Solution There is water on the floor: Too much detergent or unsuitable detergent (creates too much foam) has been used. • Reduce the detergent quantity or use another one. Check whether there are any leaks from one of the inlet hose fittings. It is not always easy to see this as the water runs down the hose; check to see if it is damp. • Check the water inlet hose connection. The drain or inlet hose is damaged. • Change it with a new one.
phoning, make a note of the model, serial number and purchase date of your machine: the Service Centre will require this information. Mod. ... ... ... Prod. No. ... ... ... Ser. No. ... ... ... Technical data Dimensions Width Height Depth 50 cm 67 cm 55 cm Electrical connection Voltage - Overall power - Fuse Information on the electrical connection is given on the rating plate, on the inner edge of the appliance door.
Programmes Load (kg) Energy consumption (kWh) Water consumption (litre) Approximate programme duration (minutes) Remaining moisture (%)1) Standard 60 °C cotton 1,5 0.54 38 127 53 Standard 40 °C cotton 1,5 0.49 38 137 53 1) At the end of spin phase. Off Mode (W) Left On Mode (W) 0.10 1.10 Installation Lifting the machine Be careful when lifting the machine. Incorrect methods of lifting can cause physical injuries and also increase the risk of damage to the machine.
Caution! Before connecting up the appliance to new pipework or to pipework that has not been used for some time, run off a reasonable amount of water to flush out any debris that may have collected Caution! Do not use the hose from your previous appliance to connect to water supply. With a suitable spanner unscrew and remove the three screws and their spacers on machine's rear.
Make sure the end cannot come unhooked when the machine is emptying. This could be done by tying it to the tap with a piece of string or attaching it to the wall. If the machine is permanently plumbed in, hook the end of the hose into a standpipe installed for the purpose. The standpipe must have an internal diameter of at least 40 mm (1 1/2”) in order that there is an air gap between the drain hose and the standpipe.
1 Green & Yellow 2 Brown 1 3 Cord clamp 4 Blue 2 4 3 The wire coloured green and yellow must be connected to the terminal marked with the letter or coloured «E» or by the earth symbol green and yellow. The wire coloured blue must be connected to the terminal «N» or coloured black. The wire coloured brown must be connected to the terminal marked «L» or coloured red. Upon completion there must be no cut, or stray strands of wire present and the cord clamp must be secure over the outer sheath.
www.zanussi.
192987441-A-142012 www.zanussi.