NL EN FR DE Gebruiksaanwijzing User manual Notice d'utilisation Benutzerinformation Inbouwoven Built-in oven Four encastrable Elektro-Einbaubackofen ZOB 482 XL 2 14 25 37
Inhoud Veiligheidsinformatie _ _ _ _ _ _ _ _ _ _ _ _ _ _ _ Voor het eerste gebruik _ _ _ _ _ _ _ _ _ _ _ _ _ _ Beschrijving van het product _ _ _ _ _ _ _ _ _ _ _ Dagelijks gebruik _ _ _ _ _ _ _ _ _ _ _ _ _ _ _ _ _ Nuttige aanwijzingen en tips _ _ _ _ _ _ _ _ _ _ _ _ Bereidingstabel _ _ _ _ _ _ _ _ _ _ _ _ _ _ _ _ _ _ 2 3 4 4 7 7 Onderhoud en reiniging _ _ _ _ _ _ _ _ _ _ _ _ _ _ 9 Problemen oplossen _ _ _ _ _ _ _ _ _ _ _ _ _ _ _ 11 Montage _ _ _ _ _ _ _ _ _ _ _ _ _ _ _ _ _ _ _ _ 11 Aansluiting aan het ele
• Dit apparaat mag alleen gerepareerd worden door een erkende servicemonteur. Gebruik alleen originele reserveonderdelen. • Inbouwapparaten mogen alleen worden gebruikt nadat zij ingebouwd zijn in geschikte inbouwunits of werkbladen die aan de normen voldoen. • Verander de specificaties van dit product niet en wijzig het niet. Gevaar voor letsel en schade aan het apparaat. Waarschuwing! Volg de instructies voor de elektrische aansluitingen nauwkeurig op.
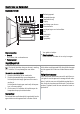
Beschrijving van het product Algemeen overzicht 1 2 3 4 5 6 7 8 9 10 1 2 3 4 5 6 7 8 9 10 11 Bedieningspaneel Temperatuurlampje Temperatuurknop Display Functieknop van de oven Stroomindicatie Luchtopeningen voor koelventilator Grill Ovenlampje Ventilator Typeplaatje 11 Ovenaccessoires • Ovenrek Voor servies, bak- en braadvormen. • Vlakke bakplaat Voor gebak en koekjes • Diepe braadslede Om te bakken en te braden of om vet op te vangen.
Ovenfuncties Ovenfunctie Toepassing UIT-stand Het apparaat staat UIT. Ovenlampje Brandt ook als er geen functie is ingeschakeld. Boven- en onderwarmte Verwarmt de oven met zowel het bovenste als het onderste verwarmingselement. Voor bakken en braden op één ovenniveau. Hetelucht met meer ver- Om verschillende gerechten tegelijk te bereiden. Om zelfgemaakte fruit in siroop mogen te bereiden en champignons of fruit te drogen. Onderste verwarmingselement Verwarmt alleen vanaf de onderkant van de oven.
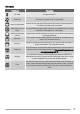
Display 1 2 6 5 3 1 2 3 4 5 6 Functie-indicatielampjes Tijddisplay Functie-indicatielampjes "+" toets Keuzetoets "-" toets 4 De klokfuncties instellen 2. Om de tijd in te stellen voor de kookwekker , bereidingsduur of einde bereiding , gebruikt u de " + " of " - "-toets. Het controlelampje voor de betreffende functie gaat branden. Wanneer de tijd is verstreken, knippert het functielampje en klinkt er gedurende 2 minuten een geluidssignaal. 1.
Na een paar seconden gaat de klokfunctie uit. Nuttige aanwijzingen en tips Waarschuwing! Sluit altijd de deur van de oven tijdens de bereiding, ook bij grillen. men. Plaats geen bakplaten, potten, etc. op de bodem van de oven om beschadiging van het email te voorko- Wees voorzichtig bij het verwijderen of installeren van accessoires om beschadiging van het email te voorkomen. • De oven heeft vier inschuifniveaus. Tel de inschuifniveaus vanaf de onderkant van de oven.
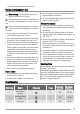
Niveau Oventemperatuur (°C) Bereidingstijd (min.) Eend 1 160 120-150 3 Gans 1 160 150-200 4 Kalkoen 1 180 210-240 1 Vis 2 190 30-40 1 Gevulde paprika's en tomaten / Gebakken aardappelen 2 190 50-70 Kant-en-klare taarten 2 160 45-55 Hartige taarten 2 160 80-100 Koekjes 3 140 25-35 2 Lasagne 2 180 45-60 1 Wit brood 2 190 50-60 1 Pizza 1 190 25-35 Gewicht (kg) Gerecht 1,5 1 Ovenfunctie Grillen Verwarm de lege oven 10 minuten voor.
Pizzafunctie Waarschuwing! Gebruik deze functie met een maximale temperatuur van 200°C. Hoeveelheid GERECHT Stuks g Rollade (kalkoen) 1 1000 Kip (in twee helften) 2 Kip drumsticks Kwartel Grillen Bereidingstijd (minuten) Temp. (°C) 1e kant 2e kant 3 200 30-40 20-30 1000 3 200 25-30 20-30 6 - 3 200 15-20 15-18 4 500 3 200 25-30 20-25 Groentegratin - - 3 200 20-25 - stuks.
• Maak alle oventoebehoren na elk gebruik schoon met een zachte doek en een warm sopje en een reinigingsmiddel en laat ze drogen. • Toebehoren met antiaanbaklaag mogen niet worden schoon gemaakt met een agressieve reinigingsmiddel, voorwerpen met scherpe randen of afwasautomaat. Hierdoor kan de antiaanbaklaag onherstelbaar worden beschadigd! A B Verwijder de strip van de Houd het glaspaneel vast deur en hef het glaspaneel met een hand en schuif eruit. met de andere hand het glas eruit.
Problemen oplossen Probleem Mogelijke oorzaak Oplossing De oven wordt niet warm De oven is niet ingeschakeld Schakel de oven in De oven wordt niet warm De tijd is niet ingesteld Klok instellen De oven wordt niet warm De benodigde kookstanden zijn niet ingesteld Controleer de kookstand De oven wordt niet warm De zekering in de zekeringenkast is uitgeschakeld Controleer de zekering. Als de zekering meer dan een keer is uitgeschakeld, raadpleeg dan een gekwalificeerd elektricien.
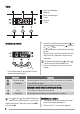
540 560 -570 00 ÷1 80 A B 50 560 570 590 20 in 550 m 600 • Het apparaat kan met de achterkant en één zijde tegen hogere apparaten of wanden aan worden geplaatst. De andere zijde moet tegen meubels met dezelfde hoogte worden geplaatst. • Inbouwovens en inbouwfornuizen zijn uitgerust met speciale aansluitsystemen. Om veiligheidsredenen mag u alleen apparaten van dezelfde fabrikant combineren.
apparatuur wordt gerecycled. Als u ervoor zorgt dat dit product op de juiste manier wordt verwijderd, voorkomt u mogelijke negatieve gevolgen voor mens en milieu die zich zouden kunnen voordoen in geval van verkeerde afvalverwerking. Voor gedetailleerdere informatie over het recyclen van dit product, kunt u contact opnemen met de gemeente, de gemeentereiniging of de winkel waar u het product hebt gekocht. Afdanken van het apparaat 1. Trek de stekker uit het stopcontact. 2.
Contents Safety information _ _ _ _ _ _ _ _ _ _ _ _ _ _ _ _ Before first use _ _ _ _ _ _ _ _ _ _ _ _ _ _ _ _ _ Product description _ _ _ _ _ _ _ _ _ _ _ _ _ _ _ Daily use _ _ _ _ _ _ _ _ _ _ _ _ _ _ _ _ _ _ _ _ Helpful hints and tips _ _ _ _ _ _ _ _ _ _ _ _ _ _ Cooking tables _ _ _ _ _ _ _ _ _ _ _ _ _ _ _ _ _ 14 15 16 16 18 19 Care and cleaning _ _ _ _ _ _ _ _ _ _ _ _ _ _ _ _ What to do if… _ _ _ _ _ _ _ _ _ _ _ _ _ _ _ _ _ Installation _ _ _ _ _ _ _ _ _ _ _ _ _ _ _ _ _ _ _ Electrical connection _ _ _ _ _
Warning! Carefully obey the instructions for electrical connections. Before first use Remove all packaging, both inside and outside the oven, before using the appliance. Do not remove the rating plate. Caution! To open the oven door, always hold the handle in the centre. Setting the time The oven only operates after time set. To set the current time use " + " or " - " button. After approximately 5 seconds, the flashing stops and the display shows the time of day set. time.
Product description General overview 1 2 3 4 5 6 7 8 9 10 1 2 3 4 5 6 7 8 9 10 11 Control panel Temperature indicator Temperature control knob Display Oven function control knob Power indicator Air vents for the cooling fan Grill Oven lamp Fan Rating plate 11 Oven accessories • Oven shelf For cookware, cake tins, roasts. • Flat baking tray For cakes and biscuits. • Deep roasting pan To bake and roast or as pan to collect fat. Daily use To use the oven, push the retractable knob.
Oven functions Oven function Application OFF position The appliance is OFF. Oven lamp Lights up without any cooking function. Conventional cooking Heats both from the top and bottom element. To bake and roast on one oven level. Fan forced cooking To cook several different dishes at the same time. To cook home-made fruit in syrup, and to dry mushrooms or fruit. Bottom heating element Heats only from the bottom of the oven. To bake cakes with crispy or crusty bases.
Setting the clock functions Push the Selection button again and again until necessary function indicator flashes. 1. 2. To set the time for Minute minder , Duration or End , use " + " or " - " button. The related function indicator comes on. When the time period is completed, the function indicator flashes and an acoustic signal sounds for 2 minutes. and End With the functions Duration oven switches off automatically. 3. Push any button to stop the signal.
• If you use two baking trays at the same time, keep one level empty between them. Cooking meat and fish • Do not cook meat with weight below 1 kg. Cooking too small quantities makes the meat too dry. • To keep the red meat well cooked outside and juicy inside set the temperature between 200 °C-250 °C. • For white meat, poultry and fish set the temperature between 150°C-175°C. • Use a dripping pan for very fatty food to prevent the oven from stains that can be permanent.
Quantity TYPE OF DISH Grilling Pieces g Fillet steaks 4 800 Beef steaks 4 600 Sausages 8 Pork chops Chicken (cut in 2) Cooking time in minutes Temp.
TYPE OF DISH Pizza Function Cooking time in minutes NOTES 200 10~20 on flat baking tray or on oven shelf 200 15~25 on flat baking tray Level temp.°C Pizza , small 1 Bread rolls 1 Care and cleaning Warning! Before you clean the appliance, switch it off. Make sure that the appliance is cold. Warning! Do not clean the appliance with steam cleaners or high-pressure cleaners.
A Oven lamp B Warning! There is a danger of electrical shock! Before you change the oven lamp: • Switch off the oven. • Remove the fuses in the fuse box or switch off the circuit breaker. Pull the trim away from the Hold the door glass with door and lift off. one hand and slide the glass out with the other hand. Put a cloth on the bottom of the oven for protection of the oven light and glass cover. Replacing the oven light bulb/cleaning the glass cover 1.
These data are necessary to help you quickly and correctly. These data are available on the rating plate (refer to "Product description") • Model description ............ • Product number (PNC) ............ • Serial number (S.N.) ............ Warning! Let a qualified electrician or competent person do repairs to the appliance. Important! If you do not operate the appliance correctly, the visit from the Service Force Centre or dealer will not be free of charge, even during the warranty period.
• This appliance has no mains plug and no mains cable. • Any electrical component must be installed or replaced by the Service Centre technician or qualified expert. • Applicable cable types : H07RN-F, H05RN-F, H05RRF, H05VVF, H05V2V2-F (T90), H05BB-F. • Always use a correctly installed shockproof socket. • Do not use multi-way plugs, connectors and extension cables. There is a risk of fire.
Sommaire Consignes de sécurité _ _ _ _ _ _ _ _ _ _ _ _ _ _ Avant la première utilisation _ _ _ _ _ _ _ _ _ _ _ Description de l'appareil _ _ _ _ _ _ _ _ _ _ _ _ _ Utilisation quotidienne _ _ _ _ _ _ _ _ _ _ _ _ _ _ Conseils utiles _ _ _ _ _ _ _ _ _ _ _ _ _ _ _ _ _ Tableaux de cuisson _ _ _ _ _ _ _ _ _ _ _ _ _ _ _ 25 26 27 27 29 30 Entretien et nettoyage _ _ _ _ _ _ _ _ _ _ _ _ _ _ En cas d'anomalie de fonctionnement _ _ _ _ _ _ _ Installation _ _ _ _ _ _ _ _ _ _ _ _ _ _ _ _ _ _ _ Branchement électrique _
• Au moment de l'ouverture de la porte du four, durant la phase de cuisson ou à la fin de cette dernière, faites attention à la bouffée d'air chaud qui sort du four. Installation • Vérifiez que l'appareil n'a pas été endommagé pendant le transport. Ne branchez jamais un appareil endommagé. Si nécessaire, contactez le magasin vendeur. • Les réparations ne doivent être effectuées que par un service après vente qualifié.
Description de l'appareil Description de l'appareil 1 2 3 4 5 6 7 8 9 10 1 2 3 4 5 6 7 8 9 10 11 Bandeau de commandes Voyant du thermostat Thermostat Affichage Sélecteur de fonctions du four Voyant Marche Orifices d'aération du ventilateur de refroidissement Gril Éclairage du four Ventilateur Plaque signalétique 11 Accessoires du four • Grille du four Elle permet de poser les plats (rôtis, gratins), les moules à pâtisserie et de faire des grillades. • Plateau multi-usages Pour gâteaux et biscuits.
Fonctions du four Fonction du four Application Position Arrêt L'appareil est à l'arrêt. Éclairage du four S'allume même si aucune fonction de cuisson n'est sélectionnée. Cuisson traditionnelle La chaleur provient des éléments chauffants supérieur et inférieur. Pour cuire et rôtir sur un seul niveau. Multichaleur tournante Pour cuire plusieurs préparations simultanément. Pour préparer des sirops de fruits maison ou faire sécher des champignons ou des fruits.
Réglage des fonctions de l'horloge 1. Appuyez plusieurs fois sur la touche de sélection jusqu'à ce que le symbole de la fonction souhaitée clignote. 2. Pour régler la fonction Minuteur , Durée ou , appuyez sur la touche " + " ou " - ". Fin Le voyant de la fonction correspondante s'allume. Dès que la durée est écoulée, le voyant de la fonction clignote et un signal sonore retentit pendant 2 minutes. et Fin , le four se Avec les fonctions Durée met à l'arrêt automatiquement. 3.
• De la vapeur peut être produite en cours de cuisson et se déposer sur les parois du four ou sur les vitres de la porte. Ce phénomène est normal. Au moment de l'ouverture de la porte du four, durant la phase de cuisson, faites attention à la bouffée d'air chaud qui sort du four. Pour réduire la condensation, préchauffez toujours le four à vide pendant 10 minutes. • Il est conseillé d'essuyer les gouttes d'eau après chaque cycle de cuisson.
Gradin Température du four (°C) Temps de cuisson (min) Petits biscuits 3 140 25-35 2 Lasagnes 2 180 45-60 1 Pain blanc 2 190 50-60 1 Pizza 1 190 25-35 Poids (kg) Mets Fonction du four Cuisson au gril Préchauffez le four à vide pendant environ 10 minutes, avant la cuisson. Quantité PLAT Cuisson au gril Pièces g Steaks dans le filet 4 800 Biftecks 4 Saucisses Côtelettes de porc Temps de cuisson en minutes Temp.
Quantité Type de plat Cuisson au gril Pièces g Caille 4 500 Gratin de légumes - pièces. Coquilles SaintJacques Temps de cuisson en minutes Temp. (°C) 1er côté 2e côté 3 200 25-30 20-25 - 3 200 20-25 - - - 3 200 15-20 - Maquereau 2-4 - 3 200 15-20 10-15 Filets de poisson 4-6 800 3 200 12-15 8-10 Gradin Pizza Préchauffez le four à vide pendant environ 10 minutes, avant la cuisson. Cuisson Pizza Gradin temp.
Glissières A Retrait des glissières B 2 1 1 Écartez l'avant de la glissière de la paroi latérale. Éloignez le cache de la porte et retirez-le en le soulevant. 2 Écartez l'arrière de la glissière de la paroi latérale et retirez-la. Remontage des glissières Pour remonter les glissières, procédez dans le sens inverse du retrait.
En cas d'anomalie de fonctionnement Anomalie Cause possible Solution Le four ne chauffe pas Le four n'est pas en fonctionnement Mettez le four en fonctionnement Le four ne chauffe pas L'heure n'est pas réglée Réglez l'horloge Le four ne chauffe pas Les réglages souhaités n'ont pas été Vérifiez les réglages effectués Le four ne chauffe pas Le fusible de l'installation domestique a disjoncté Vérifiez le fusible. Si le fusible disjoncte à plusieurs reprises, contactez un électricien qualifié.
540 560 -570 00 ÷1 80 A B 50 560 570 590 20 in 550 m 600 • L'appareil peut être placé avec sa paroi arrière et latérale posées contre des appareils ou des parois d'une hauteur supérieure. L'autre paroi latérale doit être placée contre des meubles ayant une hauteur identique à celle du four. • Les fours et plaques de cuisson encastrables sont équipés de connexions particulières. Par mesure de sécurité, vous devez uniquement associer des appareils du même fabricant.
En matière de protection de l'environnement Le symbole sur le produit ou son emballage indique que ce produit ne peut être traité comme déchet ménager. Il doit être remis au point de collecte dédié à cet effet (collecte et recyclage du matériel électrique et électronique). En procédant à la mise au rebut de l'appareil dans les règles de l’art, nous préservons l'environnement et notre sécurité, s’assurant ainsi que les déchets seront traités dans des conditions optimum.
Inhalt Sicherheitshinweise _ _ _ _ _ _ _ _ _ _ _ _ _ _ _ Vor der ersten Inbetriebnahme _ _ _ _ _ _ _ _ _ _ Gerätebeschreibung _ _ _ _ _ _ _ _ _ _ _ _ _ _ _ Täglicher Gebrauch _ _ _ _ _ _ _ _ _ _ _ _ _ _ _ Praktische Tipps und Hinweise _ _ _ _ _ _ _ _ _ _ Kochtabellen _ _ _ _ _ _ _ _ _ _ _ _ _ _ _ _ _ _ 37 38 39 39 42 42 Reinigung und Pflege _ _ _ _ _ _ _ _ _ _ _ _ _ _ Was tun, wenn … _ _ _ _ _ _ _ _ _ _ _ _ _ _ _ _ Gerät aufstellen _ _ _ _ _ _ _ _ _ _ _ _ _ _ _ _ _ Elektrischer Anschluss _ _ _ _ _ _ _ _ _
Installation • Vergewissern Sie sich, dass das Gerät beim Transport nicht beschädigt wurde. Schließen Sie ein beschädigtes Gerät nicht an. Wenden Sie sich bei Bedarf an den Lieferanten. • Das Gerät darf nur von einem autorisierten Servicetechniker repariert werden. Dabei dürfen ausschließlich Originalersatzteile verwendet werden. • Einbaugeräte dürfen nur betrieben werden, wenn sie in normgerechte, passende Einbauschränke und Arbeitsplatten eingebaut wurden.
Gerätebeschreibung Gesamtansicht 1 2 3 4 5 6 7 8 9 10 1 2 3 4 5 6 7 8 9 10 11 Bedienfeld Temperaturkontrolllampe Schalter für die Temperaturwahl Anzeige Schalter Backofen-Funktionen Betriebs-Kontrolllampe Lüftungsöffnungen für das Kühlgebläse Grill Backofenlampe Ventilator Typenschild 11 Backofenzubehör • Rost Für Geschirr, Kuchenformen, Braten • Backblech Für Kuchen und Plätzchen • Fettpfanne Zum Backen und Braten oder zum Auffangen von austretendem Fett.
Backofenfunktionen Backofenfunktion Anwendung Position AUS Das Gerät ist AUSGESCHALTET. Backofenlampe Leuchtet, auch wenn keine Gar-Funktion eingestellt ist. Ober- und Unterhitze Die Hitze kommt von den Heizelementen oben und unten im Backofen. Zum Backen und Braten auf einer Ebene. Zum gleichzeitigen Garen und Backen verschiedener Gerichte zur selben Zeit. Zum Umluft mit RingheizkörSterilisieren von Eingemachtem, zum Kochen selbstgemachter Konfitüre und zum per Trocknen von Pilzen und Obst.
Anzeige 1 2 6 5 3 1 2 3 4 5 6 Funktionsleuchten Zeitanzeige Funktionsleuchten Taste "+" Auswahltaste Taste "-" 4 Einstellen der Uhrfunktionen Drücken Sie die Auswahltaste so oft, bis die gewünschte Funktionsleuchte blinkt. 1. 2. Zum Einstellen der Zeit für Kurzzeit , Dauer oder Ende verwenden Sie die Taste " + " oder " - ". Die entsprechende Funktionsleuchte leuchtet auf. Nach Ablauf der eingestellten Zeit blinkt die Funktionsleuchte und es ertönt für 2 Minuten ein akustisches Signal.
Die Uhrfunktions-Leuchte erlischt nach einigen Sekunden. Praktische Tipps und Hinweise Warnung! Schließen Sie beim Braten oder Backen immer die Backofen-Tür, ebenso beim Grillen. Stellen Sie keine Backbleche, Töpfe usw. auf den Boden des Backofens, um Beschädigungen der Emailbeschichtung zu verhindern. Gehen Sie beim Entfernen oder Einsetzen des Zubehörs sorgsam vor, um die Emailbeschichtung des Ofens nicht zu beschädigen. • Der Backofen hat vier Einsatzebenen. Zählen Sie die Einsatzebenen vom Boden aus.
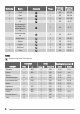
Ebene Backofentemperatur (°C) Garzeit (Min.) Hähnchen/Kaninchen 2 200 70-80 1,5 Ente 1 160 120-150 3 Gans 1 160 150-200 4 Truthahn/Pute 1 180 210-240 1 Fisch 2 190 30-40 1 Gefüllte Paprika oder Tomaten/ Ofenkartoffeln 2 190 50-70 Kuchen 2 160 45-55 Pasteten, Gedeckte Kuchen usw. 2 160 80-100 Kleingebäck 3 140 25-35 2 Lasagne 2 180 45-60 1 Weißbrot 2 190 50-60 1 Pizza 1 190 25-35 Temp. (°C) 1. Seite 2.
Heißluftgrillen Warnung! Wählen Sie bei Verwendung dieser Funktion eine Höchsttemperatur von 200 °C. Menge GERICHT Grillen Stück g Rollbraten (Puter) 1 1000 Hähnchen (in 2 Hälften) 2 Hähnchenschlegel Wachtel Garzeit in Minuten Temp. (°C) 1. Seite 2.
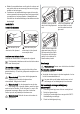
• Reinigen Sie nach jedem Gebrauch alle Zubehörteile mit einem weichen Tuch, das mit warmem Wasser und Reinigungsmittel angefeuchtet wurde, und lassen Sie sie trocknen. • Reinigen Sie Zubehörteile mit Antihaftbeschichtung nicht mit aggressiven Reinigungsmitteln, scharfkantigen Gegenständen oder im Geschirrspüler. Die Antihaftbeschichtung kann zerstört werden! A B Ziehen Sie die Türabde- Halten Sie die Glasscheickung nach oben weg und be mit einer Hand und heben Sie diese heraus.
3. Ersetzen Sie die Backofenlampe durch eine geeignete 300 °C hitzbeständige Backofenlampe. 4. Bringen Sie die Glasabdeckung wieder an.
540 560 -570 00 ÷1 80 A B 50 560 570 590 20 in 550 m 600 • Einige Teile des Ofens sind spannungsführend. Das Gerät sollte mit dem Küchenmöbel bündig abschließen, stellen Sie sicher, dass keine Zwischenräume vorhanden sind. Dies verhindert das Risiko von Stromschlägen, denn so können Sie nicht versehentlich gefährliche Teile berühren. • Das Gerät kann mit der Rückseite und mit einer der Seitenwände neben höheren Geräten oder Wänden aufgestellt werden.
• In der elektrischen Installation ist eine Einrichtung vorzusehen, die es ermöglicht, das Gerät mit einer Kontaktöffnungsweite von mindestens 3 mm allpolig vom Netz zu trennen (z.B. Sicherheitsschalter, Sicherungen). • Angaben zur Spannung finden Sie auf dem Typenschild (siehe "Gesamtansicht").
Vous pouvez commander des accessoires, consommables et pièces détachées via notre magasin online sur: www.zanussi.be Benötigen Sie Zubehör, Verbrauchsmaterial und Ersatzteile? Dann besuchen Sie bitte unseren Onlineshop unter: www.zanussi.de Voor het on-line bestellen van accessoires, consumables en onderdelen gaat u naar de ’webwinkel’ op: www.zanussi.nl www.zanussi.com 356967905-A-092009 U kan toebehoren, verbruiksprodukten en onderdelen bestellen via onze webwinkel op: www.zanussi.