EN User manual Washer Dryer ZKN 7147 J
Contents Safety information _ _ _ _ _ _ _ _ _ _ _ _ _ _ _ _ _ _ 2 Product description _ _ _ _ _ _ _ _ _ _ _ _ _ _ _ _ _ 4 Control panel _ _ _ _ _ _ _ _ _ _ _ _ _ _ _ _ _ _ _ _ 5 Washing Programmes _ _ _ _ _ _ _ _ _ _ _ _ _ _ _ _ 7 Automatic Drying programmes _ _ _ _ _ _ _ _ _ _ _ _ 9 Helpful hints and tips _ _ _ _ _ _ _ _ _ _ _ _ _ _ _ 10 Drying Hints _ _ _ _ _ _ _ _ _ _ _ _ _ _ _ _ _ _ _ _ 11 First use _ _ _ _ _ _ _ _ _ _ _ _ _ _ _ _ _ _ _ _ _ _ 12 Personalisation _ _ _ _ _ _ _ _ _ _ _ _ _ _ _ _ _ _ 12 Da
• After having installed the appliance, check that it is not standing on the inlet and drain hose and the worktop is not pressing the electrical supply cable against the wall. • If the machine is situated on a carpeted floor, please adjust the feet in order to allow air to circulate freely under the appliance. • Always be sure, that there is no water leakage from hoses and their connections after the installation.
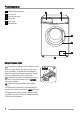
Product description 1 2 3 4 5 6 Detergent dispenser drawer Control panel Door opening handle Rating plate Drain pump Adjustable feet 1 2 3 4 5 6 Detergent dispenser drawer Compartment for detergent used for prewash and soak phase or for stain remover used during the stain action phase (if available). The prewash and soak detergent is added at the beginning of the wash programme. The stain remover is added during the stain action phase. Compartment for powder or liquid detergent used for main wash.
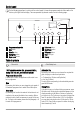
Control panel On the following page there is a picture of the control panel. It shows the programme selector dial as well as the buttons, pilot lights and the display. These are presented by relevant numbers on the following pages.
Available options: Super Quick Short cycle for lightly soiled items or for laundry which needs only freshening up. We recommend you to reduce the fabrics loading. Extra Rinse This appliance is designed to save energy. If it necessary to rinse the laundry using an extra quantity of water (extra rinse), select this option. Some additional rinses will be performed. This option is recommended for people who are allergic to detergents, and in areas where the water is very soft.
Washing Programmes Programme - Maximum and Minimum Temperature - Cycle Description - Maximum Spin Speed - Maximum Fabrics Load Type of Laundry Options Cottons 90° - 60° Main wash - Rinses Maximum spin speed at 1400 rpm Max. load 8 kg - Reduced load 4 kg1) White cotton(heavily and normally soiled items). SPIN RINSE HOLD SUPER QUICK EXTRA RINSE Cottons Eco 60° - 40° Main wash - Rinses Maximum spin speed at 1400 rpm Max. load 8 kg White or fast colour cotton (normally soiled items).
Programme - Maximum and Minimum Temperature - Cycle Description - Maximum Spin Speed - Maximum Fabrics Load Type of Laundry Options Easy iron 40° Main wash - Rinses Maximum spin speed at 900 rpm Max. load 1 kg Synthetic or mixed fabrics: selecting this programme the laundry is gently washed and spun to avoid any creasing. In this way ironing is easier. Furthermore the machine will perform additional rinses.
Programme - Maximum and Minimum Temperature - Cycle Description - Maximum Spin Speed - Maximum Fabrics Load Type of Laundry Rinses Maximum spin speed at 1400 rpm Max. load 8 kg With this programme it is possible to rinse and spin cotton garments which have been washed by hand. The machine performs 3 rinses, followed by a final long spin. Options Detergent Compartment SPIN RINSE HOLD EXTRA RINSE Important! The spin speed will automatically assume the setting for cotton items.
Timed Programmes Type of Fabric Drying Load Spin Speed (rpm) Suggested drying time (minutes) Cupboard dry Suitable for items to put away without ironing Cotton and linen (bathrobes, bath towels, etc) 6 kg 4 kg 2 kg 1400 185 - 205 110 - 120 60 - 70 Cupboard dry Suitable for items to put away without ironing Synthetics and mixed fabrics (jumpers, blouses, underwear, household linen) 3 kg 1 kg 900 115-125 40-50 Cotton and linen (sheets, tablecloths, shirts, etc.
Red wine: soak in water and detergent, rinse and treat with acetic or citric acid, then rinse. Treat any residual marks with bleach. Ink: depending on the type of ink, moisten the fabric first with acetone1), then with acetic acid; treat any residual marks on white fabrics with bleach and then rinse thoroughly. Tar stains: first treat with stain remover, methylated spirits or benzine, then rub with detergent paste.
• Also, fabrics containing residue of setting lotions or hair sprays, nail solvents or similar solutions must not be machine dried in order to avoid the formation of harmful vapours. The detergent and any additives must be placed in the appropriate compartments of the dispenser drawer before starting the wash programme. If using liquid detergents, a programme without prewash must be selected. Your appliance incorporates a re-circulation system which allows an optimal use of the concentrated detergent.
Daily Use Load the laundry Open the door by carefully pulling the door handle outwards. Place the laundry in the drum, one item at a time, shaking them out as much as possible. Close the door. Make sure that no laundry stays between the seal and the door. There is a risk of water leakage or damage to the laundry. Measure out the detergent and the fabric softener Pull out the dispenser drawer until it stops.
Select the Delay Start by pressing button 8 Interrupting a programme Before you start the programme, if you wish to delay the start, press this button to select the desired delay. The selected delay time value will appear on the display for a few seconds, then the duration of the programme will appear again. You must select this option after you have set the programme and before you start the programme. You can cancel or modify the delay time at any moment, before you press button 7.
Use - Drying Drying only Caution! The recommended load size is 4 kg for cottons and linen and 3 kg for synthetic items. 6. 7. By pressing Drying Time button it is also possible to dry up to 6 kg of cotton items (see the «Drying Programme » table). Caution! The water tap must be open and the drain hose must be positioned in the sink or connected to the drain pipe. 1. Load the laundry. 2.
5. 6. 7. Set the dryness degree by pressing button 3. The display shows the whole duration of the washing and the set drying cycle. Start the programme by pressing button 7. The time remaining is updated every minute on the display. At the end of the programme turn the selector dial to the position to switch the machine off. Remove the laundry. 3. If possible, do not select a spin speed lower than that proposed by the appliance to avoid too long a drying time therefore saving energy.
Cleaning the dispenser drawer The washing powder and additive dispenser drawer should be cleaned regularly. Remove the drawer by pressing the catch downwards and by pulling it out. Flush it out under a tap, to remove any traces of accumulated powder. To aid cleaning, the top part of the additive compartment should be removed. appliance is hot. The water must be cold before you clean the drain pump. Proceed as follows: Open the pump door.
Caution! When the appliance is in use and depending on the programme selected there can be hot water in the pump. Never remove the pump cover during a wash cycle, always wait until the appliance has finished the cycle, and is empty. When refitting the pump cover, ensure it is securely re-tightened so as to stop leaks and young children being able to remove it. Pull back the drainage duct. Unscrew the filter and remove it. Cleaning the water inlet filters Remove fluff and objects from the pump.
Make sure that the temperature is more than 0 °C before you use the appliance again. The manufacturer is not responsible for damages caused by low temperatures. 35° 45° • Screw the hose back to the machine and make sure the connection is tight. • Turn on the water tap. Frost precautions If the machine is installed in a place where the temperature could drop below 0°C, remove the remaining water from the inlet hose and the drain pump. 1. disconnect the mains plug from the mains socket. 2.
Problem Possible cause/Solution The door has not been closed. • Close the door firmly. The plug is not properly inserted in the power socket. • Insert the plug into the power socket. There is no power at the socket. • Please check your domestic electrical installation. The main fuse has blown. The washing machine does not start: • Replace the fuse. The selector dial is not correctly positioned and/or the button 7 has not been pressed. • Please turn the selector dial and press the button 7 again.
Problem Possible cause/Solution There is water on the floor: Too much detergent or unsuitable detergent (creates too much foam) has been used. • Reduce the detergent quantity or use another one. Check whether there are any leaks from one of the inlet hose fittings. It is not always easy to see this as the water runs down the hose; check to see if it is damp. • Check the water inlet hose connection. The drain or inlet hose is damaged. • Replace it with a new one.
Problem Possible cause/Solution Spinning starts late or the machine does not spin: The electronic unbalance detection device has cut in because the laundry is not evenly distributed in the drum. The laundry is redistributed by reverse rotation of the drum. This may happen several times before the unbalance disappears and normal spinning can resume. If, after 10 minutes, the laundry is still not evenly distributed in the drum, the machine will not spin.
If you are unable to identify or solve the problem, contact our service centre. Before telephoning, make a note of the model, serial number and purchase date of your machine: the Service Centre will require this information. Mod. ... ... ... Prod. No. ... ... ... Ser. No. ... Technical data Dimensions Width Height Depth 60 cm 85 cm 63 cm Electrical connection Voltage - Overall power - Fuse Information on the electrical connection is given on the rating plate, on the inner edge of the appliance door.
Installation Unpacking Positioning All transit bolts and packing must be removed before using the appliance. You are advised to keep all transit devices so that they can be refitted if the machine ever has to be transported again. Install the machine on a flat hard floor. Make sure that air circulation around the machine is not impeded by carpets, rugs etc. Check that the machine does not touch the wall or other kitchen units. Level the washing machine by raising or lowering the feet.
Caution! Before connecting up the appliance to new pipework or to pipework that has not been used for some time, run off a reasonable amount of water to flush out any debris that may have collected Caution! Do not use the hose from your previous appliance to connect to water supply. The inlet hose is screwed to the back of the appliance. Connect the hose to a tap with a 3/4” thread. Always use the hose supplied with the appliance. There should be a minimum vertical distance of 5.02 m (16.
Please ensure that when the appliance is installed it is easily accessible for the engineer in the event of a breakdown. In the interest of the environment Min. 60 cm (23.6”) Max. 90 cm (35.4”) If your drain hose looks like this (see beside) you do not require the “U” piece”. Just push the hose firmly in to the standpipe. The appliance should be connected to the FOUL drainage system, the water will then be taken to a sewage works for treatment before being discharged safely into a river.
In the event of having to change the fuse in the plug supplied, a 13 amp ASTA approved (BS1363/A) fuse must be used. MUST be carried out by our Service Force Centre. The appliance should not be connected to the electrical supply by means of an extension cable. Warning! A cut off plug inserted into a 13 amp socket is a serious safety (shock) hazard. Ensure that the cut off plug is disposed of safely.
132935111-A-162011 www.zanussi.