User Manual Cooker Model ZKM6040
The following symbols are used in this user manual: WARNING! Important information concerning your personal safety and information on how to avoid damaging the appliance.
Important safety instructions These warnings are provided in the interests of your safety. Ensure that you understand them all before installing or using the appliance. Your safety is of paramount importance. If you are unsure about any of the meanings of these warnings please contact customer care. Installation • The appliance must be installed according to the instructions supplied.
• Always use oven gloves to remove and replace the grill pan handle when grilling. • Always support the grill pan when it is in the withdrawn or partially withdrawn position. • Always use oven gloves to remove and place food in the oven. • Ensure cooking utensils are large enough to contain foods to prevent spillage and boil over. • The handles of saucepans, which are smaller than the heated area on the hob, will become hot. • Ensure your hand is protected before handling the pan.
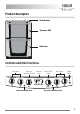
Product description Control panel Top oven / Grill Main oven Controls and their functions Hob controls 1 Main oven temperature control Main oven indicator neon Electronic timer Top oven / Grill control Hob controls Ignition switch Top oven / Grill indicator neon 5
Before using the appliance Rating plate • This is usually situated on the front frame of the appliance and can be seen upon opening the door. Alternatively the rating plate may also be found on the back or top of some models (where applicable). • The appliance must be protected by a suitably rated fuse or circuit breaker. • The rating of the appliance is given on the rating plate. • Do not remove the rating plate from the appliance as this may invalidate the guarantee.
Grill and oven furniture • The following items of grill and oven furniture have been supplied with the appliance. If you require replacements of any of the items listed below please contact your local service force centre.
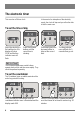
The electronic timer This oven has a 24-hour clock. In the event of an interuption of the electricity supply, the clock will stop and you will not be able to use the main oven. To set the time of day + + + When the electricity is first switched on, the display will show 12.00 and the time indicator neon will flash. Press the increase buttons until the correct time is showing. If necessary press the decrease button to help set the correct time.
IMPORTANT! At the end of the timed period a sound will be heard intermittently for up to 2 minutes. This must be completed within 5 seconds of first pressing the selector control button If necessary press the decrease button to achieve the correct time interval. + The sound can be stopped by pressing any button.
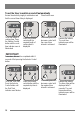
To set the timer to switch on and off automatically Ensure the electricity supply is switched on and that the correct time of day is displayed. Place food in oven. + + To set the length of cooking time. Press the Selector Control button until the cook time indicator neon is illuminated. Press the increase control until the required length of cooking time is displayed. If necessary press the decrease control until the correct time interval is achieved. Release the buttons.
Set the main oven control to the required temperature. To set the timer to switch off only Ensure the electricity supply is switched on and that the correct time of day is displayed. Place food in oven. + + To set the length of cooking time. Press the Selector Control button until the cook time indicator neon is illuminated. Press the increase control until the required length of cooking time is displayed. If necessary press the decrease control until the correct time interval is achieved.
To cancel an automatic programme + + Press the selector control button until the cook time indicator neon flashes. Press the decrease button until 0.00 is shown in the display. The cook time indicator neon will continue to flash for a few seconds and then return to the time of day. Turn off the oven controls. To return the appliance to manual At the end of a timed cooking period, the 'End Time' indicator neon will flash and an alarm will sound for up to 2 minutes.
The hob The gas hob has different burner sizes to suit different types of cooking. To ensure maximum burner efficiency only use pots and pans with flat bases appropriate to the burner size used. The largest pan, which you should use on any burner, is 230mm (9") and the smallest pan should not measure less than 100mm (4"). WARNING! Ensure the pan supports are correctly fitted before using the hob.
WARNING! If you close the lid of the appliance while any of the hotplate burners are lit, the gas will go out. This is because it would be dangerous if the burners stayed on when the lid was closed. WARNING! Always use the control knob to turn off a burner. Do not use the lid as a cut-off device. This will only cut off the gas when the lid is closed. The gas will flow again when the lid is opened. WARNING! When lighting any burner, ensure that it is lit before you leave the appliance.
The grill CAUTION! Accessible parts may be hot when the grill is in use. Young children should be kept away. The grill is a dual circuit grill which means that the full area of the grill can be used, or for economy purposes, the centre section only can be used when cooking smaller quantities of food. Using the grill The grill settings are as follows:- Full grill area at ¼ power. Centre grill area at full power. Turn the top oven/grill control to the required setting.
The grill pan and handle The grill pan has a removable handle. Attach and remove as described below To attach. Press the button on the handle with the thumb and insert the lip into the widest part of the bracket. Slide the handle towards the left and release the button. WARNING! Ensure the handle is properly located. Place the grill pan on the shelf so that the pan is positioned centrally beneath the grill.
Hints and tips • Most foods should be placed on the grid in the grill pan to allow maximum circulation of air to lift the food out of the fats and juices. • Adjust the grid and grill pan runner position to allow for different thicknesses of food. • Food should be thoroughly dried before grilling to minimise splashing. Brush lean meats and fish lightly with a little oil or melted butter to keep them moist during cooking.
The top oven The top oven is the smaller of the two ovens. It is designed for cooking smaller quantities of food. It gives especially good results if used to cook fruitcakes, sweets and savoury flans or quiche. The top oven is also ideal for use as warming compartment to warm dishes and keep food hot. Use the top oven when you want to warm plates. Use the lowest setting on the second oven temperature control. Using the top oven Turn the top oven/grill control to the required setting.
Hints and tips • • The material and finish of the baking tray and dishes used affect base browning. Enamelware, dark, heavy or non-stick utensils increase base browning. Shiny aluminium or polished steel trays reflect the heat away and give less base browning. • Because of the smaller cooking space and lower temperatures, shorter cooking times are sometimes required. Be guided by the recommendations given in the cooking chart.
The main oven The fan oven is particularly suitable for cooking larger quantities of food. The advantages of fan oven cooking are: Preheating The fan oven quickly reaches its temperature, so it is not usually necessary to preheat the oven. Without preheating however, you may need to add an extra 5 – 10 minutes on the recommended cooking times. For recipes needing high temperatures, e.g. bread, pastries, scones, soufflés etc., best results are achieved if the oven is preheated first.
Things to note • The oven light will illuminate. • The indicator neon will glow. It may turn on and off during use to show that the setting is being maintained. • The cooling fan for the controls may operate after a time. • The oven fan will operate. • If an automatic programme has been set, the oven light will not come on until cooking begins. Hints and tips • Arrange the shelves in the required positions before switching the oven on. Shelf positions are numbered from the bottom upwards.
Oven cooking chart The oven temperatures are intended as a guide only. It may be necessary to increase or decrease the temperatures to suit individual preferences and requirements.
Oven cooking chart continued FAN OVEN FOOD Choux Pastry COOKING TEMP °C 190 - 200 Éclairs / Profiteroles TOP OVEN APPROX COOK TIME (m) 3 COOKING TEMP °C 180 - 190 30 - 35 170 - 180 3 170 - 180 20 - 30 Flaky Pastry 210 - 220 3 210 - 220 25 - 40 Mince Pies 190 - 200 2 190 - 200 15 - 20 Pasta Lasagne etc.
Roasting chart Meat Temperature Cooking time Beef/ Beef boned 160 – 180 °C 20-35 minutes per ½kg (1lb) and 20-35 minutes over Mutton/Lamb 160 – 180 °C 25-35 minutes per ½kg (1lb) and 25-35 minutes over Pork/Veal/Ham 160 – 180 °C 30-40 minutes per ½kg (1lb) and 30-40 minutes over Chicken 160 – 180 °C 20-25 minutes per ½kg (1lb) and 20 minutes over Turkey/Goose 160 – 180 °C 20-25 minutes per ½kg (1lb) up to 3½kg (7lb) then 10 minutes per ½kg (1lb) over 3½kg (7lb) Duck 160 – 180 °C 25-35 mi
Defrost This main oven function defrosts most foods faster than more conventional methods. It is particularly suitable for delicate frozen foods which are to be served cold e.g. cream filled gateaux, cakes covered with icings or frostings, cheesecakes, biscuits, scones, etc. Using defrost Turn the main oven temperature control to the required setting. Things to note • The oven fan and interior light will come on.
Slow cook The slow cook setting gives a very low heat in the oven. It is particularly useful when you are cooking soups, stews and casseroles because the long slow cooking will make cheaper, tougher cuts of meat more tender. Some foods such as pastry and biscuits are not suitable for slow cooking because the temperature is too low. Cover all food during cooking to prevent it from drying out. You can uncover food for the last half hour if it is normally served golden brown.
Food preparation – slow cooking Joints of meat and poultry Milk puddings • Do not cook meat joints over 2.7kg (6lb). • Do not cook poultry over 2 kg (4lb 8oz). • Cook on the middle shelf of the oven or above. • Cook stuffing separately. • Cook for at least six hours. • Only cook joints of pork if you can make sure, by using a meat thermometer, that the temperature inside the joint is at least 88°C. • For good air circulation always stand joints on a rack in a roasting tin or casserole.
Main oven light It is possible to turn the light on in your main oven. Using main oven light Turn the main oven temperature control to the required setting. Top oven light It is possible to turn the light on in your top oven. Using top oven light Turn the top oven/grill control to the required setting.
Care and cleaning WARNING! Before cleaning always allow the appliance to cool down before switching off at the electricity supply. Cleaning materials • Before using any cleaning materials on your appliance, check that they are suitable and that their use is recommended by the manufacturer. • Cleaners that contain bleach should not be used as they may dull the surface finishes. Harsh abrasives and scourers should also be avoided.
WARNING! Pan support Cap Hole Crown Location peg Electrode Slots Body Cleaning the grill and oven furniture All removable parts, except the grill pan handle can be washed in the dishwasher. The grill pan, grill pan grid and oven shelves may be cleaned using a soap impregnated steel wool pad. Soaking first in hot soapy water will make cleaning easier.
Cleaning the door(s) WARNING! To prevent damaging or weakening the door glass panels avoid the use of the following: • • • • • • Household detergents and bleaches Soap impregnated pads unsuitable for non-stick saucepans. Abrasive cleaning pads, scourers and steel wool pads. Chemical oven pads or aerosols. Rust removers. Main Oven: • Carefully push the trim towards the oven. • Hold the door glass securely in place with one hand before sliding the glass out with the other hand. Bath/Sink stain removers.
Always ensure that the glass is returned to the same side trim it was removed from. To replace the trim, line up the clips on the underside of the trim with the connectors at the top of the door. Carefully slide the trim towards the door. Ensure the trim is securely in place before closing the oven door. WARNING! Do not attempt to use the oven without the glass being in place. To clean the inner glass door panels Clean the inner glass door panels using hot soapy water, hob cleaner may also be used.
Troubleshooting • Maintenance must only be carried out by a competent/qualified person. Do not try to alter/modify the appliance yourself, as this could be dangerous. • We recommend that your appliance has an annual gas safety check carried out by our approved service organisation. • Please carry out the following checks on your appliance before calling a Service Engineer. It may be that the problem is a simple one that you can solve yourself without the expense of a service call.
PROBLEM POSSIBLE SOLUTION The oven light fails to illuminate. The oven light bulb may need replacing. If the Main Oven is set for automatic cooking the light will illuminate when the cook time begins. Check that the oven is level. Check that the shelves and bakeware are not vibrating in contact with the oven back panel. Check that the recommended temperatures and shelf positions are being used. Be prepared to adjust the temperature up or down slightly to achieve the results you want.
Technical data Dimensions Height: Width: Depth: (excluding handles and knobs) Weight • • • • 900mm 600mm 600mm 65kg Space for fixing at hob level 2mm minimum clearance Space for fixing above hob level See important note 'Location of Appliance'. Minimum space above hob 650mm (If cooker hood is fitted refer to the cooker hood installation instructions.
Installation instructions Important – safety requirements Provision for ventilation • Natural Gas versions of this appliance are available. • Check that this model is suitable for the type of supply available. This appliance must be installed and/or serviced by a competent person in accordance with the Gas Safety (Installation and Use) Regulations Current Editions and the I.E.E. Wiring Regulations. • Detailed recommendations are contained in the following British Standard Codes of Practice – BS.6172, BS.
Moving your appliance • You may damage some soft or badly fitted floor coverings when you move the appliance. The floor covering under the appliance should be securely fixed so it does not ruck up when you move the appliance across it. Alternatively you could remove the floor covering. This appliance is heavy and care must be taken when moving it. Do not try to move the appliance by pulling the door handles. • To move the appliance, open the grill door.
• Curtains must not be fitted immediately behind the appliance or within 150mm of the sides of the hotplate. If fitted next to or between two base units a minimum space of 2mm must be left between each unit and the sides of the appliance. The levelling feet fitted to the appliance will achieve a nominal height to hotplate of 900mm + 20mm.
IMPORTANT! ONLY LIQUID SEALANTS TO BE USED WHEN INLET GAS PIPE IS FITTED I.E.: DO NOT USE P.T.F.E. SEALANT TAPE. • Carry out a gas tightness test after connecting to the gas supply. • The gas bayonet connector must be fitted in the shaded area indicated. • Ensure that the cover is securely fastened. Note: House circuit Earth leakage / continuity tests must be carried out before the appliance is connected to the mains supply and re-checked after fitting.
1. 2. 3. 4. Place the appliance in its intended position and level appliance. Mark a position 100mm from the top of the rear right hand corner. Measure down 150mm from this point. This gives the position of the wall anchor point for the stability chain. The stability chain anchor point on the appliance is shown below. Checking the hob 1. Lift the lid. Fit the burner crowns and caps ensuring that they are correctly seated. Fit the pan supports. 2.
Environment After installation please dispose of the packaging with due regard for safety and the environment. Your local authority can arrange this. Energy save mode By switching off the time display you can save energy. Switching off the time display Press and hold any two buttons until the display switches off. Switching on the time display Press any button to switch on the display. IMPORTANT! The display can only be switched off if none of the timer functions are in use.
Guarantee / Customer care Standard guarantee conditions We, Electrolux, undertake that if within 12 months of the date of the purchase this Electrolux appliance or any part thereof is proved to be defective by reason only of faulty workmanship or materials, we will, at our option repair or replace the same FREE OF CHARGE for labour, materials or carriage on condition that: • The appliance has been correctly installed and used only on the electricity supply stated on the rating plate.
Notes 43
www.electrolux.com www.zanussi-electrolux.co.