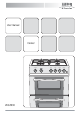
User manual Cooker Top Oven/Grill ZKG5030 Back Left Front left Front Reight Back Reight
Thank you for selecting our appliance We wish you lots of enjoyment with your new appliance and we hope that you will consider our brand again when purchasing household appliances. Please read this user manual carefully and keep it throughout the product life cycle as a reference document. The user manual should be passed on to any future owner of the appliance.
Safety instructions General safety These warnings are provided in the interest of your safety. Ensure that you understand them all before installing or using the appliance. Your safety is of paramount importance. If you are unsure about any of the meanings of these warnings please contact customer care. Installation • The appliance must be installed according to the instructions supplied.
• When you are lighting any burner check that it is lit before you leave the appliance. When turning off a burner, do not leave the appliance until the flame has gone out. • Never place plastic or any other material, which may melt in or on the oven. • Do not leave the grill pan handle in position when grilling, as it will become hot. • Always support the grill pan when it is in the withdrawn or partially withdrawn position. • Always use oven gloves to remove and replace the grill pan handle when grilling.
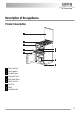
Description of the appliance Product description 1 2 3 4 5 6 7 8 9 1 2 3 4 5 6 7 8 9 Glass Hob Lid Pan Supports Control Panel Top Oven Door Main Oven Door Grill Pan Grid Grill Pan Shelf Levelling Feet 5
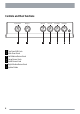
Controls and their functions 1 2 3 4 5 6 7 6 Top Oven/Grill Main Oven 1 2 Top Oven/Grill Knob Main Oven Knob Left Medium Burner Knob Large Burner Knob Small Burner Knob Right Medium Burner Knob Ignition Button Back Left 3 Front Left Front Right Back Right 4 5 6 7
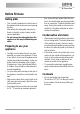
Before first use Rating plate • This is usually situated on the front frame of the appliance and can be seen upon opening the door. Alternatively the rating plate may also be found on the back or top of some models (where applicable). • Do not remove the rating plate from the appliance as this may invalidate the guarantee. Preparing to use your appliance • Carefully check whether there is any damage after you unpack the appliance.
Grill and oven furniture • The following items of grill and oven furniture have been supplied with the appliance. If you require replacements of any of the items listed below please contact your local service force centre.
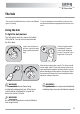
The hob The gas hob has different burner sizes to suit different To ensure maximum burner efficiency only use pots types of cooking. and pans with flat bases appropriate to the burner size used. Using the hob To light the hob burners The hob ignition works by means of a battery. Lift up the lid. You can not use the hob when the lid is down. Push in and hold the control knob, turn to the large flame symbol (highest setting). Press the ignition button immediately.
Pans To get the best efficiency from your appliance and for your safety, use the following pan sizes for each burner. Rapid Burner: 22-26 cm Medium Burner: 14-22 cm Auxillary Burner: 12-18 cm To turn off any burner Turn the control knob to the off position. This is shown by a dot. Turn knob clockwise until dot position is reached. Do not attempt to turn the burner off by turning the knob counter-clockwise. WARNING! When lighting any burner, ensure that it is lit before you leave the appliance.
WARNING! Take care to avoid burns and scalds when reaching across the hotplate. WARNING! Take extra care when deep fat frying, do not cover the pan with a lid. Do not leave a pan unattended. If the pan catches fire, leave it where it is and turn off all controls. Place a damp cloth or a fitting lid over the pan to smother the flames. Never put water on the fire. Leave to cool for 30 minutes. WARNING! Do not use the lid as a work surface or chopping board.
The grill CAUTION! Accessible parts may be hot when the grill is in use. Young children should be kept away. IMPORTANT! When you first operate the grill you may hear some sounds as the burner heats up, this is quite normal and is not a fault on the appliance. Using the grill Fully open the door before lighting the grill. Keep the control knob depressed for up to 5 seconds, but no longer than 10 seconds. After this time release the controls. The flame should remain alight.
To turn off the grill The grill pan and handle WARNING! Always use an oven glove to protect your hand when using the grill as all the metal parts can become very hot! Turn the control knob to the off position shown by a dot. WARNING! Never cover the grill pan or grid with foil as this can lead to grill fires. The grill pan has a detachable handle. Ensure to locate the tip of grill pan handle inside the recessed form as indicated in the figure below. Do not leave the handle in position when grilling.
• Food should be thoroughly dried before grilling to minimise splashing. Brush lean meats and fish lightly with a little oil or melted butter to keep them moist during cooking. • Accompaniments such as tomatoes and mushrooms may be placed underneath the grid when grilling meats. • When toasting bread use the shelf in position 1 with the grid in the high position. • Preheat the grill on a full setting for a few minutes before sealing steaks or toasting.
The top oven The top oven is the smaller of the two ovens. It is designed for cooking smaller quantities of food. The top oven is also ideal for use as warming compartment to warm dishes and keep food hot. Use the top oven when you want to warm plates. Use the lowest setting on the top oven temperature control. Using the top oven Press the ignition button immediately. Keep the control knob depressed for up to 5 seconds, but no longer than 10 seconds.
To fit the top oven shelf To turn the top oven off 0 S 12 3 4 5 6 78 Turn the control knob to the off position. This is shown by a dot. Hints and tips • Arrange the shelves in the required positions before switching the oven on. Shelf positions are counted from the bottom upwards. • Ensure that food is placed centrally on the shelf and there is sufficient room around the baking tray/dish to allow for maximum circulation.
The main oven Heat zones There are zones of heat within the oven. The temperature in the middle is the gas mark you have chosen. The top of the oven is slightly hotter and the lower shelf slightly cooler. The base of the oven is quite a lot cooler. You can make use of these heat zones when you are cooking foods requiring different temperatures all at the same time.
Slow Cook Function S The food needs to be cooked at Gas mark 6 for 30 minutes before the oven is turned down to "Slow Cook". This ensures that the central temperature of the food gets hot enough to start the food cooking. Main Oven s 1 23 4 5 6 78 Hints and tips • Arrange the shelves in the required positions before switching the oven on. Shelf positions are numbered from bottom upwards.
Cooking tables erence and requirements. For best results, moist recipes (for example pizza, fruit flans etc.) should be baked on one level. To ensure optimal performance when cooking convenience foods, pizza or frozen and chilled ready meal, always preheat the oven first. Oven cooking chart The temperature and baking times are for guidance only, as these will depend on the consistency of the various ingredients and the number, type and size of baking tray or tins used.
Main oven Food Gas mark Top oven Pos. Gas mark Pos. Approximate cook time (h) Éclairs / Profiter5 oles 4 5 2 0:25 - 0:35 Flaky Pastry 6 4 6 2 0:25 - 0:45 Mince Pies 5 3+5 5 1 0:15 - 0:30 Pasta Lasagne etc.
Roasting chart Meat Beef/ Beef boned Mutton/Lamb Pork/Veal/Ham Chicken Gas mark 5 0:20 - 0:35 minutes per ½kg (1lb) and 0:20 - 0:35 minutes over. 5 0:25 - 0:35 minutes per ½kg (1lb) and 0:25 - 0:35 minutes over. 5 0:30 - 0:40 minutes per ½kg (1lb) and 0:30 - 0:40 minutes over. 5 0:20 - 0:25 minutes per ½kg (1lb) and 0:20 minutes over. 5 0:20 - 0:25 minutes per ½kg (1lb) up to 3½kg (7lb) then 0:10 minutes per ½kg (1lb) over 3½kg (7lb).
• Cleaners that contain bleach should not be used as they may dull the surface finishes. Harsh abrasives and scourers should also be avoided. Cleaning the outside of the appliance • Do not use abrasive cleaning materials e.g. abrasive cream cleaners, wire wool pads or scourers on painted or printed finishes as damage may occur. Regularly wipe over the control panel, control knobs, handles, doors and appliance sides using a soft cloth and hot soapy water. To prevent streaking, finish with a soft cloth.
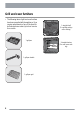
Cleaning the grill 1 2 3 4 5 6 7 8 1 2 3 4 5 6 7 8 Pan Support Cap Hole Crown Location peg Electrode Slots Body Cleaning the grill/oven furniture • All removable parts, except the grill pan handle can be washed in the dishwasher. • The grill pan, grill pan grid and oven shelves may be cleaned using a soap impregnated steel wool pad. Soaking first in hot soapy water will make cleaning easier. Do not clean the grill burner itself.
Cleaning between the outer and inner door glass IMPORTANT! Please note that the door glass on your product may differ in type and shape from that shown in the diagrams. To remove the inner door glass 2 1 4 3 If the oven door is the triple glass oven door, the third glass can also be pulled out the same way as second glass. 2 B Before cleaning the oven door glasses, you must pull out the inner glass as shown: • Push the glass towards direction 1 and release from the location bracket.
WARNING! If the door glass panel becomes chipped or has deep scratches the glass will be weakened and must be replaced to prevent the possibility of the panel shattering. Please contact your local service force centre who will be pleased to advise further. WARNING! Do not attempt to use the oven without the glass being in place. What to do if... Maintenance must only be carried out by a competent/qualified person. Do not try to alter/ modify the appliance yourself, as this could be dangerous.
Problem Possible solution The hob burners will not light. • Ensure the burner parts have been placed correctly. • The battery may need replacing. • Check that there is not a problem with your gas supply. You can do this by making sure the other gas appliances such as central heating or gas fires are working. The flame colour is orange/yellow. • Due to the design of the burner the flame can appear to be orange/yellow (flame disturbance) in certain areas of the burner this is a natural occurrence.
Minimum space above hob level 787mm (If a cooker hood is fitted refer to the cookerhood installation instructions) Connections Gas connection Rear left hand side of appliance at hob level. Rc ½" ( ½ " B.S.P. female) Electrical connection None Ignition Battery 1.5 Volt AA size LPG GB: I3+ IE: I3+ GAS CONSUMPTION TABLE NG GB: I2H LARGE BURNER INJECTOR 85 115 NOMINAL RATING (KW) 3 3 CONSUMPTION IN 1h 218.3 gr/h 285.7 lt/h INJECTOR 65 97 NOMINAL RATING (KW) 1.75 1.
LPG GB: I3+ IE: I3+ GAS CONSUMPTION TABLE NG GB: I2H NOMINAL RATING (KW) 2.2 2.2 CONSUMPTION IN 1h 160 gr/h 209.5 lt/h This appliance complies with: European Council Directives Low voltage Directive 73/23/EEC, Gas Directive 90/396/EEC EMC Directive 89/336/EEC, CE Marking Directive 93/68/EEC.
WARNING! This appliance must be installed by a qualified electrician / competent person (CORGI Registered). Safety may be impaired if installation is not carried out in accordance with these instructions. Do not alter the electrical circuitry of this appliance. Provision for ventilation • This appliance is not connected to a combustion products evacuation device. It should be installed and connected in accordance with the current installation regulations.
750 max 400 • Curtains must not be fitted immediately behind the appliance or within 150mm of the sides of the hotplate. If fitted next to or between two base units a minimum space of 1mm must be left between each unit and the sides of the appliance. The hob must be set to a minimum of 7mm above the adjacent units. (Note: The levelling feet fitted to the appliance will achieve a nominal height of 907mm -5+ 13mm. Base units not meeting the above conditions must be a minimum of 100mm away from the hob.
• Carry out a gas tightness test after connecting to the gas supply. • The gas bayonet connector must be fitted in the enlarged area indicated. • Take into account that it must be possible to pull the appliance forward sufficiently. Ensure the hose does not become trapped when pushing the appliance into position. IMPORTANT! Flexible tubing used must comply with BS. 669 current edition. LPG Flexible connections must be a type suitable for L.P.
3. Check the supply pressure by turning the Rapid burner on and one other hob burner full on and light the appropriate burner. The pressure should be either: – For Natural Gas 20mbar – For LP. Gas. The pressure must be set to 29 mbar for use on butane or 37 mbar for use on propane. 4. Turn off the taps, disconnect the pressure gauge. 5. Check operation of each hob burner. Checking the grill • Place the grill pan containing the grid, with the handle attached, into the grill compartment.
(highest setting) Press the ignition button immediately. Keep the control knob depressed for up to 5 seconds, but no longer than 10 seconds. After this time release the controls. The flame should remain alight. If after 10 seconds the burner has not lit, stop operating the appliance and wait at least 1 minute before attempting a further ignition of the burner. When the burner has lit release the control and ignition button. 3. Close the lid.
• The appliance has not been serviced, maintained, repaired, taken apart or tampered with by any person not authorised by us. • Electrolux Service Force Centre must undertake all service work under this guarantee • Any appliance or defective part replaced shall become the Company's property. • This guarantee is in addition to your statutory and other legal rights.
For Customer Service in The Republic of Ireland please contact us at the address below: Electrolux Group (Irl) Ltd Long Mile Road, Dublin 12, Republic of Ireland Tel: +353 (0)1 4090751 Email: service.eid@electrolux.
www.electrolux.com www.zanussi-electrolux.co.