User Manual GETTING STARTED? EASY.
SAFETY INFORMATION Before the installation and use of the appliance, carefully read the supplied instructions. The manufacturer is not responsible for any injuries or damages that are the result of incorrect installation or usage. Always keep the instructions in a safe and accessible location for future reference.
• • • • • • • • • • • • • • • Ensure that the appliance is switched off before replacing the lamp to avoid the possibility of electric shock. Do not use a steam cleaner to clean the appliance. Do not use harsh abrasive cleaners or sharp metal scrapers to clean the glass door since they can scratch the surface, which may result in shattering of the glass.
• • • Eggs in their shell and whole hard-boiled eggs should not be heated in the appliance since they may explode, even after microwave heating has ended. The appliance should be cleaned regularly and any food deposits removed. Failure to maintain the appliance in a clean condition could lead to deterioration of the surface that could adversely affect the life of the appliance and possibly result in a hazardous situation.
• • • • • • Do not apply pressure on the open door. Do not use the appliance as a work surface or as a storage surface. Open the appliance door carefully. The use of ingredients with alcohol can cause a mixture of alcohol and air. Do not let sparks or open flames to come in contact with the appliance when you open the door. Do not put flammable products or items that are wet with flammable products in, near or on the appliance. Do not use microwave function to preheat the oven.
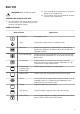
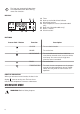
PRODUCT DESCRIPTION GENERAL OVERVIEW 1 2 3 4 7 8 9 4 12 1 Control panel 2 Power lamp / symbol 5 6 3 10 2 1 11 3 Knob for the oven functions 4 Electronic programmer 5 Temperature and microwave power indicator / symbol 6 Knob for the temperature / microwave power 7 Heating element 8 Microwave generator 9 Lamp 10 Fan 11 Shelf support, removable 12 Shelf positions ACCESSORIES Baking tray Wire shelf For cakes and biscuits. For cookware, cake tins, roasts.
DAILY USE WARNING! Refer to Safety chapters. TURNING THE OVEN ON AND OFF. 1. Turn the knob for the oven functions to select an oven function. This automatically turns on the oven with default settings. 2. Turn the knob for the temperature / microwave power to set a temperature. 3. To turn off the oven, turn the knob for the oven functions to the off position. OVEN FUNCTIONS Oven function Application Off position The appliance is off. Light To activate the lamp without a cooking function.
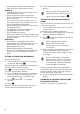
The lamp may automatically deactivate at a temperature below 60 °C during some oven functions. DISPLAY A G F B E C D A. B. C. D. Timer Heat-up and residual heat indicator Microwave function Core temperature sensor (selected models only) E. Door lock (selected models only) F. Hours / minutes G. Clock functions BUTTONS Sensor field / Button Function CLOCK To set a clock function. MINUS To set the time. MICROWAVE To set the Microwave function.
SUITABLE COOKWARE AND MATERIALS For the microwave use only suitable cookware and materials. Use below table as a reference. Microwave Cookware / Material Defrosting Heating Cooking Heating Function+Microwave Ovenproof glass and porcelain with no metal components, e.g. heat-proof glass X Non-ovenproof glass and porcelain1) X X Glass and glass ceramic made of ovenproof / frost-proof material X Ceramic2), earthenware2) Ceramic, porcelain and earthenware with unglazed bottom or with small holes, e.g.
• Put the food on a plate on the bottom of the cavity when you use Microwave function. Cooking • • • • • • • • Cook food covered. If you want to keep a crust cook food without a cover. Do not overcook the dishes by setting the power and time too high. The food can dry out, burn or cause fire. Do not use the oven to cook eggs or snails in their shells, because they can burst. Pierce the yolk of fried egg before reheating it. Pierce food with skin or peel with a fork several times before cooking.
Power setting Use • • • • 1000 Watt 900 Watt 800 Watt 700 Watt Heating liquids Searing at the start of the cooking process Cooking vegetables • • 600 Watt 500 Watt Defrosting and heating frozen meals Heating one-plate meals Simmering stews Cooking egg dishes • • 400 Watt 300 Watt Continuing to cook meals Cooking delicate food Heating baby food Simmering rice Heating delicate food Melting cheese, chocolate, butter • • 200 Watt 100 Watt Defrosting meat, fish Defrosting cheese, cream, butter Defro
The display shows flashes. 3. Press or and the set hour. "00" to set the current minutes. 4. Press to confirm or the set time of day will be saved automatically after 5 seconds. The display shows the new time. To change the time of day press again and again until the indicator for the time of day flashes in the display. SETTING THE DURATION 1. Set an oven function. 2. Press flash. again and again until 3. Press or starts to to set the minutes and then the hours for DURATION time.
WARNING! Refer to "Microwave mode" chapter. Wire shelf: Push the shelf between the guide bars of the shelf support and make sure that the feet point down. Wire shelf and baking tray together: Push the baking tray between the guide bars of the shelf support and the wire shelf on the guide bars above. Small indentation at the top increase safety. The indentations are also antitip devices. The high rim around the shelf prevents cookware from slipping of the shelf.
RESIDUAL HEAT INDICATOR When you turn off the oven, the display shows the Temperature (°C) residual heat indicator if the temperature in the oven is more than 40 °C. AUTOMATIC SWITCH-OFF For safety reasons the appliance deactivates automatically after some time if an oven function operates and you do not change any settings. Temperature (°C) 200 - 230 12.5 120 - 195 8.5 5.5 After an automatic switch-off, press any button to operate the appliance again.
Baking results Possible cause Remedy The cake sinks and becomes soggy, lumpy or streaky. There is too much liquid in the mixture. Use less liquid. Be careful with mixing times, especially if you use a mixing machine. The cake is too dry. The oven temperature is too low. The next time you bake, set a higher oven temperature. The cake is too dry. The baking time is too long. The next time you bake, set a shorter baking time. The cake browns unevenly.
Food Cheesecake, tray2) Function Top / Bottom Heat Temperature (°C) 160 170 Time (min) 60 - 90 Shelf position 1 1) Preheat the oven. 2) Use a deep pan.
Biscuits Food Temperature (°C) Function Time (min) Shelf position Short pastry biscuits True Fan Cooking 150 - 160 10 - 20 1 Short bread / Short bread / Pastry Stripes True Fan Cooking 140 20 - 35 1 Short bread / Short bread / Pastry Stripes1) Top / Bottom Heat 160 20 - 30 2 Biscuits made with sponge mixture True Fan Cooking 150 - 160 15 - 20 1 Pastries made with egg white, meringues True Fan Cooking 80 - 100 120 - 150 1 Macaroons True Fan Cooking 100 - 120 30 - 50 1 Biscu
Food Function Temperature (°C) Time (min) Shelf position Sweet bakes Top / Bottom Heat 180 - 200 40 - 60 1 Fish bakes Top / Bottom Heat 180 - 200 30 - 60 1 Stuffed vegetables True Fan Cooking 160 - 170 30 - 60 1 1) Preheat the oven. MULTILEVEL BAKING Use the function True Fan Cooking.
Food Temperature (°C) Time (min) Shelf position Pizza (with a lot of topping)2) 180 - 200 20 - 30 3 Tarts 180 - 200 40 - 55 3 Spinach flan 160 - 180 45 - 60 3 Quiche Lorraine (Savoury flan) 170 - 190 45 - 55 3 Swiss Flan 170 - 190 45 - 55 3 Cheesecake 140 - 160 60 - 90 3 Apple cake, covered 150 - 170 50 - 60 3 Vegetable pie 160 - 180 50 - 60 3 230 10 - 20 3 Puff pastry flan1) 160 - 180 45 - 55 3 Flammekuchen1) 230 12 - 20 3 Piroggen (Russian version of calzone)
Pork Food Function Quantity (kg) Power (Watts) Temperature (°C) Time (min) Shelf position Shoulder, neck, ham joint Turbo Grilling 1 - 1.5 200 160 - 180 50 - 70 1 Meat loaf Turbo Grilling 0.75 - 1 200 160 - 170 35 - 50 1 Pork knuckle (precooked) Turbo Grilling 0.75 - 1 200 150 - 170 60 - 75 1 Veal Food Function Quantity (kg) Power (Watts) Temperature (°C) Time (min) Shelf position Roast veal Turbo Grilling 1 200 160 - 180 50 - 70 1 Knuckle of veal Turbo Grilling 1.
Fish (steamed) Food Whole fish Function Top / Bottom Heat Quantity (kg) 1 - 1.
Grilling Time (min) Food Temperature (°C) Shelf position 1st side 2nd side Roast beef, medium 210 - 230 30 - 40 30 - 40 1 Filet of beef, medium 230 20 - 30 20 - 30 1 Back of pork 210 - 230 30 - 40 30 - 40 1 Back of veal 210 - 230 30 - 40 30 - 40 1 Back of lamb 210 - 230 25 - 35 20 - 35 1 Whole Fish, 500 - 1000 g 210 - 230 15 - 30 15 - 30 1 Fast Grilling Time (min) Food Shelf position 1st side Burgers / Burgers 9 - 13 8 - 10 3 Pork fillet 10 - 12 6 - 10 2 Sausages
Food Temperature (°C) Time (min) Shelf position Pizza, chilled 210 - 230 13 - 25 3 Pizza Snacks, frozen 180 - 200 15 - 30 3 French Fries, thin1) 210 - 230 20 - 30 3 French Fries, thick1) 210 - 230 25 - 35 3 Wedges / Croquettes1) 210 - 230 20 - 35 3 Hash Browns 210 - 230 20 - 30 3 Lasagne / Cannelloni, fresh 170 - 190 35 - 45 2 Lasagne / Cannelloni, frozen 160 - 180 40 - 60 2 Chicken Wings 190 - 210 20 - 30 3 1) Turn 2 or 3 times during roasting.
top of the plate inside the oven. Remove shelf supports if necessary. Food Quantity (kg) Chicken 1 Defrosting time (min) Further defrosting time (min) 100 - 140 20 - 30 Comments Put the chicken on an upturned saucer in a big plate. Turn halfway through. Meat 1 100 - 140 20 - 30 Turn halfway through. Meat 0.5 90 - 120 20 - 30 Turn halfway through. Trout 0.15 25 - 35 10 - 15 - Strawberries 0.3 30 - 40 10 - 20 - Butter 0.25 30 - 40 10 - 15 - Cream 2 x 0.
Stone fruit Food Pears / Quinces / Plums Temperature (°C) 160 - 170 Cooking time until sim- Continue to cook at mering (min) 100 °C (min) 35 - 45 10 - 15 Vegetables Food Temperature (°C) Cooking time until sim- Continue to cook at mering (min) 100 °C (min) Carrots1) 160 - 170 50 - 60 5 - 10 Cucumbers 160 - 170 50 - 60 - Mixed pickles 160 - 170 50 - 60 5 - 10 Kohlrabi / Peas / Asparagus 160 - 170 50 - 60 15 - 20 1) Leave standing in the oven after it is deactivated.
Tips for the Microwave Cooking/Defrosting results Possible cause Remedy The food is too dry. The power was too high. The time was too long. The food was not covered. Next time select a lower power and a longer time. The food is still not defrosted, hot or cooked after the end of cooking time. The time was too short. Set a longer time. Do not increase the Microwave Power. The food is overheated at the edges but is still not ready in the middle. The power was too high.
Defrosting cakes / pastries Food Yeast cake (1 piece) Power (Watts) 200 Time (min) Standing time (min) 2-3 15 - 20 Cheesecake (1 piece) 100 2-4 15 - 20 Dry cake (e.g. Pound cake) (1 piece) 200 2-4 15 - 20 Bread (1 kg) 200 15 - 20 5 - 10 Sliced bread (0,2 kg) 200 3-5 5 - 10 Bread rolls (4 pieces) 200 2-4 2-5 Defrosting fruit Food Fruit (0.
Cooking Food Power (Watts) Time (min) Standing time (min) Whole fish (0.5 kg) 500 8 - 10 2-5 Fish fillets (0.5 kg) 400 4-7 2-5 Vegetables, fresh (0.5 kg + 50 ml of water) 600 5 - 15 - Vegetables, frozen (0.5 kg + 50 ml of water) 600 10 - 20 - Jacked potatoes (0.5 kg) 600 7 - 10 - Rice (0.2 kg + 400 ml of water) 600 15 - 18 - Popcorn 1000 1:30 - 3 - Microwave Combi function Use this function to cook food in a shorter time and to brown it.
Food Power (Watts) Quantity (kg) Shelf position 1) Time (min) Comments Egg custard 300 1 Bottom 18 - Meat defrosting 100 0.5 Bottom 7-8 Turn the meat upside down halfway through the cooking time. 1) Use wire shelf unless otherwise specified. Combi microwave function Tests according to IEC 60705. Shelf Power Quanti- Tempera- position Time (min) (Watts) ty (kg) ture (°C) 1) Food Function Comments Cake True Fan Cooking + MW 100 0.
• objects or a dishwasher. It can cause damage to the nonstick coating. Dry the oven when the cavity is wet after usage. WARNING! Danger of electrocution! Disconnect the fuse before you replace the lamp. The lamp and the lamp glass cover can be hot. REMOVING THE SHELF SUPPORTS Before maintenance, make sure that the oven is cool. There is a risk of burns. To clean the oven, remove the shelf supports. 1. Pull carefully the supports up and out of the front catch. 1 3 2 2.
Problem Possible cause Remedy The oven does not heat up. The Child Lock is on. Refer to "Using the Child Lock". The oven does not heat up. The fuse is blown. Make sure that the fuse is the cause of the malfunction. If the fuse is blown again and again, contact a qualified electrician. The lamp does not operate. The lamp is defective. Replace the lamp. It takes too long to cook the dishes or they cook too quickly. The temperature is too low or too high. Adjust the temperature if necessary.
Residual heat Use metal dishes to improve energy saving, but only when you use a non-microwave function. When possible, do not preheat the oven before you put the food inside. When the cooking duration is longer than 30 minutes, reduce the oven temperature to minimum 3 - 10 minutes before the end of the cooking time, depending on the duration of the cooking. The residual heat inside the oven will continue to cook. Use the residual heat to warm up other dishes.
867343021-A-232017 WWW.ZANUSSI.