User Manual GETTING STARTED? EASY.
VEILIGHEIDSINFORMATIE Lees zorgvuldig de meegeleverde instructies voor installatie en gebruik van het apparaat. De fabrikant is niet verantwoordelijk voor letsel of schade veroorzaakt door een verkeerde installatie of verkeerd gebruik. Bewaar de instructies altijd op een veilige en toegankelijke plaats voor toekomstig gebruik.
• • • • • • • • • • • WAARSCHUWING: Zonder toezicht koken op een kookplaat met vet of olie kan gevaarlijk zijn en brandgevaar opleveren. Probeer brand NOOIT met water te blussen, maar schakel in plaats daarvan het apparaat uit en bedek de vlam bijv. met een deksel of blusdeken. LET OP: Er dient toezicht te worden gehouden op het bereidingsproces. Een kort bereidingsproces moet onder constant toezicht staan. WAARSCHUWING: Brandgevaar: Bewaar geen voorwerpen op de kookplaten.
• isolatiehoes) met onderdelen die temperaturen kunnen bereiken van 50°C hoger dan kamertemperatuur. WAARSCHUWING: Gebruik alleen kookplaatbeschermers die door de fabrikant van het kookapparaat zijn ontworpen of door de fabrikant van het apparaat in de gebruiksinstructies als geschikt zijn aangegeven of kookplaatbeschermers die in het apparaat zijn geïntegreerd. Het gebruik van ongeschikte kookplaatbeschermers kan ongelukken veroorzaken.
• • • • • Steek de stekker pas in het stopcontact als de installatie is voltooid. Zorg ervoor dat het netsnoer na installatie bereikbaar is. Sluit de stroomstekker niet aan op een losse stroomaansluiting. Trek niet aan het netsnoer om het apparaat los te koppelen. Trek altijd aan de stekker. Gebruik alleen de juiste isolatie-apparaten: stroomonderbrekers, zekeringen (schroefzekeringen moeten uit de houder worden verwijderd), aardlekschakelaars en contactgevers.
• • andere doeleinden, zoals het verwarmen van een kamer. Laat geen zure vloeistoffen, zoals bijv. azijn, citroensap of reinigingsmiddelen voor het verwijderen van kalkaanslag, in aanraking komen met de kookplaat. Hierdoor kunnen doffe plekken ontstaan. Verkleuring van het email of roestvrij staal is niet van invloed op de werking van het apparaat. ONDERHOUD EN REINIGING WAARSCHUWING! Verwijder de toetsen, knoppen of pakkingen niet van het bedieningspaneel.
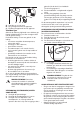
A B C A. Uiteinde van as met moer B. Ring meegeleverd met het apparaat C. Elleboog meegeleverd met het apparaat Vloeibaar gas Gebruik de rubberen pijphouder voor vloeibaar gas. Koppel altijd de pakking vast. Ga vervolgens door met de gasaansluiting. De flexibele leiding is klaar voor gebruik als de leiding: • niet warmer wordt dan kamertemperatuur, warmer dan 30°C; • niet langer is dan 1.
• • • • Zorg ervoor dat het netsnoer na installatie bereikbaar is. Trek niet aan het netsnoer om het apparaat los te koppelen. Trek altijd aan de stekker. Er is brandgevaar als het apparaat verbinding maakt met een verlengkabel, een adapter of een meervoudige aansluiting. Zorg ervoor dat de aarde-aansluiting overeenkomt met de normen en regelgeving. Laat de stroomkabel niet warmer worden dan 90° C. Zorg ervoor dat u de blauwe neutrale kabel aansluit op de aansluiting met de letter "N" erop.
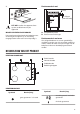
Keukenmeubel met 7. 30 mm min 20 mm (max 150 mm) A 60 mm B LET OP! Installeer het apparaat alleen op een werkblad met een plat oppervlak. MOGELIJKHEDEN VOOR INBOUW Het paneel geïnstalleerd onder de kookplaat moet eenvoudig te verwijderen zijn en eenvoudig toegang bieden indien technische hulp nodig is. A. Verwijderbaar paneel B.
DAGELIJKS GEBRUIK WAARSCHUWING! Houd de bedieningsknop niet langer dan 15 seconden ingedrukt. Als de brander na 15 seconden nog niet brandt, de bedieningsknop loslaten en minstens 1 minuut wachten voordat u opnieuw probeert de vlam te ontsteken. WAARSCHUWING! Raadpleeg de hoofdstukken Veiligheid. BRANDEROVERZICHT LET OP! Bij afwezigheid van elektrische stroom kunt u de brander ontsteken zonder elektrische inrichting.
AANWIJZINGEN EN TIPS WAARSCHUWING! Raadpleeg de hoofdstukken Veiligheid. KOOKGEREI LET OP! Gebruik geen gietijzeren pannen, aardewerk of grillplaten. WAARSCHUWING! Zet één pan niet op twee branders. WAARSCHUWING! Zet geen instabiele of beschadigde pannen op de brander om morsen en letsel te voorkomen. LET OP! Zorg dat de bodems van de pannen niet dichtbij de bedieningsknop staan, anders wordt de bedieningsknop heet. LET OP! Zorg dat de handvaten van de pot niet boven de voorste rand van het werkblad komen.
DE KOOKPLAAT SCHOONMAKEN • Verwijder direct: gesmolten kunststof, plastic folie, suiker en suikerhoudend voedsel, anders kan dit schade aan de kookplaat veroorzaken. Doe voorzichtig om brandwonden te voorkomen. • Verwijder nadat de kookplaat voldoende is afgekoeld: kalk- en waterkringen, vetspatten en metaalachtig glanzende verkleuringen. Reinig de kookplaat met een vochtige doek en een beetje niet-schurend reinigingsmiddel. Droog de kookplaat na reiniging af met een zachte doek.
LABELS MEEGELEVERD IN DE ZAK MET ACCESSOIRES Bevestig de stickers zoals hieronder weergegeven: A B MOD. MOD. PROD.NO. PROD.NO. SER.NO SER.NO DATA DATA C MOD. PROD.NO. SER.NO. 0049 TYPE IP20 03 IT MADE IN ITALY A. Plak het op de garantiekaart en verstuur dit deel (indien van toepassing). B. Plak het op de garantiekaart en bewaar dit deel (indien van toepassing). C. Plak het op het instructieboekje.
Gasaansluiting: R 1/2" Apparaatklasse: 3 BYPASSDIAMETERS BRANDER Ø BYPASS 1/100 mm Snelle brander 42 Normale brander 32 Sudderbrander 28 GASBRANDERS VOOR AARDGAS G20/G25 20/25 mbar (BE) - G20 20 mbar (LU) NORMAAL VERMOGEN kW BRANDER MINIMUM VERMOGEN kW INSPUITMARKERING Snelle brander 2,9 0,75 119 Normale brander 1,9 0,45 96 Sudderbrander 1,0 0,33 70 GASBRANDERS VOOR LPG G30/G31 28-30/37 mbar BRANDER NORMAAL VERMOGEN kW MINIMUM VERMOGEN kW NOMINALE GASSTROMING g/h INSPUITMARKE
Energiezuinigheid per gasbrander (EE gas burner) Links achter - semi-snel 54.9% Rechts achter - semi-snel 54.9% Linksvoor - Snelle brander 57.5% Rechts voor - hulp niet van toepassing Energiezuinigheid voor de gaskookplaat (EE gas hob) 55.8% EN 30-2-1: Huishoudelijke kookapparaten op gas - deel 2-1 : Energieverbruik - Algemeen ENERGIE BESPAREN • Zorg er voor gebruik voor dat de branders en pansteunen goed worden geplaatst.
SAFETY INFORMATION Before the installation and use of the appliance, carefully read the supplied instructions. The manufacturer is not responsible for any injuries or damages that are the result of incorrect installation or usage. Always keep the instructions in a safe and accessible location for future reference.
• • • • • • • • • • • NEVER try to extinguish a fire with water, but switch off the appliance and then cover flame e.g. with a lid or a fire blanket. CAUTION: The cooking process has to be supervised. A short term cooking process has to be supervised continuously. WARNING: Danger of fire: Do not store items on the cooking surfaces. Metallic objects such as knives, forks, spoons and lids should not be placed on the hob surface since they can get hot. Do not use a steam cleaner to clean the appliance.
SAFETY INSTRUCTIONS This appliance is suitable for the following markets: BE LU INSTALLATION WARNING! Only a qualified person must install this appliance. WARNING! Risk of injury or damage to the appliance. • • • • • • • • • • Remove all the packaging. Do not install or use a damaged appliance. Follow the installation instructions supplied with the appliance. Keep the minimum distance from other appliances and units. Always take care when moving the appliance as it is heavy.
• USE WARNING! Risk of injury, burns and electric shock. • • • • • • • • • • Remove all the packaging, labelling and protective film (if applicable) before first use. This appliance is for household use only. Do not change the specification of this appliance. Make sure that the ventilation openings are not blocked. Do not let the appliance stay unattended during operation. Set the cooking zone to “off” after each use. Do not put cutlery or saucepan lids on the cooking zones. They can become hot.
• • Disconnect the appliance from the mains supply. Cut off the mains electrical cable close to the appliance and dispose of it. • Flat the external gas pipes. INSTALLATION WARNING! Refer to Safety chapters. BEFORE THE INSTALLATION Before you install the hob, write down the information bellow from the rating plate. The rating plate is on the bottom of the hob. Model ....................................... PNC ......................................... Serial number ...........................
3. With a socket spanner 7 remove the injectors and replace them with the ones which are necessary for the type of gas you use (see table in "Technical Data" chapter). 4. Assemble the parts, follow the same procedure backwards. 5. Replace the rating plate (it is near the gas supply pipe) with the one for the new type of gas supply. You can find this plate in the package supplied with the appliance.
3. 7. min. 600 mm A) supplied seal B) supplied brackets min. 650 mm min. 55 mm 30 mm 470+02 mm 550+02 mm 4. CAUTION! Install the appliance only on a worktop with flat surface. POSSIBILITIES FOR INSERTION The panel installed below the hob must be easy to remove and let an easy access in case a technical assistance intervention is necessary. Kitchen unit with door 5. 30 mm A 60 mm min 20 mm (max 150 mm) B 6. A A. Removable panel B.
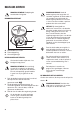
PRODUCT DESCRIPTION COOKING SURFACE LAYOUT 2 1 1 Rapid burner 2 Semi-rapid burner 3 3 Auxiliary burner 4 Control knobs 4 CONTROL KNOB Symbol Description no gas supply / off position Symbol Description minimum gas supply ignition position / maximum gas supply DAILY USE WARNING! Refer to Safety chapters. BURNER OVERVIEW A B C A. Burner cap and crown B.
C. Ignition candle If the burner accidentally goes out, turn the control knob to the off position and try to light the burner again after minimum 1 minute. IGNITION OF THE BURNER Always light the burner before you put on the cookware. The spark generator can start automatically when you switch on the mains, after installation or a power cut. It is normal. WARNING! Be very careful when you use open fire in the kitchen environment. The manufacturer declines any responsibility in case of the flame misuse.
CAUTION! Make sure that the bottoms of pots do not stand too close to the control knob, otherwise the flame heats the control knob up. DIAMETERS OF COOKWARE Use cookware with diameters applicable to the size of burners. CAUTION! Make sure that pot handles are not above the front edge of the cooktop. CAUTION! Make sure that the pots are placed centrally on the burner in order to get the maximum stability and a lower gas consumption.
TROUBLESHOOTING WARNING! Refer to Safety chapters. WHAT TO DO IF... Problem There is no spark when you try to activate the spark generator. Possible cause The hob is not connected to an electrical supply or it is connected incorrectly. Check if the hob is correctly connected to the electrical supply. The fuse is blown. Make sure that the fuse is the cause of the malfunction. If the fuse is blown again and again, contact a qualified electrician. Burner cap and crown are placed incorrectly.
LABELS SUPPLIED WITH THE ACCESSORIES BAG Stick the adhesive labels as indicated below: A B MOD. MOD. PROD.NO. PROD.NO. SER.NO SER.NO DATA DATA C MOD. PROD.NO. SER.NO. 0049 TYPE IP20 03 IT MADE IN ITALY A. Stick it on Guarantee Card and send this part (if applicable). B. Stick it on Guarantee Card and keep this part (if applicable). C. Stick it on instruction booklet.
Appliance class: 3 BYPASS DIAMETERS BURNER Ø BYPASS 1/100 mm Rapid 42 Semi-rapid 32 Auxiliary 28 GAS BURNERS FOR NATURAL GAS G20/G25 20/25 mbar (BE) - G20 20 mbar (LU) BURNER NORMAL POWER kW MINIMUM POWER kW INJECTOR MARK Rapid 2,9 0,75 119 Semi-rapid 1,9 0,45 96 Auxiliary 1,0 0,33 70 GAS BURNERS FOR LPG G30/G31 28-30/37 mbar NOMINAL GAS FLOW g/h BURNER NORMAL POWER kW MINIMUM POWER kW INJECTOR MARK G30 28-30 mbar G31 37 mbar Rapid 2,7 0,75 86 196 193 Semi-rapid 1,9 0,
Energy efficiency for the gas hob (EE gas hob) 55.8% EN 30-2-1: Domestic cooking appliances burning gas - Part 2-1 : Rational use of energy - General ENERGY SAVING • Before use, make sure that the burners and pan supports are assembled correctly. • Use cookware with diameters applicable to the size of burners. • Center the pot on the burner. • When you heat up water, use only the amount you need. • If it is possible, always put the lids on the cookware.
INFORMATIONS DE SÉCURITÉ Avant d'installer et d'utiliser cet appareil, lisez soigneusement les instructions fournies. Le fabricant ne pourra être tenu pour responsable des blessures et dégâts résultant d'une mauvaise installation ou utilisation. Conservez toujours les instructions dans un lieu sûr et accessible pour vous y référer ultérieurement.
• • • • • • • • • • • Ne faites pas fonctionner l'appareil avec un minuteur externe ou un système de commande à distance. AVERTISSEMENT : Il peut être dangereux de laisser chauffer de la graisse ou de l'huile sans surveillance sur une table de cuisson car cela pourrait provoquer un incendie. N'essayez JAMAIS d'éteindre un feu avec de l'eau. Éteignez l'appareil puis couvrez les flammes, par exemple avec un couvercle ou une couverture ignifuge. ATTENTION : Toute cuisson doit être surveillée.
• • Lorsque vous acheminez le câble d'alimentation, assurez-vous qu'il n'entre pas en contact direct (par exemple, à l'aide d'un manchon isolant) avec des parties pouvant atteindre des températures supérieures de 50 °C à la température ambiante.
• • • • • • électricien pour remplacer le câble d'alimentation s'il est endommagé. La protection contre les chocs des parties sous tension et isolées doit être fixée de telle manière qu'elle ne peut pas être enlevée sans outils. Ne branchez la fiche d'alimentation à la prise de courant qu'à la fin de l'installation. Assurez-vous que la prise de courant est accessible une fois l'appareil installé. Si la prise de courant est lâche, ne branchez pas la fiche d'alimentation secteur.
• • • • • • • • Assurez-vous que la flamme ne s'éteint pas lorsque vous tournez rapidement la manette de la position maximale à la position minimale. N'utilisez que les accessoires fournis avec l'appareil. N'installez pas de diffuseur de flamme sur le brûleur. L'utilisation d'un appareil de cuisson au gaz génère de la chaleur et de l'humidité. Veillez à ce que la pièce où est installé l'appareil soit bien aérée.
avec des parties mobiles ni être comprimés. Soyez également vigilant lorsque la table est installée avec un four. Assurez-vous que la pression de l'alimentation en gaz de l'appareil correspond aux valeurs recommandées. Le raccordement réglable est relié à la rampe complète par un écrou fileté R 1/2 po. Tous les composants apparaissant dans la figure ont déjà été assemblés en usine. L'appareil a été testé avant de quitter l'usine pour vous garantir les meilleurs résultats. A B C A.
AVERTISSEMENT! Assurez-vous que la flamme ne s'éteint pas lorsque vous tournez rapidement la manette de la position maximale à la position minimale. CONNEXION ÉLECTRIQUE • Assurez-vous que la tension nominale et le type d'alimentation sur la plaque signalétique correspondent bien à la tension et à la puissance de l'alimentation locale. • Cet appareil est fourni avec un câble d'alimentation.
5. ATTENTION! Installez l'appareil uniquement sur un plan de travail dont la surface est plane. POSSIBILITÉS D'INSERTION Le panneau installé sous la table de cuisson doit être facile à retirer et facilement accessible au cas où une intervention technique serait nécessaire. 6. Élément de cuisine avec une porte 30 mm A A 60 mm min 20 mm (max 150 mm) B B 7. A) joint fourni B) équerres fournies A. Panneau amovible B.
DESCRIPTION DE L'APPAREIL DESCRIPTION DE LA TABLE DE CUISSON 2 1 1 Brûleur rapide 2 Brûleur semi-rapide 3 3 Brûleur auxiliaire 4 Manettes de commande 4 MANETTE DE COMMANDE Symbole Description pas d'alimentation en gaz / position Arrêt Symbole Description alimentation en gaz minimale position d'allumage / alimentation en gaz maximale UTILISATION QUOTIDIENNE AVERTISSEMENT! Reportez-vous aux chapitres concernant la sécurité. VUE D'ENSEMBLE DES BRÛLEURS A B C A. Chapeau et couronne du brûleur B.
C. Bougie d'allumage ALLUMAGE DU BRÛLEUR Allumez toujours le brûleur avant de poser un récipient dessus. AVERTISSEMENT! Faites très attention lorsque vous utilisez une flamme nue dans une cuisine. Le fabricant décline toute responsabilité en cas de mauvaise utilisation de la flamme. 1. Enfoncez la manette et tournez-la vers la gauche jusqu'à la position d'arrivée de gaz maximale ( ). 2. Maintenez la manette enfoncée pendant 10 secondes environ. Cela permet au thermocouple de chauffer.
ATTENTION! Assurez-vous que les récipients de cuisson sont bien centrés sur le brûleur afin de garantir leur stabilité et de réduire la consommation de gaz. ATTENTION! Des liquides renversés durant la cuisson peuvent provoquer le bris du verre. Brûleur Diamètre du récipient (mm) Rapide 180 - 260 Semi-rapide 120 - 220 Auxiliaire 80 - 180 DIAMÈTRES DES RÉCIPIENTS Utilisez uniquement des récipients dont le diamètre correspond aux dimensions des brûleurs.
NETTOYAGE DE LA BOUGIE D'ALLUMAGE Cette fonctionnalité est obtenue grâce à une bougie d'allumage en céramique dotée d'une électrode en métal. Veillez à maintenir ces composants propres afin de faciliter l'allumage. Assurez-vous également que les orifices des couronnes des brûleurs ne sont pas obstrués. ENTRETIEN PÉRIODIQUE Contactez périodiquement votre service aprèsvente pour contrôler l'état du tuyau d'arrivée de gaz et du régulateur de pression si votre installation en est équipée.
ÉTIQUETTES FOURNIES DANS LE SACHET DES ACCESSOIRES Collez les étiquettes adhésives comme indiqué cidessous : A B MOD. MOD. PROD.NO. PROD.NO. SER.NO SER.NO DATA DATA C MOD. PROD.NO. SER.NO. 0049 TYPE IP20 03 IT MADE IN ITALY A. Collez-la sur la carte de garantie et envoyez cette partie (le cas échéant). B. Collez-la sur la carte de garantie et conservez cette partie (le cas échéant). C. Collez-la sur la notice d'utilisation.
Raccordement au gaz : R 1/2" Classe de l'appareil : 3 DIAMÈTRES DES VIS DE RÉGLAGE BRÛLEUR Ø VIS DE RÉGLAGE 1/100 mm Rapide 42 Semi-rapide 32 Auxiliaire 28 BRÛLEURS À GAZ POUR LE GAZ NATUREL G20/G25 20/25 mbar (BE) - G20 20 mbar (LU) PUISSANCE NORMALE kW BRÛLEUR PUISSANCE MINIMALE kW CARACTÉRISTIQUE DE L'INJECTEUR Rapide 2,9 0,75 119 Semi-rapide 1,9 0,45 96 Auxiliaire 1,0 0,33 70 BRÛLEURS À GAZ POUR LPG G30/G31 28-30/37 mbar BRÛLEUR CARACTÉRISPUISSANCE PUISSANCE TIQUE DE L'INNO
Efficacité énergétique selon le brûleur à gaz (EE gas burner) Arrière gauche - Semi-rapide 54.9% Arrière droit - Semi-rapide 54.9% Avant gauche - Rapide 57.5% Avant droit - Auxiliaire non applicable Efficacité énergétique de la table de cuisson (EE gas hob) 55.
867329339-C-432018 WWW.ZANUSSI.