User Manual GETTING STARTED? EASY.
VEILIGHEIDSINFORMATIE Lees zorgvuldig de meegeleverde instructies voor installatie en gebruik van het apparaat. De fabrikant is niet verantwoordelijk voor letsel of schade veroorzaakt door een verkeerde installatie of verkeerd gebruik. Bewaar de instructies altijd op een veilige en toegankelijke plaats voor toekomstig gebruik.
• • • • • • • • • • • WAARSCHUWING: Zonder toezicht koken op een kookplaat met vet of olie kan gevaarlijk zijn en brandgevaar opleveren. Probeer brand NOOIT met water te blussen, maar schakel in plaats daarvan het apparaat uit en bedek de vlam bijv. met een deksel of blusdeken. LET OP: Er dient toezicht te worden gehouden op het bereidingsproces. Een kort bereidingsproces moet onder constant toezicht staan. WAARSCHUWING: Brandgevaar: Bewaar geen voorwerpen op de kookplaten.
• isolatiehoes) met onderdelen die temperaturen kunnen bereiken van 50°C hoger dan kamertemperatuur. WAARSCHUWING: Gebruik alleen kookplaatbeschermers die door de fabrikant van het kookapparaat zijn ontworpen of door de fabrikant van het apparaat in de gebruiksinstructies als geschikt zijn aangegeven of kookplaatbeschermers die in het apparaat zijn geïntegreerd. Het gebruik van ongeschikte kookplaatbeschermers kan ongelukken veroorzaken.
• • • • • Steek de stekker pas in het stopcontact als de installatie is voltooid. Zorg ervoor dat het netsnoer na installatie bereikbaar is. Sluit de stroomstekker niet aan op een losse stroomaansluiting. Trek niet aan het netsnoer om het apparaat los te koppelen. Trek altijd aan de stekker. Gebruik alleen de juiste isolatie-apparaten: stroomonderbrekers, zekeringen (schroefzekeringen moeten uit de houder worden verwijderd), aardlekschakelaars en contactgevers.
• • andere doeleinden, zoals het verwarmen van een kamer. Laat geen zure vloeistoffen, zoals bijv. azijn, citroensap of reinigingsmiddelen voor het verwijderen van kalkaanslag, in aanraking komen met de kookplaat. Hierdoor kunnen doffe plekken ontstaan. Verkleuring van het email of roestvrij staal is niet van invloed op de werking van het apparaat. ONDERHOUD EN REINIGING WAARSCHUWING! Verwijder de toetsen, knoppen of pakkingen niet van het bedieningspaneel.
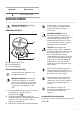
Symbool Beschrijving minimale gastoevoer DAGELIJKS GEBRUIK Als de brander na enkele pogingen niet aan gaat, controleer dan of de kroon en de deksel goed op hun plaats zitten. WAARSCHUWING! Raadpleeg de hoofdstukken Veiligheid. BRANDEROVERZICHT WAARSCHUWING! Houd de bedieningsknop niet langer dan 15 seconden ingedrukt. Als de brander na 15 seconden nog niet brandt, de bedieningsknop loslaten en minstens 1 minuut wachten voordat u opnieuw probeert de vlam te ontsteken.
WAARSCHUWING! Draai de vlam altijd lager of schakel hem uit voordat u de pan van de brander haalt AANWIJZINGEN EN TIPS WAARSCHUWING! Raadpleeg de hoofdstukken Veiligheid. LET OP! Zorg dat de potten zich in het midden van de brander bevinden, voor een maximum aan stabiliteit en lager gasverbruik. KOOKGEREI LET OP! Vloeistoffen die tijdens het koken worden gemorst kunnen ervoor zorgen dat het glas breekt. LET OP! Gebruik geen gietijzeren pannen, aardewerk of grillplaten.
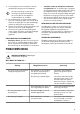
1. U kunt de pansteunen verwijderen voor een gemakkelijke reiniging van het kookplaat. Ga zeer voorzichtig te werk bij het vervangen van de pannendrager, dit om schade aan het oppervlak van de kookplaat te vermijden. 2. De emaillelaag kan scherpe randen hebben, dus wees voorzichtig tijdens het met de hand afwassen en afdrogen. Verwijder hardnekkige vlekken zo nodig met een pastareiniger. 3. Zorg er na het reinigen van de pansteunen voor dat u ze in de juiste stand terugplaatst. 4.
ALS U HET PROBLEEM NIET KUNT OPLOSSEN... Als u niet zelf het probleem kunt verhelpen, neem dan contact op met uw verkoper of de serviceafdeling. Zie voor deze gegevens het typeplaatje. Verzeker u ervan dat u de kookplaat correct gebruikt heeft. Bij onjuist gebruik van het apparaat wordt het bezoek van de onderhoudstechnicus van de klantenservice of de A vakhandelaar in rekening gebracht, zelfs tijdens de garantieperiode.
opletten dat deze niet in aanraking komen met bewegende onderdelen, of dat ze niet vastgeklemd worden. Wees ook voorzichtig wanneer de kookplaat wordt samengebracht met een oven. Controleer of de gastoevoerdruk van het apparaat voldoet aan de aanbevolen waarden. De verstelbare aansluiting wordt op de uitbreidingsbrug bevestigd met behulp van een schroefdraadmoer R 1/2". Alle onderdelen die getoond worden op de afbeelding zijn reeds in de fabriek gemonteerd.
WAARSCHUWING! Zorg dat de vlam niet uitgaat als u de knop snel van de maximale stand naar de minimale stand draait. AANSLUITING OP HET ELEKTRICITEITSNET • Zorg er voor dat het aangegeven voltage en het type stroom op het typeplaatje overeenkomen met het voltage en stroomtype van uw lokale stroomleverancier. • Dit apparaat wordt geleverd met een netsnoer. Dit moet zijn voorzien van een geschikte stekker, die geschikt is voor de belasting die vermeld is op het identificatieplaatje.
4. A B min 12 mm min 5 mm (max 150 mm) 60 mm A. Verwijderbaar paneel B. Ruimte voor aansluitingen 5. Keukenmeubel met oven Om veiligheidsredenen en om een gemakkelijke verwijdering van de oven uit het meubel mogelijk te maken, moeten de elektrische aansluitingen van de kookplaat en de oven afzonderlijk geïnstalleerd worden. min. 30 mm min. 2 mm 6. min. 12 mm LET OP! Installeer het apparaat alleen op een werkblad met een plat oppervlak.
TECHNISCHE GEGEVENS AFMETINGEN KOOKPLAAT Breedte 590 mm Diepte 510 mm OVERIGE TECHNISCHE GEGEVENS TOTAAL VERMOGEN: Gas origineel: Gasvervanging: G20/G25 (2E+) 20/25 mbar (BE) 7,7 kW G20 (2E) 20 mbar (LU) 7,7 kW G30 (3+) 28-30 mbar 545 g/h G31 (3+) 37 mbar 536 g/h Elektrische voeding: 220-240 V ~ 50/60 Hz Categorie apparaat: II2E+3+ (BE) I2E (LU) Gasaansluiting: R 1/2" Apparaatklasse: 3 BYPASSDIAMETERS BRANDER Ø BYPASS 1/100 mm Snelle brander 42 Normale brander 32 Sudderbrander
GASBRANDERS VOOR LPG G30/G31 28-30/37 mbar BRANDER NORMAAL VERMOGEN kW MINIMUM VERMOGEN kW NOMINALE GASSTROMING g/h INSPUITMARKERING G30 28-30 mbar G31 37 mbar Snelle brander 2,7 0,75 86 196 193 Normale brander 1,9 0,45 71 138 136 Sudderbrander 1,0 0,33 50 73 71 ENERGIEZUINIGHEID PRODUCTINFORMATIE VOLGENS EU-RICHTLIJN 66/2014 Modelidentificatie ZGO63414BA Type kooktoestel Ingebouwde kookplaat Aantal gasbranders Energiezuinigheid per gasbrander (EE gas burner) 4 Links achter - s
product naar het milieustation bij u in de buurt of neem contact op met de gemeente.
SAFETY INFORMATION Before the installation and use of the appliance, carefully read the supplied instructions. The manufacturer is not responsible for any injuries or damages that are the result of incorrect installation or usage. Always keep the instructions in a safe and accessible location for future reference.
• • • • • • • • • • • 18 NEVER try to extinguish a fire with water, but switch off the appliance and then cover flame e.g. with a lid or a fire blanket. CAUTION: The cooking process has to be supervised. A short term cooking process has to be supervised continuously. WARNING: Danger of fire: Do not store items on the cooking surfaces. Metallic objects such as knives, forks, spoons and lids should not be placed on the hob surface since they can get hot.
SAFETY INSTRUCTIONS This appliance is suitable for the following markets: BE LU INSTALLATION WARNING! Only a qualified person must install this appliance. WARNING! Risk of injury or damage to the appliance. • • • • • • • • • • Remove all the packaging. Do not install or use a damaged appliance. Follow the installation instructions supplied with the appliance. Keep the minimum distance from other appliances and units. Always take care when moving the appliance as it is heavy.
• USE WARNING! Risk of injury, burns and electric shock. • • • • • • • • • • Remove all the packaging, labelling and protective film (if applicable) before first use. This appliance is for household use only. Do not change the specification of this appliance. Make sure that the ventilation openings are not blocked. Do not let the appliance stay unattended during operation. Set the cooking zone to “off” after each use. Do not put cutlery or saucepan lids on the cooking zones. They can become hot.
• • Disconnect the appliance from the mains supply. Cut off the mains electrical cable close to the appliance and dispose of it. • Flat the external gas pipes. PRODUCT DESCRIPTION COOKING SURFACE LAYOUT 2 1 1 Rapid burner 2 Semi-rapid burner 3 3 Auxiliary burner 4 Control knobs 4 CONTROL KNOB Symbol Description no gas supply / off position Symbol Description minimum gas supply ignition position / maximum gas supply DAILY USE WARNING! Refer to Safety chapters.
BURNER OVERVIEW WARNING! Do not keep the control knob pushed for more than 15 seconds. If the burner does not light after 15 seconds, release the control knob, turn it into off position and try to light the burner again after minimum 1 minute. A CAUTION! In the absence of electricity you can ignite the burner without electrical device; in this case approach the burner with a flame, turn the control knob counter-clockwise to maximum gas supply position and push it down.
WARNING! Do not put unstable or damaged pots on the burner to prevent spills and injuries. CAUTION! Make sure that the bottoms of pots do not stand too close to the control knob, otherwise the flame heats the control knob up. CAUTION! Liquids spilt during cooking can cause the glass to break. DIAMETERS OF COOKWARE Use cookware with diameters applicable to the size of burners. CAUTION! Make sure that pot handles are not above the front edge of the cooktop.
TROUBLESHOOTING WARNING! Refer to Safety chapters. WHAT TO DO IF... Problem There is no spark when you try to activate the spark generator. Possible cause The hob is not connected to an electrical supply or it is connected incorrectly. Check if the hob is correctly connected to the electrical supply. The fuse is blown. Make sure that the fuse is the cause of the malfunction. If the fuse is blown again and again, contact a qualified electrician. Burner cap and crown are placed incorrectly.
LABELS SUPPLIED WITH THE ACCESSORIES BAG Stick the adhesive labels as indicated below: A B MOD. MOD. PROD.NO. PROD.NO. SER.NO SER.NO DATA DATA C 0049 MOD. PROD.NO. SER.NO. TYPE IP20 03 IT MADE IN ITALY A. Stick it on Guarantee Card and send this part (if applicable). B. Stick it on Guarantee Card and keep this part (if applicable). C. Stick it on instruction booklet. INSTALLATION WARNING! Refer to Safety chapters.
gas supply. You can find this plate in the package supplied with the appliance. If the supply gas pressure is changeable or different from the necessary pressure, you must fit an applicable pressure adjuster on the gas supply pipe. A B C A. End of shaft with nut B. Washer supplied with the appliance C. Elbow supplied with the appliance Liquid gas Use the rubber pipe holder for liquid gas. Always engage the gasket. Then continue with the gas connection.
• ground connection agrees with the standards and regulations. Do not let the power cable to heat up to a temperature higher than 90° C. Make sure that you connect the blue neutral cable to the terminal with a letter "N" on it. Connect the brown (or black) phase cable to the terminal which has a letter "L". Keep the phase cable connected at all times. 3. min. 600 mm min. 650 mm min. 55 mm 30 mm 470+02 mm 550+02 mm 4.
B. Space for connections Kitchen unit with oven The electrical connection of the hob and the oven must be installed separately for safety reasons and to let easy remove oven from the unit. min. 30 mm min. 2 mm min 6 mm A B min 12 mm min 5 mm (max 150 mm) 60 mm A.
BYPASS DIAMETERS BURNER Ø BYPASS 1/100 mm Rapid 42 Semi-rapid 32 Auxiliary 28 GAS BURNERS FOR NATURAL GAS G20/G25 20/25 mbar (BE) - G20 20 mbar (LU) BURNER NORMAL POWER kW MINIMUM POWER kW INJECTOR MARK Rapid 2,9 0,75 119 Semi-rapid 1,9 0,45 96 Auxiliary 1,0 0,33 70 GAS BURNERS FOR LPG G30/G31 28-30/37 mbar NOMINAL GAS FLOW g/h BURNER NORMAL POWER kW MINIMUM POWER kW INJECTOR MARK G30 28-30 mbar G31 37 mbar Rapid 2,7 0,75 86 196 193 Semi-rapid 1,9 0,45 71 138 136 Aux
ENERGY SAVING • Before use, make sure that the burners and pan supports are assembled correctly. • Use cookware with diameters applicable to the size of burners. • Center the pot on the burner. • When you heat up water, use only the amount you need. • If it is possible, always put the lids on the cookware. • When the liquid starts to boil, turn down the flame to barely simmer the liquid. • If it is possible, use a pressure cooker. Refer to its user manual.
INFORMATIONS DE SÉCURITÉ Avant d'installer et d'utiliser cet appareil, lisez soigneusement les instructions fournies. Le fabricant ne pourra être tenu pour responsable des blessures et dégâts résultant d'une mauvaise installation ou utilisation. Conservez toujours les instructions dans un lieu sûr et accessible pour vous y référer ultérieurement.
• • • • • • • • • • • 32 Ne faites pas fonctionner l'appareil avec un minuteur externe ou un système de commande à distance. AVERTISSEMENT : Il peut être dangereux de laisser chauffer de la graisse ou de l'huile sans surveillance sur une table de cuisson car cela pourrait provoquer un incendie. N'essayez JAMAIS d'éteindre un feu avec de l'eau. Éteignez l'appareil puis couvrez les flammes, par exemple avec un couvercle ou une couverture ignifuge. ATTENTION : Toute cuisson doit être surveillée.
• • Lorsque vous acheminez le câble d'alimentation, assurez-vous qu'il n'entre pas en contact direct (par exemple, à l'aide d'un manchon isolant) avec des parties pouvant atteindre des températures supérieures de 50 °C à la température ambiante.
• • • • • • électricien pour remplacer le câble d'alimentation s'il est endommagé. La protection contre les chocs des parties sous tension et isolées doit être fixée de telle manière qu'elle ne peut pas être enlevée sans outils. Ne branchez la fiche d'alimentation à la prise de courant qu'à la fin de l'installation. Assurez-vous que la prise de courant est accessible une fois l'appareil installé. Si la prise de courant est lâche, ne branchez pas la fiche d'alimentation secteur.
• • • • • • • • Assurez-vous que la flamme ne s'éteint pas lorsque vous tournez rapidement la manette de la position maximale à la position minimale. N'utilisez que les accessoires fournis avec l'appareil. N'installez pas de diffuseur de flamme sur le brûleur. L'utilisation d'un appareil de cuisson au gaz génère de la chaleur et de l'humidité. Veillez à ce que la pièce où est installé l'appareil soit bien aérée.
DESCRIPTION DE L'APPAREIL DESCRIPTION DE LA TABLE DE CUISSON 2 1 1 Brûleur rapide 2 Brûleur semi-rapide 3 3 Brûleur auxiliaire 4 Manettes de commande 4 MANETTE Symbole Description pas d'alimentation en gaz / position Arrêt Symbole Description alimentation en gaz minimale position d'allumage / alimentation en gaz maximale UTILISATION QUOTIDIENNE AVERTISSEMENT! Reportez-vous aux chapitres concernant la sécurité. VUE D'ENSEMBLE DES BRÛLEURS A B C A. Chapeau et couronne du brûleur B.
C. Bougie d'allumage ALLUMAGE DU BRÛLEUR Allumez toujours le brûleur avant de poser un récipient dessus. AVERTISSEMENT! Faites très attention lorsque vous utilisez une flamme nue dans une cuisine. Le fabricant décline toute responsabilité en cas de mauvaise utilisation de la flamme. 1. Enfoncez la manette et tournez-la vers la gauche jusqu'à la position d'arrivée de gaz maximale ( ). 2. Maintenez la manette enfoncée pendant 10 secondes environ. Cela permet au thermocouple de chauffer.
ATTENTION! Assurez-vous que les récipients de cuisson sont bien centrés sur le brûleur afin de garantir leur stabilité et de réduire la consommation de gaz. ATTENTION! Des liquides renversés durant la cuisson peuvent provoquer le bris du verre. Brûleur Diamètre du récipient (mm) Rapide 180 - 260 Semi-rapide 120 - 220 Auxiliaire 80 - 180 DIAMÈTRES DES RÉCIPIENTS Utilisez uniquement des récipients dont le diamètre correspond aux dimensions des brûleurs.
NETTOYAGE DE LA BOUGIE D'ALLUMAGE Cette fonctionnalité est obtenue grâce à une bougie d'allumage en céramique dotée d'une électrode en métal. Veillez à maintenir ces composants propres afin de faciliter l'allumage. Assurez-vous également que les orifices des couronnes des brûleurs ne sont pas obstrués. ENTRETIEN PÉRIODIQUE Contactez périodiquement votre service aprèsvente pour contrôler l'état du tuyau d'arrivée de gaz et du régulateur de pression si votre installation en est équipée.
ÉTIQUETTES FOURNIES DANS LE SACHET DES ACCESSOIRES Collez les étiquettes adhésives comme indiqué cidessous : A B MOD. MOD. PROD.NO. PROD.NO. SER.NO SER.NO DATA DATA C 0049 MOD. PROD.NO. SER.NO. TYPE IP20 03 IT MADE IN ITALY A. Collez-la sur la carte de garantie et envoyez cette partie (le cas échéant). B. Collez-la sur la carte de garantie et conservez cette partie (le cas échéant). C. Collez-la sur la notice d'utilisation.
Assurez-vous que la pression de l'alimentation en gaz de l'appareil correspond aux valeurs recommandées. Le raccordement réglable est relié à la rampe complète par un écrou fileté R 1/2 po. Tous les composants apparaissant dans la figure ont déjà été assemblés en usine. L'appareil a été testé avant de quitter l'usine pour vous garantir les meilleurs résultats. A B C A. Extrémité du tuyau avec écrou B. Joint fourni avec l'appareil C.
AVERTISSEMENT! Assurez-vous que la flamme ne s'éteint pas lorsque vous tournez rapidement la manette de la position maximale à la position minimale. CONNEXION ÉLECTRIQUE • Assurez-vous que la tension nominale et le type d'alimentation sur la plaque signalétique correspondent bien à la tension et à la puissance de l'alimentation locale. • Cet appareil est fourni avec un câble d'alimentation.
4. A B min 12 mm min 5 mm (max 150 mm) 60 mm A. Panneau amovible B. Espace pour les branchements 5. Élément de cuisine avec four Les branchements électriques de la table de cuisson et du four doivent être installés séparément pour des raisons de sécurité et pour permettre un retrait facile du four de l'ensemble. min. 30 mm min. 2 mm 6. min. 12 mm ATTENTION! Installez l'appareil uniquement sur un plan de travail dont la surface est plane.
CARACTÉRISTIQUES TECHNIQUES DIMENSIONS DE LA TABLE DE CUISSON Largeur 590 mm Profondeur 510 mm AUTRES CARACTÉRISTIQUES TECHNIQUES PUISSANCE TOTALE : Gaz d'origine : Gaz de remplacement : G20/G25 (2E+) 20/25 mbar (BE) 7,7 kW G20 (2E) 20 mbar (LU) 7,7 kW G30 (3+) 28-30 mbar 545 g/h G31 (3+) 37 mbar 536 g/h Alimentation électrique : 220-240 V ~ 50/60 Hz Catégorie de l'appareil : II2E+3+ (BE) I2E (LU) Raccordement au gaz : R 1/2" Classe de l'appareil : 3 DIAMÈTRES DES VIS DE RÉGLAGE BRÛLE
BRÛLEURS À GAZ POUR LPG G30/G31 28-30/37 mbar BRÛLEUR CARACTÉRISPUISSANCE PUISSANCE TIQUE DE L'INNORMALE kW MINIMALE kW JECTEUR DÉBIT DE GAZ NOMINAL g/h G30 28-30 mbar G31 37 mbar Rapide 2,7 0,75 86 196 193 Semi-rapide 1,9 0,45 71 138 136 Auxiliaire 1,0 0,33 50 73 71 RENDEMENT ÉNERGÉTIQUE INFORMATIONS DE PRODUIT SELON LA NORME EU 66/2014 Identification du modèle ZGO63414BA Type de table de cuisson Table de cuisson intégrée Nombre de brûleurs à gaz 4 Efficacité énergétique selon
867345613-A-202018 WWW.ZANUSSI.