EN User Manual Hob ZGH78534 DZ LY MA TN
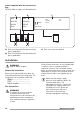
Contents Safety information Safety instructions Product description Daily use Hints and tips 2 3 5 6 7 Care and cleaning Troubleshooting Installation Technical information Energy efficiency 8 8 10 13 14 Subject to change without notice. Safety information Before the installation and use of the appliance, carefully read the supplied instructions. The manufacturer is not responsible if an incorrect installation and use causes injuries and damages.
• • • • • • • • Unattended cooking on a hob with fat or oil can be dangerous and may result in fire. Never try to extinguish a fire with water, but switch off the appliance and then cover flame e.g. with a lid or a fire blanket. Do not store items on the cooking surfaces. Metallic objects such as knives, forks, spoons and lids should not be placed on the hob surface since they can get hot. Do not use a steam cleaner to clean the appliance.
• • • • • • • • • • • • • • • • Before carrying out any operation make sure that the appliance is disconnected from the power supply. Make sure that the electrical information on the rating plate agrees with the power supply. If not, contact an electrician. Make sure the appliance is installed correctly. Loose and incorrect electricity mains cable or plug (if applicable) can make the terminal become too hot. Use the correct electricity mains cable. Do not let the electricity mains cable tangle.
• • • • • • • • • • • • • Do not let cookware to boil dry. Be careful not to let objects or cookware fall on the appliance. The surface can be damaged. Do not activate the cooking zones with empty cookware or without cookware. Do not put aluminium foil on the appliance. Use only stable cookware with the correct shape and diameter larger than the dimensions of the burners. Make sure cookware is centrally positioned on the burners.
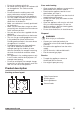
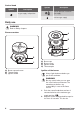
Control knob Symbol Symbol Description Description ignition position / maximum gas supply no gas supply / off position minimum gas supply Daily use WARNING! Refer to Safety chapters. Burner overview A B A C D B C A) Burner cap and crown B) Thermocouple C) Ignition candle A) B) C) D) Burner cap Burner crown Ignition candle Thermocouple Ignition of the burner Always light the burner before you put on the cookware. WARNING! Be very careful when you use open fire in the kitchen environment.
thermocouple warm up. If not, the gas supply is interrupted. 3. Adjust the flame after it is regular. If after some tries the burner does not light, check if the crown and its cap are in correct positions. WARNING! Do not keep the control knob pushed for more than 15 seconds. If the burner does not light after 15 seconds, release the control knob, turn it into off position and try to light the burner again after minimum 1 minute.
Burner Diameter of cookware (mm) Burner Diameter of cookware (mm) Triple Crown 180 - 280 Semi-rapid (front right) 120 - 220 Semi-rapid (rear left) 120 - 240 Auxiliary 80 - 180 Semi-rapid (rear right) 120 - 240 Care and cleaning WARNING! Refer to Safety chapters. General information • • • • • Clean the hob after each use. Always use cookware with clean bottom. Scratches or dark stains on the surface have no effect on how the hob operates.
What to do if... Problem There is no spark when you try to activate the spark generator. Possible cause Remedy The hob is not connected to an electrical supply or it is connected incorrectly. Check if the hob is correctly connected to the electrical supply. The fuse is released. Make sure that the fuse is the cause of the malfunction. If the fuse releases again and again, contact a qualified electrician. Burner cap and crown are placed Place the burner cap and crown incorrectly. correctly.
Labels supplied with the accessories bag Stick the adhesive labels as indicated below: A B MOD. MOD. PROD.NO. PROD.NO. SER.NO SER.NO DATA DATA C MOD. PROD.NO. SER.NO. 0049 TYPE IP20 03 IT MADE IN ITALY A) Stick it on Guarantee Card and send this part (if applicable). B) Stick it on Guarantee Card and keep this part (if applicable). C) Stick it on instruction booklet. Installation WARNING! Refer to Safety chapters.
A B C A) End of shaft with nut B) Washer C) Elbow (if needed) Liquid gas Use the rubber pipe holder for liquid gas. Always engage the gasket. Then continue with the gas connection.
• Make sure that there is an access to the mains plug after the installation. Do not pull the mains cable to disconnect the appliance. Always pull the mains plug. There is a risk of fire when the appliance is in connection with an extension cable, an adapter or a multiple connection. Make sure that the ground connection agrees with the standards and regulations. Do not let the power cable to heat up to a temperature higher than 90° C.
Technical information Hob dimensions Width 745 mm Depth 515 mm Bypass diameters BURNER Ø BYPASS 1/100 mm Triple Crown 56 Semi-rapid 32 Auxiliary 28 Other technical data Gas original: G20 (2H) 20 mbar = 11 kW TOTAL POWER: Gas replacement: G30 (3+) 28-30 mbar = 800 g/h G31 (3+) 37 mbar = 786 g/h Electric supply: 230 V ~ 50 Hz Appliance category: II2H3+ Gas connection: G 1/2" Appliance class: 3 Gas burners for NATURAL GAS G20 20 mbar BURNER NORMAL POWER kW MINIMUM POWER kW INJECTOR
BURNER Auxiliary NORMAL POWER kW 1,0 MINIMUM POWER kW 0,33 INJECTOR MARK 1/100 mm 50 NOMINAL GAS FLOW g/h G30 28-30 mbar 73 G31 37 mbar 71 Energy efficiency Product information according to EU 66/2014 Model identification ZGH78534XA Type of hob Built-in hob Number of gas burners 5 Energy efficiency per gas burner (EE gas burner) Middle rear - Semi-rapid Right rear - Semi-rapid Left - Triple Crown Middle front - Auxiliary Right front - Semi-rapid Energy efficiency for the gas hob (EE gas hob)
www.zanussi.
867321497-A-072015 www.zanussi.