EN DE User manual Benutzerinformation Freezer Freezer ZFU420FW 2 12
Contents Safety information _ _ _ _ _ _ _ _ _ _ _ _ _ _ Product description _ _ _ _ _ _ _ _ _ _ _ _ _ Control panel _ _ _ _ _ _ _ _ _ _ _ _ _ _ _ _ _ Daily use _ _ _ _ _ _ _ _ _ _ _ _ _ _ _ _ _ _ _ First use _ _ _ _ _ _ _ _ _ _ _ _ _ _ _ _ _ _ _ _ Helpful hints and tips _ _ _ _ _ _ _ _ _ _ _ _ _ 2 4 5 5 6 6 Care and cleaning _ _ _ _ _ _ _ _ _ _ _ _ _ _ 7 Troubleshooting _ _ _ _ _ _ _ _ _ _ _ _ _ _ _ 7 Technical data _ _ _ _ _ _ _ _ _ _ _ _ _ _ _ _ 9 Installation _ _ _ _ _ _ _ _ _ _ _ _ _ _ _ _ _ _ _ 9 Env
• It is dangerous to alter the specifications or modify this product in any way. Any damage to the cord may cause a short-circuit, fire and/or electric shock. Warning! Any electrical component (power cord, plug, compressor) must be replaced by a certified service agent or qualified service personnel to avoid hazard. 1. 2. • • • • Power cord must not be lengthened. Make sure that the power plug is not squashed or damaged by the back of the appliance.
• The appliance must not be located close to radiators or cookers. • Make sure that the mains plug is accessible after the installation of the appliance. • Connect to potable water supply only (If a water connection is foreseen). Service • Any electrical work required to do the servicing of the appliance should be carried out by a qualified electrician or competent person. • This product must be serviced by an authorized Service Centre, and only genuine spare parts must be used.
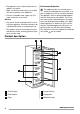
Control panel 1 2 3 1 Alarm Light 2 Fast Freeze Indicator 3 Fast Freeze Switch 4 Pilot Light 5 Temperature Regulator Switching on Insert the plug into the wall socket. Turn the Temperature regulator clockwise to a medium setting. The Pilot light and the Alarm light will light up. Switching off To turn off the appliance, turn the Temperature regulator to the "0" position. Fast Freeze function To activate the Fast Freeze function, press the Fast Freeze switch. The Fast Freeze light will light up.
Important! In the event of accidental defrosting, for example due to a power failure, if the power has been off for longer that the value shown in the technical characteristics chart under "rising time", the defrosted food must be consumed quickly or cooked immediately and then re-frozen (after cooling). or at room temperature, depending on the time available for this operation. Small pieces may even be cooked still frozen, directly from the freezer: in this case, cooking will take longer.
• it is advisable to show the freezing in date on each individual pack to enable you to keep tab of the storage time.
Problem The appliance does not operate. The Pilot light does not flash. Possible cause Solution The appliance is switched off. Switch on the appliance. The mains plug is not connected to the mains socket correctly. Connect the mains plug to the mains socket correctly. The appliance has no power. There is no voltage in the mains socket. Connect a different electrical appliance to the mains socket. Contact a qualified electrician. The Pilot light flashes. The appliance is not working properly.
Technical data Dimension Height 1540 mm Width 595 mm Depth 658 mm Rising Time 15 h Voltage 230 - 240 V Frequency 50 Hz The technical information are situated in the rating plate on the internal left side of the appliance and in the energy label.
The appliance must be earthed. The power supply cable plug is provided with a contact for this purpose. If the domestic power supply socket is not earthed, connect the appliance to a separate earth in compliance with current regulations, consulting a qualified electrician. The manufacturer declines all responsibility if the above safety precautions are not observed. This appliance complies with the E.E.C. Directives. Rear spacers You can find the two spacers in the bag with documentation.
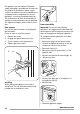
• Unscrew the handle (1) and fix it on the opposite side (2). • Re-insert the cover pins (3) on the opposite side. 1 3 2 Do a final check to make sure that: • All screws are tightened. • The edges of the doors run parallel to the side edge of the appliance. • The magnetic seal adheres to the cabinet. • The door opens and closes correctly. It is advisable to wait at least four hours before connecting the appliance to allow the oil to flow back in the compressor. If the ambient temperature is cold (i.e.
Inhalt Sicherheitshinweise _ _ _ _ _ _ _ _ _ _ _ _ _ Gerätebeschreibung _ _ _ _ _ _ _ _ _ _ _ _ Bedienfeld _ _ _ _ _ _ _ _ _ _ _ _ _ _ _ _ _ _ Täglicher Gebrauch _ _ _ _ _ _ _ _ _ _ _ _ _ Erste Inbetriebnahme _ _ _ _ _ _ _ _ _ _ _ _ Praktische Tipps und Hinweise _ _ _ _ _ _ _ 12 15 15 16 17 17 Reinigung und Pflege _ _ _ _ _ _ _ _ _ _ _ _ Fehlersuche _ _ _ _ _ _ _ _ _ _ _ _ _ _ _ _ _ Technische Daten _ _ _ _ _ _ _ _ _ _ _ _ _ _ Montage _ _ _ _ _ _ _ _ _ _ _ _ _ _ _ _ _ _ _ Hinweise zum Umweltschutz _ _ _ _
sehr umweltfreundliches Gas, das jedoch leicht entflammbar ist. Achten Sie beim Transport und bei der Aufstellung des Gerätes darauf, nicht die Komponenten des Kältekreislaufs zu beschädigen. Bei einer eventuellen Beschädigung des Kältekreislaufs: – Offene Flammen und Zündfunken vermeiden – Den Raum, in dem das Gerät installiert ist, gut lüften • Technische und anderweitige Änderungen am Gerät sind gefährlich.
Montage Wichtig! Halten Sie sich für den elektrischen Anschluss strikt an die Anweisungen der betreffenden Abschnitte. • Kontrollieren Sie nach dem Auspacken das Gerät auf eventuelle Beschädigungen. Nehmen Sie das Gerät nicht in Betrieb, wenn es beschädigt ist. Melden Sie die Schäden umgehend dem Händler, bei dem Sie es erworben haben. Bewahren Sie in diesem Fall die Verpackung auf.
Gerätebeschreibung 1 2 3 4 6 5 1 Bedienfeld 2 Kältemodul 4 Gefrierkörbe 5 Typenschild 3 Klappen 6 Maxibox Körbe Bedienfeld 1 1 Alarmleuchte 2 Superfrost-Anzeige 3 Superfrost-Taste (Schnellgefrieren) 4 Kontrolllampe 5 Temperaturregler www.zanussi.com 2 3 4 5 Einschalten Stecken Sie den Stecker in die Netzsteckdose. Drehen Sie den Temperaturregler im Uhrzeigersinn auf eine mittlere Einstellung. Die Kontrolllampe und die Alarmleuchte leuchten auf.
Ausschalten des Geräts Drehen Sie den Temperaturregler zum Ausschalten des Geräts in die Position „0“. Funktion Fast Freeze Drücken Sie zum Einschalten der Funktion Fast Freeze die Taste Fast Freeze. Die Kontrolllampe Fast Freeze leuchtet auf. Temperaturregelung Die Temperatur wird automatisch geregelt. Bedienen Sie das Gerät wie folgt: • Drehen Sie den Temperaturregler auf eine niedrigere Einstellung, um die minimal mögliche Kühlung zu erreichen.
Lebensmittel auf Kühlablagen, um die optimale Leistung zu erhalten. Erste Inbetriebnahme Reinigung des Innenraums Bevor Sie das Gerät in Betrieb nehmen, beseitigen Sie den typischen „Neugeruch“ am besten durch Reinigen der Innenteile mit lauwarmem Wasser und einer neutralen Seife. Sorgfältig nachtrocknen. Wichtig! Verwenden Sie keine aggressiven Reinigungsmittel oder Scheuerpulver, die die Oberfläche beschädigen.
Hinweise zur Lagerung gefrorener Produkte So erzielen Sie die besten Ergebnisse mit Ihrem Gerät: • Vergewissern Sie sich, dass die gefrorenen Lebensmittel vom Händler angemessen gelagert wurden. • Achten Sie unbedingt darauf, die eingekauften gefrorenen Lebensmittel in der kürzest möglichen Zeit in das Gefriergerät zu bringen. • Öffnen Sie die Tür nicht zu häufig, und lassen Sie die Tür nicht länger offen als notwendig.
nur von einem qualifizierten Elektriker oder einer kompetenten Person durchgeführt werden. Problem Das Gerät funktioniert nicht. Die Kontrolllampe blinkt nicht. Mögliche Ursache Abhilfe Das Gerät ist ausgeschaltet. Gerät einschalten. Der Netzstecker wurde nicht richtig in die Steckdose gesteckt. Stecken Sie den Netzstecker richtig in die Steckdose. Das Gerät wird nicht mit Spannung versorgt. Es liegt keine Spannung an der Netzsteckdose an.
Technische Daten Abmessungen Höhe 1540 mm Breite 595 mm Tiefe 658 mm Lagerzeit bei Störung 15 Std. Spannung 230 - 240 V Frequenz 50 Hz Die technischen Daten befinden sich auf dem Typenschild im Innern des Gerätes auf der linken Seite sowie auf der Energieplakette. Montage Vorsicht! Lesen Sie bitte die "Sicherheitshinweise" sorgfältig vor der Aufstellung des Geräts durch, um Gefahren für Sie selbst zu vermeiden und einen korrekten Betrieb des Geräts zu gewährleisten.
Elektrischer Anschluss Kontrollieren Sie vor der ersten Benutzung des Gerätes, ob die Netzspannung und -frequenz Ihres Hausanschlusses mit den auf dem Typenschild angegebenen Anschlusswerten übereinstimmen. Das Gerät muss geerdet sein. Zu diesem Zweck ist die Netzkabelsteckdose mit einem Schutzkontakt ausgestattet. Falls die Steckdose Ihres Hausanschlusses nicht geerdet sein sollte, lassen Sie das Gerät bitte gemäß den geltenden Vorschriften erden und fragen Sie dafür einen qualifizierten Elektriker.
2 1 • Stellen Sie das Gerät wieder in aufrechte Position. • Schrauben Sie den Griff (1) ab und an der gegenüberliegenden Seite (2) an. • Bringen Sie die Abdeckstifte (3) auf der anderen Seite wieder an. 1 3 2 Führen Sie eine Endkontrolle durch, um sicherzustellen, dass: • Alle Schrauben fest angezogen sind. • Die Türkanten parallel zum Seitenrand des Gerätes laufen. • Der magnetische Dichtungsstreifen am Gerät anliegt. • Die Tür ordnungsgemäß öffnet und schließt.
www.zanussi.
280150510-A-092012 www.zanussi.