User manual Dishwasher ZDTS 300
Thank you for selecting our appliance We wish you lots of enjoyment with your new appliance and we hope that you will consider our brand again when purchasing household appliances. Please read this user manual carefully and keep it throughout the product life cycle as a reference document. The user manual should be passed on to any future owner of the appliance.
Safety information In the interest of your safety and to ensure the correct use, before installing and first using the appliance, read this user manual carefully, including its hints and warnings. To avoid unnecessary mistakes and accidents, it is important to ensure that all people using the appliance are thoroughly familiar with its operation and safety features.
Installation • Check your dishwasher for any transport damage. Never connect a damaged machine. If your dishwasher is damaged contact your supplier. • All packaging must be removed before use. • Any electrical and plumbing work required to install this appliance must be carried out by a qualified and competent person. • For safety reasons it is dangerous to alter the specifications or attempt to modify this product in any way.
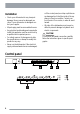
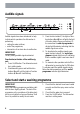
1 2 3 4 5 On/Off button Programme selection buttons Delay start button Indicator lights Function buttons Functions buttons In addition to the dishwashing programme selection, the following functions can also be set with the help of these buttons: • the setting of the water softener, • deactivation/activation of the audible signals.
Audible signals Audible signals have been introduced to help indicate which operations the dishwasher is performing: • setting the water softener, • end of the programme, • intervention of an alarm due to malfunction. IMPORTANT! Factory setting: audible signals activated. Deactivation/activation of the audible signals 1. Press On/Off button. The dishwasher must be in setting mode. 2. Simultaneously press and hold function buttons B and C until the lights of function buttons A, B and C start flashing. 3.
4. Press the button corresponding to the required programme (see "Washing programmes" chart). When a programme has been selected the corresponding light will illuminate. 5. Close the dishwasher door, the programme starts automatically. Setting and starting the programme with "delay start" 1. After having selected the washing programme, press the delay start button until the light corresponding to the chosen hours flashes (3h, 6h, 9h). 2. Close the dishwasher door, the countdown starts automatically. 3.
IMPORTANT! When the washing programme has finished, it is recommended that the dishwasher is un- plugged and the water tap turned off.
First use Before using your dishwasher for the first time: • Ensure that the electrical and water connections comply with the installation instructions • Remove all packaging from inside the appliance • Set the water softener • Pour 1 litre of water inside the salt container and then fill with dishwasher salt • Fill the rinse aid dispenser When using tablets that integrate rinse aid and detergent: there is no need to fill up with rinse aid – set the water softener – add special (dishwasher) salt When using
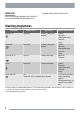
Water hardness Adjusting the water hardness setting Use of salt °dH °TH mmol/l manually electronically 51 - 70 91 - 125 9,1 - 12,5 2 level 10 yes 43 - 50 76 - 90 7,6 - 8,9 2 level 9 yes 37 - 42 65 - 75 6,5 - 7,5 2 level 8 yes 29 - 36 51 - 64 5,1 - 6,4 2 level 7 yes 23 - 28 40 - 50 4,0 - 5,0 2 level 6 yes 19 - 22 33 - 39 3,3 - 3,9 2 level 5 yes 15 - 18 26 - 32 2,6 - 3,2 1 level 4 yes 11 - 14 19 - 25 1,9 - 2,5 1 level 3 yes 4 - 10 7 - 18 0,7 - 1,8 1
1. Press the On/Off button. The dishwasher must be in setting mode. 2. Simultaneously press and hold function buttons B and C until the lights of the function buttons A, B and C start flashing. 3. Press function button A, the lights function buttons B and C turn off while the light of function button A goes flashing, at the same time the end of programme indicator light starts to flash, along with a sequence of intermittent audible signals.
Unscrew the cap. Only before filling with Using the funnel provided, salt for the first time, fill pour in the salt until the the salt container with wa- container is filled with salt. ter. IMPORTANT! Immediately start a complete programme. IMPORTANT! Water will overflow from the container as salt is added. Remove any trace of salt. Replace the cap tightly turning it clockwise until it stops with a click. IMPORTANT! Top up the special salt when the light on the control panel illuminates.
Use of rinse aid Open the lid. Fill up with rinse aid. The Clean up any rinse aid maximum level for filling is which overflows. Close the lid and press until it indicated by "max" locks. IMPORTANT! CAUTION! Top up the rinse aid when the light on the control panel Never fill the rinse aid dispenser with any other subilluminates. stances (e.g. dishwasher cleaning agent, liquid detergent). This would damage the appliance.
• Before loading the dishes, you should: – Remove all left over food and debris. – Soften remnants of burnt food in pans • When loading the dishes and cutlery, please note: – Dishes and cutlery must not impede the rotation of the spray arms. – Load hollow items such as cups, glasses, pans, etc. with the opening downwards so that water cannot collect in the container or a deep base. – Dishes and items of cutlery must not lie inside one another, or cover each other.
Load cutlery. For best results we recommend you to use the cutlery grid provided (if the size and dimensions of the cutlery allow it) Place knives and other items of cutlery with sharp points or edges with their handles facing upwards. Risk of injury! Load upper basket. Light items (plastic bowls etc.) must be loaded in the upper basket and arranged so they do not move. For taller items, the cup racks can be folded upwards. Load the lower basket.
To move to the higher position proceed as follows: 1. Pull out the basket until it stops. 2. Carefully lift both sides upwards until the mechanism is engaged and the basket is stable. To lower the basket to the original position proceed as follows: 1. Pull out the basket until it stops. 2. Carefully lift both sides upwards and then allow the mechanism to drop back down slowly, keeping hold of it.
For programmes with pre- When using detergent Close the lid. wash add an additional tablets: place detergent detergent dose in comtablets in compartment A. partmentB. Detergent tablets Detergent tablets from different manufacturers dissolve at different rates. For this reason, some detergent tablets do not attain their full cleaning power during short washing programmes. Therefore, please use long washing programmes when using detergent tablets, to ensure the complete removal of detergent residuals.
Clean filters A, B and C Turn the handle about 1/4 Remove filter A from the thoroughly under running turn anticlockwise and re- base of the washing comwater. partment. move filters B and C. Replace the filters and lock by turning the handle clockwise to the stop. Cleaning the spray arms Internal cleaning NEVER try to remove the spray arms. Ensure that the seals around the door, the detergent and rinse aid dispensers are cleaned regularly with a damp cloth.
2. Leave the door ajar to prevent the formation of any unpleasant smells. 3. Leave the inside of the machine clean. Frost precautions Avoid placing the machine in a location where the temperature is below 0°C. If this is unavoidable, empty the machine, close the appliance door, disconnect the water inlet pipe and empty it. 1. Unplug it. 2. Turn the water tap off. 3. Remove the water inlet and discharge hoses. 4. Pull the machine out together with the hoses.
What to do if ... The dishwasher will not start or stops during operation. Certain problems are due to the lack of simple maintenance or oversights, which can be Fault code and malfunction solved with the help of the indications described in the chart, without calling out an engineer. Switch off the dishwasher and carry out the following suggested corrective actions. Possible cause and solution • 1 intermittent audible signal • The water tap is blocked or furred with limescale. Clean the water tap.
Once these checks have been carried out; switch on the dishwasher. The programme will continue from the point at which it was interrupted. If the malfunction or fault code reappears contact the Service Force Centre. For other fault codes not described in the above chart, please contact your Service Force Centre. The wash results are not satisfactory The dishes are not clean • The wrong washing programme has been selected.
Technical data Dimensions Width x Height x Depth (cm) Electrical connection Voltage - Overall power - Fuse Information on the electrical connection is given on the rating plate on the inner edge of the dishwasher’s door. 44,6 x 81,8-89,8 x 55,5 Water supply pressure Minimum - Maximum (MPa) 0,05 - 0,8 Capacity place settings 9 Max.
rinse aid respectively and using the test programme (see "Consumption values").
WARNING! The dishwasher must be secured against tilting. Therefore make sure that the counter it is fixed under, is suitably secured to a fixed structure (adjacent kitchen units cabinets, wall). This dishwasher is designed to be fitted under a kitchen counter or work surface. No further openings for the venting of the dishwasher are required, but only to let the water fill and drain hose and power supply cable pass through. The dishwasher incorporates adjustable feet to allow the adjustment of the height.
CAUTION! A water inlet hose with safety valve MUST only be replaced by your local Service Force Centre. Drain hose Connect drain hose to the Required height: 30 to 100 Ensure that the hoses are When connecting the sink. cm above bottom of the not kinked, crushed or en- drain hose to an under dishwasher. tangled. sink trap spigot, the entire plastic membrane (A) must be removed.
on the rating plate match that of the supply where the appliance is to be installed. The fuse rating is also to be found on the rating plate. Always plug the mains plug into a correctly installed shockproof socket. Multi-way plugs, connectors and extension cables must not be used. This could constitute a fire hazard through overheating. 26 If necessary, have the domestic wiring system socket replaced. In case that the electrical cable has to be replaced, contact your local Service Force centre.
www.electrolux.