User Manual GETTING STARTED? EASY.
SAFETY INFORMATION Before the installation and use of the appliance, carefully read the supplied instructions. The manufacturer is not responsible for any injuries or damages that are the result of incorrect installation or usage. Always keep the instructions in a safe and accessible location for future reference.
• • • • • • Put the cutlery in the cutlery basket with the sharp ends pointing down or put them in the cutlery drawer in a horizontal position with the sharp edges down. Do not leave the appliance with the open door unattended to avoid stepping accidentally onto it. Before any maintenance operation, deactivate the appliance and disconnect the mains plug from the socket. Do not use high pressure water sprays and/or steam to clean the appliance.
• • • • Do not drink and play with the water in the appliance. Do not remove the dishes from the appliance until the programme is complete. Some detergent may remain on the dishes. The appliance can release hot steam if you open the door while a programme operates. Do not put flammable products or items that are wet with flammable products in, near or on the appliance. SERVICE • Contact the Authorised Service Centre to repair the appliance. We recommend only the use of original spare parts.
CONTROL PANEL 2 1 5 1 On/off button 2 Programme indicators 3 4 4 Programme button 5 Delay button 3 Indicators INDICATORS End indicator. Salt indicator. It is always off while the programme operates. Rinse aid indicator. It is always off while the programme operates. PROGRAMMES Consumption values 1) Programme Degree of soil Type of load Programme phases Duration (min) 2) Energy (kWh) Water (l) Normal soil Crockery and cutlery • • • • Pre-wash Wash 50 °C Rinses Dry 227 1.
Consumption values 1) Programme Degree of soil Type of load Programme phases Duration (min) 3) 4) Fresh soil Crockery and cutlery • All Energy (kWh) Water (l) 30 0.8 10 • Wash 60 °C or 65 °C Rinses • Pre-wash 14 0.1 5 1) The pressure and the temperature of the water, the variations of the mains supply, the options and the quantity of dishes can change the values.
• The activation or the deactivation of the acoustic signal for the end of programme. • The activation or the deactivation of AirDry. As the appliance stores the saved settings, there is no need to configure it before every cycle. ADJUSTING THE WATER SOFTENER 1. While the appliance is in user mode, wait until the indicators • The indicator and are off. still flashes. • The current setting is indicated by the number of flashes of the indicator (e.g. 5 flashes + pause + 5 flashes... = level 5). 2.
ACTIVATING AIRDRY AirDry improves the drying results with less energy consumption. By default, AirDry is activated with all programmes excluding deactivate it. (if applicable) but it is possible to While the drying phase operates, the device opens the appliance door. The door is then kept ajar. While the appliance is in user mode, within about 5 seconds: 1. Press the programme button twice. • The indicators and • The indicator flashes. 2. Wait until the indicators are on. and are off.
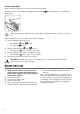
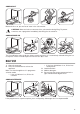
ADDING SALT Before the first use, put one litre of water in the salt container. CAUTION! Water and salt can come out of the salt container during filling. To prevent corrosion, start a programme immediately after filling the salt container. ADDING RINSE AID 1 43 21 A 2 The rinse aid helps to dry the dishes without streaks and stains. It is automatically released during the hot rinse phase. Fill the rinse aid dispenser when the lens (A) is clear. DAILY USE 1. Open the water tap. 2.
ADDING MULTI-TABLETS 1 30 20 2 • • Do not fill the salt container and the rinse aid dispenser. Set the rinse aid dispenser to the lowest position. SETTING AND STARTING A PROGRAMME Starting a programme 1. Keep the appliance door ajar. 2. Press the on/off button to activate the appliance. Make sure that the appliance is in programme selection mode. 3. Press the programme button until the indicator of the chosen programme is flashing. 4. Close the appliance door to start the programme. Option delay 1.
HINTS AND TIPS GENERAL The following hints will ensure optimal cleaning and drying results in daily use and also help to protect the environment. • Remove larger residues of food from the dishes into the waste bin. • Do not pre-rinse dishes by hand. When needed, use the prewash programme (if available) or select a programme with a prewash phase. • Always use the whole space of the baskets.
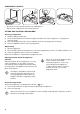
UNLOADING THE BASKETS 1. Let the tableware cool down before you remove it from the appliance. Hot items can be easily damaged. 2. First remove items from the lower basket, then from the upper basket. At the end of the program water can still remain on the sides and on the door of the appliance. CARE AND CLEANING WARNING! Before maintenance, deactivate the appliance and disconnect the mains plug from the main socket. Dirty filters and clogged spray arms decrease the washing results.
Follow carefully the instructions on the packaging of the product. TROUBLESHOOTING If the appliance does not start or it stops during operation, before you contact an Authorised Service Centre, check if you can solve the problem by yourself with the help of the information in the table. With some problems the end indicator flashes intermittently indicating a malfunction. The majority of problems that can occur can be solved without the need to contact an Authorised Service Centre.
Problem and alarm code Possible cause and solution The program lasts too long. • If the delayed start option is set, cancel the delay setting or wait for the end of the countdown. Small leak from the appliance door. • The appliance is not levelled. Loosen or tighten the adjustable feet (if applicable). The appliance door is not centred on the tub. Adjust the rear foot (if applicable). • The appliance door is difficult to close. • • Rattling/knocking sounds from inside the appliance.
Problem Possible cause and solution There are whitish streaks or bluish layers on glasses and dishes. • There are stains and dry water drops on glasses and dishes. • The dishes are wet. • • • • • • • The release quantity of rinse aid is too much. Adjust the rinse aid level to a lower level. The quantity of detergent is too much. The released quantity of rinse aid is not sufficient. Adjust the rinse aid level to a higher level. The quality of the rinse aid can be the cause.
Refer to "Before first use", "Daily use" or "Hints and tips" for other possible causes. TECHNICAL INFORMATION Dimensions Width / height / depth (mm) 596 / 818 - 898 / 550 Electrical connection 1) Voltage (V) 220 - 240 Frequency (Hz) 50 Water supply pressure Min. / max. bar (MPa) 0.5 (0.05) / 8 (0.8) Water supply Cold water or hot water 2) max 60 °C Capacity Place settings 13 Power consumption Left-on mode (W) 5.0 Power consumption Off-mode (W) 0.
INFORMATIONS DE SÉCURITÉ Avant d'installer et d'utiliser cet appareil, lisez soigneusement les instructions fournies. Le fabricant ne pourra être tenu pour responsable des blessures et dégâts résultant d'une mauvaise installation ou utilisation. Conservez toujours les instructions dans un lieu sûr et accessible pour vous y référer ultérieurement.
• • • • • • • Si le câble d'alimentation est endommagé, il doit être remplacé par le fabricant, un service de maintenance agréé ou un technicien qualifié afin d'éviter tout danger. Placez les couverts dans le panier à couverts, avec les extrémités pointues vers le bas, ou placez-les dans le bac à couverts en position horizontale, bords tranchants vers le bas. Ne laissez pas la porte de l'appareil ouverte sans surveillance pour éviter de vous prendre accidentellement les pieds dedans.
• • • Avant d'installer des tuyaux neufs, des tuyaux n'ayant pas servi depuis longtemps, lorsqu'une réparation a été effectuée ou qu'un nouveau dispositif a été installé (compteurs d'eau, etc.), laissez l'eau s'écouler jusqu'à ce qu'elle soit parfaitement propre et claire. Pendant et après la première utilisation de l'appareil, vérifiez qu'aucune fuite n'est visible. Si le tuyau d'arrivée d'eau est endommagé, fermez immédiatement le robinet d'eau et débranchez la fiche de la prise secteur.
BANDEAU DE COMMANDE 2 1 5 1 Touche Marche/Arrêt 2 Voyants de programme 3 4 4 Touche de programme 5 Touche Départ différé 3 Voyants VOYANTS Voyant de fin. Voyant du réservoir de sel régénérant. Ce voyant est toujours éteint pendant le déroulement du programme. Voyant du réservoir de liquide de rinçage. Ce voyant est toujours éteint pendant le déroulement du programme.
Valeurs de consommation 1) Programme 3) 4) Degré de salissure Type de vaisselle Phases du programme Durée (min) Normalement sale Vaisselle et couverts • • Vaisselle fraîchement salie Vaisselle et couverts • Tous Consommation électrique (kWh) Eau (l) Prélavage Lavage à 65 °C Rinçages Séchage 130 140 1.4 - 1.6 15-17 30 0.8 10 • Lavage à 60 °C ou 65 °C Rinçages • Prélavage 14 0.
FONCTION CANCEL Maintenez la touche de programme enfoncée jusqu'à ce que l'appareil se mette en mode Programmation. Avec cette fonction, vous pouvez annuler le programme en cours ou le départ différé. MODE UTILISATEUR Lorsque l'appareil est en mode Programmation : clignote et 1. Appuyez sur la touche de programme et maintenez-la enfoncée jusqu'à ce que le voyant que les voyants et s'allument. Réglages disponibles en mode utilisateur : • Le niveau de l'adoucisseur d'eau en fonction de la dureté de l'eau.
ACTIVATION DU SIGNAL SONORE DE FIN DE PROGRAMME Par défaut, ce signal sonore est désactivé, mais il est possible de l'activer. Lorsque l'appareil est en mode utilisateur, dans les 5 secondes : 1. Appuyez sur la touche de programme. • Les voyants et • Le voyant clignote. sont allumés. 2. Attendez que les voyants et s'éteignent. • Le voyant est éteint = le signal sonore est désactivé. 3. Appuyez sur la touche de programme pour modifier le réglage.
5. Lancez un programme pour éliminer tous les résidus qui peuvent toujours se trouver à l'intérieur de l'appareil. N'utilisez pas de produit de lavage et ne chargez pas les paniers. Lorsque vous démarrez un programme, l'appareil peut prendre 5 minutes pour recharger la résine dans l'adoucisseur d'eau. Pendant ce temps, l'appareil semble ne pas fonctionner. La phase de lavage ne démarre qu'une fois cette procédure achevée. La procédure sera répétée régulièrement.
AJOUT DE PRODUIT DE LAVAGE 1 A B 30 20 2 Si le programme comporte une phase de prélavage, versez également une petite quantité de produit de lavage dans le compartiment B. UTILISATION DE PASTILLES TOUT EN 1 1 30 20 2 • • Ne remplissez pas le réservoir de sel régénérant ni le distributeur de liquide de rinçage. Réglez le distributeur de liquide de rinçage sur le niveau le plus faible. RÉGLAGE ET DÉPART D'UN PROGRAMME Départ d'un programme 1. Laissez la porte de l'appareil entrouverte. 2.
Ne tentez pas de refermer la porte dans les 2 minutes suivant son ouverture automatique par la fonction AirDry car vous pourriez endommager l'appareil. Si par la suite vous refermez la porte pendant 3 minutes, le programme en cours se termine. Fin du programme Lorsque le programme est terminé, le voyant est allumé. 1. Appuyez sur la touche Marche/Arrêt ou ouvrez la porte pour éteindre l'appareil. 2. Fermez le robinet d'eau.
• N'utilisez que la quantité nécessaire de produit de lavage. Reportez-vous aux instructions figurant sur l'emballage du produit de lavage. QUE FAIRE SI VOUS NE VOULEZ PLUS UTILISER DE PASTILLES TOUT EN 1 Avant de commencer à utiliser le produit de lavage, le sel régénérant et le liquide de rinçage séparément, effectuez la procédure suivante. 1. Réglez l'adoucisseur d'eau sur le niveau maximal. 2. Assurez-vous que le réservoir de sel régénérant et le distributeur de liquide de rinçage sont pleins. 3.
NETTOYAGE DES FILTRES B A C • • • • Assurez-vous qu'il ne reste aucun résidu alimentaire ni salissure à l'intérieur ou autour du bord du collecteur d'eau. Remettez le filtre plat (C) en place. Assurez-vous qu'il soit correctement positionné entre les 2 guides. Remontez les filtres (A) et (B). Remettez le filtre (A) dans le filtre plat (C). Tournez-le vers la droite jusqu'à la butée. Une position incorrecte des filtres peut donner de mauvais résultats de lavage et endommager l'appareil.
Pour certains problèmes, le voyant de fin clignote pour indiquer un dysfonctionnement. La plupart des problèmes peuvent être résolus sans avoir recours au service aprèsvente agréé. Problème et code d'alarme L'appareil ne s'allume pas. Cause et solution possibles • • Le programme ne démarre pas. • • • L'appareil ne se remplit pas d'eau. • Le voyant Fin clignote une fois de façon intermittente. • Le signal sonore retentit 1 fois, de façon intermittente.
Problème et code d'alarme Cause et solution possibles Bruit de cliquetis ou de battement à l'intérieur de l'appareil. • • L'appareil déclenche le disjoncteur. • • Reportez-vous aux chapitres « Avant la première utilisation », « Utilisation quotidienne » ou « Conseils » pour connaître les autres causes probables. La vaisselle n'est pas correctement rangée dans les paniers. Reportez-vous au manuel de chargement du panier. Assurez-vous que les bras d'aspersion peuvent tourner librement.
Problème La vaisselle est mouillée. Cause et solution possibles • • • • • Pour de meilleures performances de séchage, activez l'option AirDry. Le programme ne contient pas de phase de séchage ou une phase de séchage à basse température. Le distributeur de liquide de rinçage est vide. Il se peut que la qualité du liquide de rinçage soit en cause. Il se peut que la qualité des pastilles tout en 1 soit en cause.
Reportez-vous aux chapitres « Avant la première utilisation », « Utilisation quotidienne » ou « Conseils » pour connaître les autres causes probables. CARACTÉRISTIQUES TECHNIQUES Dimensions Largeur / hauteur / profondeur (mm) 596 / 818 - 898 / 550 Branchement électrique 1) Tension (V) 220 - 240 Fréquence (Hz) 50 Pression de l'arrivée d'eau Min. / max. bar (MPa) 0.5 (0.05) / 8 (0.8) Arrivée d'eau Eau froide ou eau chaude 2) max.
СВЕДЕНИЯ ПО ТЕХНИКЕ БЕЗОПАСНОСТИ Перед установкой и эксплуатацией прибора внимательно ознакомьтесь с приложенным руководством. Производитель не несет ответственности за какие-либо травмы или ущерб, возникший вследствие неправильной установки или эксплуатации. Всегда храните данное руководство под рукой в надежном месте для последующего использования.
для использования клиентами отелей, мотелей минигостиниц типа «ночлег и завтрак» и других мест проживания. Не вносите изменения в параметры данного прибора. Рабочее давление воды (минимальное и максимальное) должно находиться в пределах 0.5 (0.05) / 8 (0.8) бар (МПа) Не превышайте максимальное количество 13 комплектов посуды. В случае повреждения шнура питания во избежание несчастного случая он должен быть заменен изготовителем, авторизованным сервисным центром или специалистом с аналогичной квалификацией.
• • • Следуйте приложенным к прибору инструкциям по его установке. Никогда не забывайте о мерах предосторожности при его перемещении: прибор имеет большой вес. Всегда используйте защитные перчатки и закрытую обувь. Убедитесь, что мебель над прибором и рядом с ним надежно закреплена. ПОДКЛЮЧЕНИЕ К ЭЛЕКТРОСЕТИ ВНИМАНИЕ! Существует риск пожара и поражения электрическим током. • • • • • • • • • Прибор должен быть заземлен.
ПАНЕЛЬ УПРАВЛЕНИЯ 2 1 5 1 Кнопка «Вкл/Выкл» 2 Индикаторы программ 3 4 4 Кнопка выбора программ 5 Кнопка отсрочки пуска 3 Индикаторы ИНДИКАТОРЫ Индикатор окончания. Индикатор отсутствия соли. Во время работы программы данный индикатор всегда погашен. Индикатор отсутствия ополаскивателя. Во время работы программы данный индикатор всегда погашен.
Показатели потребления 1) Программа Степень загряз‐ ненности Этапы программы Тип загрузки Продолжи‐ Энергопо‐ тельность требление (мин) (кВт·ч) Сильная за‐ грязненность Посуда, сто‐ ловые прибо‐ ры, кастрюли и сковороды • Обычная за‐ грязненность Посуда и сто‐ ловые прибо‐ ры • Свежее за‐ грязнение Посуда и сто‐ ловые прибо‐ ры • Все • • • • • • • 3) 4) • Вода (л) Предвари‐ тельная мой‐ ка Мойка, 70°C Ополаскива‐ ния Сушка 155 - 170 1.5 - 1.
ПАРАМЕТРЫ РЕЖИМ ВЫБОРА ПРОГРАММЫ Если мигает индикатор программ , это означает, что прибор находится в режиме выбора программы. После включения прибор по умолчанию переходит в режим выбора программы. В противном случае задайте режим выбора программы следующим образом: 1. Нажмите и удерживайте в течение 3 секунд кнопку программ. ФУНКЦИЯ CANCEL Нажмите и удерживайте кнопку программ, пока прибор не перейдет в режим выбора программы. Данная функция позволяет отменить выполняющуюся программу или отсрочку пуска.
ТАБЛИЦА ЖЕСТКОСТИ ВОДЫ Градусы по не‐ Градусы по фран‐ мецкому стан‐ цузскому стандарту дарту (°fH) (°dH) ммоль/л Градусы по шка‐ Уровень смягчи‐ ле Кларка теля для воды 47 -50 84 - 90 8.4 - 9.0 58 - 63 10 43 - 46 76 - 83 7.6 - 8.3 53 - 57 9 37 - 42 65 - 75 6.5 - 7.5 46 - 52 8 29 - 36 51 - 64 5.1 - 6.4 36 - 45 7 23 - 28 40 - 50 4.0 - 5.0 28 - 35 6 19 - 22 33 - 39 3.3 - 3.9 23 - 27 5 1) 15 - 18 26 - 32 2.6 - 3.2 18 - 22 4 11 - 14 19 - 25 1.9 - 2.
В ходе этапа сушки прибор приоткрывает дверцу. После этого дверца остается приоткрытой. Пока прибор находится в пользовательском режиме, произведите следующие действия примерно в течение 5 секунд: 1. Дважды нажмите на кнопку выбора программы. • Индикаторы • Индикатор и будут гореть. будет мигать. 2. Дождитесь, пока индикаторы и не погаснут. • Если светится индикатор = функция AirDry включена. 3. Для изменения установки нажмите кнопку программы. • Если индикатор выключен = функция AirDry выключена.
ДОБАВЛЕНИЕ СОЛИ Перед первым использованием налейте в емкость для соли один литр воды. ПРЕДУПРЕЖДЕНИЕ При заполнении емкости для соли из нее может вытечь вода с солью. Для предотвращения коррозии сразу после наполнения емкости для соли запустите какую-либо программу. ДОБАВЛЕНИЕ ОПОЛАСКИВАТЕЛЯ 1 43 21 A 2 Дозатор ополаскивателя способствует высушиванию посуды без образования потеков и пятен. Он автоматически срабатывает на этапе ополаскивания горячей водой.
ДОБАВЛЕНИЕ МОЮЩЕГО СРЕДСТВА 1 A B 30 20 2 Если в программе мойки предусмотрен этап предварительной мойки, добавьте немного моющего средства в отделение B. ДОБАВЛЕНИЕ ТАБЛЕТИРОВАННОГО МОЮЩЕГО СРЕДСТВА 1 30 20 2 • • Не наполняйте емкость для соли и дозатор ополаскивателя. Выберите минимальный уровень дозатора ополаскивателя. НАСТРОЙКА И ЗАПУСК ПРОГРАММЫ Запуск программы 1. Приоткройте дверцу прибора. 2. Включите прибор нажатием на кнопку «Вкл/Выкл».
Не пытайтесь закрыть дверцу прибора в течение 2 минут после того как AirDry автоматически ее откроет; это может привести к повреждению прибора. Если в дальнейшем закрыть дверцу еще на 3 минуты, выполняемая программа будет завершена. Окончание программы . По завершении программы высвечивается индикатор 1. Выключите прибор нажатием на кнопку «Вкл/Выкл» или открыванием дверцы. 2. Закройте водопроводный вентиль. Через 5 минут отсутствия активности прибор переходит в режим ожидания, а все индикаторы гаснут.
• • • (порошок, гель или таблетки без дополнительных составляющих), и отдельно – ополаскиватель и соль. Не реже одного раза в месяц запускайте прибор с очищающим средством, специально предназначенным для этой цели. Таблетированные моющие средства не успевают полностью раствориться при использовании коротких программ. Для того, чтобы избежать образование на посуде осадка из моющего средства, рекомендуется использовать таблетки с длинными программами. Не превышайте указанную дозировку моющего средства. См.
Грязные фильтры засоренность разбрызгивателей приводит к ухудшению качества мойки. Периодически проверяйте состояние фильтров и, при необходимости, проводите их очистку. ОЧИСТКА ФИЛЬТРОВ B A C • • • • Убедитесь, что внутри или по краям отстойника нет остатков пищи или других загрязнений загрязнений. Установите его обратно в фильтр (С). Убедитесь, что он установлен правильно – под двумя направляющими. Соберите фильтры (А) и (В). Установите фильтр (А) в плоский фильтр (С).
ПОИСК И УСТРАНЕНИЕ НЕИСПРАВНОСТЕЙ Если прибор не запускается или останавливается во время работы, перед обращением в авторизованный сервисный центр убедитесь, что разрешить проблему самостоятельно при помощи информации, приведенной в Таблице, не удается. В случае ряда неисправностей прерывистое мигание индикатора окончания обозначает характер неисправности. Большинство возможных неполадок могут быть устранены без обращения в авторизованный сервисный центр.
Неисправность и код неисправности Возможная причина неисправности и способ ее устранения Сработала система защиты от пере‐ лива. • Три мигания индикатора оконча‐ ния цикла перемежаются с паузой. • Периодически выдаются 3 звуко‐ вых сигнала. • Закройте водопроводный вентиль и обрат‐ итесь в авторизованный сервисный центр. Во время выполнения цикла прибор останавливает и возобновляет работу чаще обычного. • Это нормально. Так обеспечиваются опти‐ мальные результаты мойки и экономия элек‐ троэнергии.
РЕЗУЛЬТАТЫ МОЙКИ И СУШКИ НЕУДОВЛЕТВОРИТЕЛЬНЫ Неисправность Неудовлетворительные ре‐ зультаты мойки. Возможная причина неисправности и способ ее устране‐ ния • • • Неудовлетворительные ре‐ зультаты сушки. • • • • • Имеются белесые потеки или синеватый налет на стеклян‐ ной посуде и тарелках. • Имеются пятна и потеки на стекле и посуде. • Посуда остается влажной. • • • • • • • 48 См. Главы «Ежедневное использование», «Указания и рекомендации» и брошюру, описывающую загрузку корзин.
Неисправность На столовых приборах имеются следы ржавчины. По окончании программы в дозаторе находятся остатки моющего средства. Возможная причина неисправности и способ ее устране‐ ния • • • • • В воде, используемой для мойки, слишком высоко со‐ держание солей. См. Главу «Смягчитель для воды». Столовые приборы из серебра и нержавеющей стали оказались рядом друг с другом. Избегайте ситуаций, в которых изделия из серебра и нержавеющей стали могли бы оказаться рядом друг с другом.
ТЕХНИЧЕСКИЕ ДАННЫЕ Габаритные размеры Ширина /высота / глубина (мм) 596 / 818 - 898 / 550 Подключение к электросе‐ ти 1) Напряжение (В) 220 - 240 Частота (Гц) 50 Давление в водопроводной сети Мин. / макс. бар (МПа) 0.5 (0.05) / 8 (0.8) Водоснабжение Холодная или горячая во‐ да 2) макс. 60°C Вместимость Комплектов посуды 13 Потребляемая мощность При оставлении во вклю‐ ченном состоянии (Вт) 5.0 Потребляемая мощность В отключенном состоянии (Вт) 0.
156922890-A-322017 WWW.ZANUSSI.