User manual Dishwasher ZDF 312
Thank you for selecting our appliance We wish you lots of enjoyment with your new appliance and we hope that you will consider our brand again when purchasing household appliances. Please read this user manual carefully and keep it throughout the product life cycle as a reference document. The user manual should be passed on to any future owner of the appliance.
Safety information In the interest of your safety and to ensure the correct use, before installing and first using the appliance, read this user manual carefully, including its hints and warnings. To avoid unnecessary mistakes and accidents, it is important to ensure that all people using the appliance are thoroughly familiar with its operation and safety features.
Installation • Check your dishwasher for any transport damage. Never connect a damaged machine. If your dishwasher is damaged contact your supplier. • All packaging must be removed before use. • Any electrical and plumbing work required to install this appliance must be carried out by a qualified and competent person. • For safety reasons it is dangerous to alter the specifications or attempt to modify this product in any way.
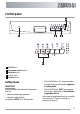
Control panel 1 2 3 4 5 On/Off button Programme selection buttons Delay start button Indicator lights Function buttons Setting mode IMPORTANT! Always remember that when performing operations as: – selecting a washing programme, – setting the water softener, the appliance MUST be in setting mode: • Press On/Off button, ALL programme selection button lights are illuminated = appliance in setting mode. • Press On/Off button, ONLY a programme button light is illuminated = last performed programme still set.
Function buttons In addition to the dishwashing programme selection, the following functions can also be set with the help of these buttons. – the setting of the water softener, – the cancelling of a programme in progress. Programme selection buttons • Starting the washing programme: 1. Press the On/Off button. 2. Press the button corresponding to the required programme, the corresponding light remains illuminated while the other programme lights turn off. 3.
Delay start button This option allows the start of the programme to be delayed by 3 or 6 hours. Before selecting the washing programme, press the On/Off button and then press the delay start button until the light corresponding to 3h or 6h illuminates. Press the button corresponding to the required washing programme, the countdown will start automatically after about 3 seconds. Once the countdown has elapsed the washing programme will start automatically. The delay start light will turn off.
Indicator lights Illuminates when rinse aid needs to be filled. Rinse aid 2) 1) As soon as you select a washing programme, the phase indicator lights for that programme will start flashing. As the programme starts, the phase indicator lights turn off except for the indicator light of the phase in progress which will remain lit with a static light. 2) The salt and rinse aid indicator lights are never illuminated while a washing programme is running even if filling with salt and rinse aid is necessary.
Programme Rinse and Hold Degree of soil Type of load Any. Partial load (to be completed later in the day). Programme description 1 cold rinse (to avoid food scraps from sticking together). This programme does not require the use of detergent. 1) Ideal for washing a partially loaded dishwasher. This is perfect daily programme, made to meet the needs of a family of 4 persons who only wish to load breakfast and dinner crockery and cutlery. 2) Test programme for test institutes.
Water hardness Adjusting the water hardness setting Use of salt °dH °TH mmol/l manually electronically 51 - 70 91 - 125 9,1 - 12,5 2 level 10 yes 43 - 50 76 - 90 7,6 - 8,9 2 level 9 yes 37 - 42 65 - 75 6,5 - 7,5 2 level 8 yes 29 - 36 51 - 64 5,1 - 6,4 2 level 7 yes 23 - 28 40 - 50 4,0 - 5,0 2 level 6 yes 19 - 22 33 - 39 3,3 - 3,9 2 level 5 yes 15 - 18 26 - 32 2,6 - 3,2 1 level 4 yes 11 - 14 19 - 25 1,9 - 2,5 1 level 3 yes 4 - 10 7 - 18 0,7 - 1,8 1
• The dishwasher must be switched off. Switch on the dishwasher by pressing the On/Off button. • Press and hold simultaneously function buttons B and C until the lights of function buttons A , B and C start flashing. • Release the buttons and then press function button A; the lights of function buttons B and C turn off while function button A goes on flashing. At the same time End of programme light starts to flash. The number of flashes of the End of programme light corresponds to the current level.
IMPORTANT! Immediately start a complete programme. IMPORTANT! Water will overflow from the container as salt is added. Remove any trace of salt. Replace the cap tightly turning it clockwise until it stops with a click. IMPORTANT! Top up the special salt when the light on the control panel illuminates. Filling with rinse aid Open the lid. Fill up with rinse aid. The Clean up any rinse aid maximum level for filling is which overflows. Close the lid and press until it indicated by "max" locks.
Adjusting the dosage of rinse aid Increase the dose if there are drops of water or lime spots on the dishes after washing. Open the lid. Reduce the dose if there are whitish streaks on the dishes or a bluish film on glassware or knife blades. Set the dosage level. (The Close the lid and press undose is factory set in po- til it locks. sition 4). Loading cutlery and dishes Sponges, household cloths and any object that can absorb water may not be washed in the dishwasher.
For washing in the dishwasher the following cutlery and dishes are not suitable: are of limited suitability: • Cutlery with wooden, horn, china or mother-of• Only wash stoneware in the dishwasher if it is pearls handles. specially marked as being dishwasher-safe by the manufacturer. • Plastic items that are not heat resistant. • Glazed patterns may fade if machine washed • Older cutlery with glued parts that are not temperafrequently. ture resistant.
The two rows of prongs on the lower basket can be easily lowered to allow you to load pots, pans and bowls. Load upper basket. Light items (plastic bowls etc.) must be loaded in the upper basket and arranged so they do not move. For taller items, the cup racks can be folded upwards. If plates are to be loaded in the upper basket: load them starting from the rear positions; tilting them slightly forwards and avoiding the front positions near the door.
To move to the higher position proceed as follows: 1. Pull out the basket until it stops. 2. Carefully lift both sides upwards until the mechanism is engaged and the basket is stable. To lower the basket to the original position proceed as follows: 1. Pull out the basket until it stops. 2. Carefully lift both sides upwards and then allow the mechanism to drop back down slowly, keeping hold of it.
For programmes with pre- When using detergent Close the lid. wash add an additional tablets: place detergent detergent dose in comtablets in compartment A. partmentB. "3 in 1 function" This appliance is equipped with the "3 in 1 function", that allows the use of the "3 in 1" combi detergent tablets. These products are detergents with a combined cleaning, rinsing and salt functions. They can also contain other different agents depending on which kind of tablets you choose ("3 in 1", "4 in 1", "5 in 1" etc.
function "indicator light illuminates. This means that the function is active. To deactivate the function press the same buttons again until the indicator light corresponding to the "3 in 1" symbol turns off. IMPORTANT! If the drying results are not satisfactory we suggest that you: 1. 2. 3. • Fill up the rinse aid dispenser with rinse aid. Activate the rinse aid dispenser. Set the rinse aid dosage to position 2.
Care and cleaning Cleaning the filters IMPORTANT! NEVER use the dishwasher without filters. Incorrect repositioning and fitting of the filters will produce poor washing results. Clean filters A, B and C Turn the handle about 1/4 Remove filter A from the thoroughly under running turn anticlockwise and re- base of the washing comwater. move filters B and C. partment.
use abrasive products, scouring pads or solvent (acetone, trichloroethylene etc....). Internal cleaning Ensure that the seals around the door, the detergent and rinse aid dispensers are cleaned regularly with a damp cloth. We recommend every 3 months to run the wash programme for heavy soiled dishes using detergent but without dishes. Prolonged periods of nonoperation If you are not using the machine for any prolonged period of time you are advised to: 1. Unplug the appliance and then turn off the water.
more detailed information about recycling of this product, please contact your local council, your household waste disposal service or the shop where you purchased the product. Something not working The dishwasher will not start or stops during operation. Certain problems are due to the lack of simple maintenance or oversights, which can be solved with the help of the indications described in the chart, without calling out an engineer.
Once these checks have been carried out; close the dishwasher’s door and switch on the appliance. Press the button of the programme that was running before the intervention of the alarm. The programme will continue from the point at which it was interrupted. If the malfunction or fault code reappears contact the Service Force Centre. For other fault codes not described in the above chart, please contact your Service Force Centre. Contact your local Service Force Centre, quoting the model (Mod.
Technical data Dimensions Width x Height x Depth (cm) Electrical connection Voltage - Overall power - Fuse Information on the electrical connection is given on the rating plate on the inner edge of the dishwasher’s door. 60,0 x 85,0 x 61,0 Water supply pressure Minimum - Maximum (MPa) 0,05 - 0,8 Capacity place settings 12 Max. weight kg 40,5 Noise level dB(A) 49 Consumption values iations of the power supply and the amount of dishes.
Test in accordance with EN 50242 must be carried out when the salt container and rinse aid dispenser have been filled with salt and rinse aid respectively and using the test programme (see "Consumption values").
WARNING! Only use, for connection to the water mains, new hose-set; old hose-set must not be reused. you should run the water for a few minutes before connecting the inlet hose. CAUTION! If the machine is connected to new pipes or pipes which have not been used for a long time, Inlet hose Connect the inlet hose to a water tap with an external thread of 3/4”. The inlet hose can be turned either to the left or the right to suit the installation by means of the locknut.
If you use a drain hose extension the total length should not be longer than 4 metres. Likewise the internal diameter of the couplings used for connections to the waste outlet must be no smaller than the diameter of the hose provided. Electrical connection CAUTION! Safety standards require the appliance to be earthed. Prior to using the appliance for the first time, ensure that the rated voltage and type of supply on the rating plate match that of the supply where the appliance is to be installed.
Levelling Good levelling is essential for correct closure and sealing of the door. When the appliance is correctly levelled, the door will not catch on either side of the cabinet. Guarantee/Customer Service Belgium DECLARATION OF GUARANTEE TERMS. Our appliances are produced with the greatest of care. However, a defect may still occur. Our consumer services department will repair this upon request, either during or after the guarantee period.
7. The statutory warranty does not apply when defects are caused by: – a chemical or electrochemical reaction caused by water, – abnormal environmental conditions in general, – unsuitable operating conditions, – contact with harsh substances. 8. The guarantee does not apply to defects due to transport which have occurred outside of our responsibility.
Belgium Electrolux Home Products Consumer services Belgium ELECTROLUX SERVICE Bergensesteenweg 719 1502 Lembeek Tel.: Fax.: 02/363.04.44 02/363.04.00 02/363.04.60 Tel.: Fax.: 00 352 42 431-1 00 352 42 431-360 E-mail: consumer.services@electrolux.be Luxembourg Grand-Duché de Luxembourg ELECTROLUX HOME PRODUCTS Rue de Bitbourg. 7 L-1273 Luxembourg-Hamm Consumer services E-mail: consumer-service.luxembourg@electrolux.
www.electrolux.com Albania +35 5 4 261 450 Rr. Pjeter Bogdani Nr. 7 Tirane Belgique/België/Belgien +32 2 363 04 44 Bergensesteenweg 719, 1502 Lembeek Česká republika +420 2 61 12 61 12 Budějovická 3, Praha 4, 140 21 Danmark +45 70 11 74 00 Sjællandsgade 2, 7000 Fredericia Deutschland +49 180 32 26 622 Muggenhofer Str. 135, 90429 Nürnberg Eesti +37 2 66 50 030 Pärnu mnt. 153, 11624 Tallinn España +34 902 11 63 88 Carretera M-300, Km. 29,900 Alcalá de Henares Madrid France www.
Portugal +35 12 14 40 39 39 Quinta da Fonte - Edificio Gonçalves Zarco - Q 35 -2774-518 Paço de Arcos Romania +40 21 451 20 30 Str. Garii Progresului 2, S4, 040671 RO Schweiz - Suisse - Svizzera +41 62 88 99 111 Industriestrasse 10, CH-5506 Mägenwil Slovenija +38 61 24 25 731 Gerbičeva ulica 98, 1000 Ljubljana Slovensko +421 2 43 33 43 22 Electrolux Slovakia s.r.o., Electrolux Domáce spotrebiče SK, Seberíniho 1, 821 03 Bratislava Suomi www.electrolux.
www.electrolux.