EN User Manual Cooker ZCV68330WA ZCV68330XA
Contents Safety information Safety instructions Product description Before first use Hob - Daily use Hob - Hints and tips Hob - Care and cleaning 2 3 6 7 7 8 8 Oven - Daily use Oven - Clock functions Oven - Hints and tips Oven - Care and cleaning Troubleshooting Installation 8 11 11 17 19 20 Subject to change without notice. Safety information Before the installation and use of the appliance, carefully read the supplied instructions.
• • • • • • • • • • • • Unattended cooking on a hob with fat or oil can be dangerous and may result in fire. Never try to extinguish a fire with water, but switch off the appliance and then cover flame e.g. with a lid or a fire blanket. Do not store items on the cooking surfaces. Do not use a steam cleaner to clean the appliance. Metallic objects such as knives, forks, spoons and lids should not be placed on the hob surface since they can get hot.
• Make sure to install a stabilizing means in order to prevent tipping of the appliance. Refer to Installation chapter. Electrical Connection WARNING! Risk of fire and electrical shock. • • • • • • • • • • • • • All electrical connections should be made by a qualified electrician. The appliance must be earthed. Make sure that the electrical information on the rating plate agrees with the power supply. If not, contact an electrician. Always use a correctly installed shockproof socket.
• • • • Do not activate the cooking zones with empty cookware or without cookware. Do not put aluminium foil on the appliance or directly on the bottom of the appliance. Cookware made of cast iron, aluminium or with a damaged bottom can cause scratches. Always lift these objects up when you have to move them on the cooking surface. This appliance is for cooking purposes only. It must not be used for other purposes, for example room heating.
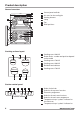
Product description General overview 1 2 3 6 3 2 1 4 1 2 3 4 5 6 Control panel and hob Air vents for the cooling fan Heating element Lamp Fan Shelf positions 3 4 5 4 3 2 1 5 Cooking surface layout 1 1 Cooking zone 1200 W 2 Steam outlet - number and position depend on the model 3 Cooking zone 1700 W 4 Cooking zone 1200 W 5 Residual heat indicator 6 Cooking zone 1700 W 3 2 145 mm 180 mm 180 mm 145 mm 6 5 4 Cooker control panel 1 2 7 6 3 4 5 1 6 Knobs for the hob Knob for the top ov
the top oven Accessories • • • Wire shelf For cookware, cake tins, roasts. Grill- / Roasting pan To bake and roast or as pan to collect fat. Trivet For roasting and grilling. Use the trivet only with the Grill- / roasting pan. Before first use Preheating WARNING! Refer to Safety chapters. Initial Cleaning Remove all accessories from the appliance. Refer to "Care and cleaning" chapter. Clean the appliance before first use. Put the accessories back to their initial position.
Residual heat indicator WARNING! The indicator comes on when a cooking zone is hot. There is a risk of burns from residual heat. Hob - Hints and tips WARNING! • The bottom of the pans and cooking zones must have the same dimension. Refer to Safety chapters. Cookware Examples of cooking applications The bottom of the cookware must be as thick and flat as possible.
Activating and deactivating the top / main oven It depends on the model if your appliance has knob symbols, indicators or lamps: • The indicator comes on when the oven heats up. • The lamp comes on when the oven operates. • The symbol shows whether the knob controls one of the cooking zones, the oven functions or the temperature. 1. Turn the knob for the top / main oven functions to select an oven function. 2. Turn the knob for the temperature to select a temperature. 3.
Symbol Oven function Application Conventional Cooking To bake and roast food on 1 shelf position. Thermaflow® To bake on up to 2 shelf positions at the same time and to dry food. Set the temperature 20 - 40 °C lower than for Conventional Cooking. Thermal Grilling To roast larger meat joints or poultry with bones on 1 shelf position. Also to make gratins and to brown.
Oven - Clock functions Display A B C A) Minute minder indicator B) Time display C) Time of day indicator Buttons Button Function Description MINUS To set the time. CLOCK To set a clock function. PLUS To set the time. Setting the Minute Minder Cancelling the clock functions Use this function to set a countdown time. The maximum time you can set is 2 hours 30 minutes. This function has no effect on the operation of the oven. 1.
Main oven • The main oven is particularly suitable for cooking larger quantities of food. Baking • Your oven can bake or roast differently to the appliance you had before. Adapt your usual settings (temperature, cooking times) and shelf positions to the values in the tables. The manufacturer recommends that you use the lower temperature the first time. If you cannot find the settings for a special recipe, look for the one that is almost the same.
Conventional Baking - Top Oven Food Temperature (°C) Time (min) Shelf position Biscuits 170 - 190 10 - 20 2 Bread 200 - 220 30 - 35 2 Bread rolls / buns 200 - 220 10 - 15 2 Cakes: Small & Queen 160 - 180 18 - 25 2 Cakes: Sponges 160 - 175 20 - 30 2 Cakes: Victoria Sandwich 160 - 170 18 - 25 2 Cakes: Madeira 140 - 150 75 - 90 2 Cakes: Rich Fruit 140 - 150 120 - 150 2 Cakes: Gingerbread 140 - 150 80 - 90 2 Cakes: Meringues 90 - 100 150 - 180 2 Cakes: Flapjack 160 -
Food Temperature (°C) Time (min) Shelf position Vegetables: Baked Jacket Potatos 180 - 190 60 - 90 2 Vegetables: Roast Potatos 180 - 190 60 - 90 2 Yorkshire Pudding Large 220 - 210 25 - 40 2 Yorkshire Pudding Individual 210 - 220 15 - 25 2 Roasting Meat, Poultry Refer to the Roasting table.
Thermaflow® Baking - Main Oven Shelf positions are not critical but ensure that the oven accessories are evenly spaced when more than one is used.
Food Temperature (°C) Time (min) Plate Tart 180 - 200 Pizza, frozen Follow manufacturer`s instructions 3 Pizza, home made 200 - 230 15 - 25 2 Quiches/Tarts 180 - 200 30 - 50 2 Roasting • • Use heat-resistant ovenware to roast (refer to the instructions of the manufacturer). You can roast large roasting joints directly in the deep pan (if present) or on the wire shelf above the deep pan. Roast lean meats in the roasting tin with the lid. This keeps the meat more succulent.
Grilling in general • WARNING! Always preheat an empty oven with the grill functions for 5 minutes. Always grill with the oven door closed. • • • • • Always grill with the maximum temperature setting. Set the shelf into the shelf position as recommended in the grilling table. Always set the deep pan to collect the fat into the first shelf position. Set the deep pan and the trivet as recommended in the grilling table. Grill only flat pieces of meat or fish.
Notes on cleaning • • • • • • Clean the front of the appliance with a soft cloth with warm water and a cleaning agent. To clean metal surfaces, use a usual cleaning agent. Clean the appliance interior after each use. Fat accumulation or other food remains may result in a fire. The risk is higher for the grill pan. Clean stubborn dirt with a special oven cleaner. Clean all accessories after each use and let them dry. Use a soft cloth with warm water and a cleaning agent.
Removing and cleaning the door glasses - main oven To replace the glass panels, do the same steps in reverse. Before you lower the trim, attach the A trim part to the door. Refer to the image. The door glass in your product can be different in type and shape from the example you see in the image. The number of glasses can also be different. Replacing the lamp 1. Push the door trim at one side to remove it. Put a cloth on the bottom of the interior of the appliance.
Problem Possible cause Remedy The oven does not heat up. The oven is deactivated. Activate the oven. The oven does not heat up. The clock is not set. Set the clock. The oven does not heat up. The necessary settings are not set. Make sure that the settings are correct. The lamp does not operate. The lamp is defective. Replace the lamp. The display shows "12.00". There was a power cut. Reset the clock. Steam and condensation settle on the food and in the cavity of the oven.
Minimum distances Dimension mm A 2 B 685 Levelling of the appliance Make sure that the surface behind the appliance is smooth. 2. Put the appliance in the middle of the space between the cupboards. If the space is larger than the width of the appliance, you must adjust the side measurement. 3. Install the anti-tilt protection (A) approximately 77 mm below the top surface of the appliance and 50 mm from the left or right side of the appliance into the circular hole on the bracket.
To open the cover of terminal board obey the procedure in opposite sequence. Terminal board L L N N N Do not remove blanking plates. Make sure that the links are fitted as shown. ENVIRONMENTAL CONCERNS Recycle the materials with the symbol . Put the packaging in applicable containers to recycle it. Help protect the environment and human health and to recycle waste of electrical and electronic appliances. Do not dispose appliances marked with the symbol with the household waste.
www.zanussi.
867307274-A-212014 www.zanussi.