EN User Manual Cooker ZCV664FPB ZCV664FPW ZCV664FPX
Contents Safety information Safety instructions Product description Before first use Hob - Daily use Hob - Hints and tips Hob - Care and cleaning 2 4 6 7 8 8 9 Oven - Daily use Oven - Clock functions Oven - Hints and tips Oven - Care and cleaning Troubleshooting Installation Energy efficiency 9 12 12 18 20 21 23 Subject to change without notice. Safety information Before the installation and use of the appliance, carefully read the supplied instructions.
• • • • • • • • • • • • • • • • • This appliance is intended for use up to an altitude of 2000 m above sea level. This appliance is not intended to be used on a ships, boats or vessels. Do not install the appliance behind a decorative door in order to avoid overheating. Do not install the appliance on a platform. Do not operate the appliance by means of an external timer or separate remote-control system. WARNING: Unattended cooking on a hob with fat or oil can be dangerous and may result in fire.
• • • • • If the mains power supply cable is damaged, it must be replaced by the manufacturer, its Authorised Service Centre or similarly qualified persons to avoid an electrical hazard. Use only the food sensor (core temperature sensor) recommended for this appliance. To remove the shelf supports first pull the front of the shelf support and then the rear end away from the side walls. Install the shelf supports in the opposite sequence.
• • • • Do not pull the mains cable to disconnect the appliance. Always pull the mains plug. Use only correct isolation devices: line protecting cut-outs, fuses (screw type fuses removed from the holder), earth leakage trips and contactors. The electrical installation must have an isolation device which lets you disconnect the appliance from the mains at all poles. The isolation device must have a contact opening width of minimum 3 mm.
• • • • • Clean regularly the appliance to prevent the deterioration of the surface material. Make sure the cavity and the door are wiped dry after each use. Steam produced during the operation of the appliance condensates on cavity walls and can cause corrosion. To decrease the condensation operate the appliance for 10 minutes before cooking. Clean the appliance with a moist soft cloth. Only use neutral detergents. Do not use any abrasive products, abrasive cleaning pads, solvents or metal objects.
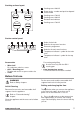
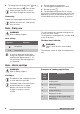
Cooking surface layout 1 145 mm 180 mm 180 mm 6 1 Cooking zone 1200 W 2 Steam outlet - number and position depend on the model 3 Cooking zone 1700 W 4 Cooking zone 1200 W 5 Residual heat indicator 6 Cooking zone 1700 W 3 2 145 mm 5 4 Cooker control panel 1 2 3 4 6 1 5 Knobs for the hob Knob for the top oven functions Electronic programmer Knob for the main oven functions Temperature indicator / symbol for the main oven 6 Temperature indicator / symbol for the top oven 1 2 3 4 5 Accessori
2. To change the time of day, press and at the same time until starts to flash. When the timer function is active, you cannot change the current time. Preheating 1. Set the maximum temperature. 2. Let the appliance operate for 1 hour. 3. Set the function . 4. Let the appliance operate for 15 minutes. Accessories can become hotter than usual. The appliance can emit an odour and smoke. This is normal. Make sure that the airflow is sufficient. Preheat the empty appliance before first use.
Hob - Care and cleaning WARNING! Refer to Safety chapters. General information • • • • • Clean the hob after each use. Always use cookware with clean bottom. Scratches or dark stains on the surface have no effect on how the hob operates. Use a special cleaner applicable for the surface of the hob. Use a special scraper for the glass. Cleaning the hob • • • the dirt can cause damage to the hob. Take care to avoid burns.
Symbol 100 - 250 Oven function Application Oven Lamp To activate the lamp without a cooking function. Defrost This function can be used for defrosting frozen foods, such as vegetables and fruits. The defrosting time depends on the amount and size of the frozen food. Thermaflow® To bake on up to two shelf positions at the same time and to dry food. Set the temperature 20 - 40 °C lower than for Conventional Cooking.
If the meat is not cooked to your satisfaction, do the above steps again and set a higher core temperature. • You can change the temperature at any time during the cooking. Press the button and then again to change the set core temperature. or WARNING! Be careful when you remove the tip and plug of the core temperature sensor. The core temperature sensor is hot. There is a risk of burns. Inserting the oven accessories Deep pan: Push the deep pan between the guide bars of the shelf support.
Oven - Clock functions Display A B C D A. B. C. D. Minute minder indicator Time display Time of day indicator Core temperature sensor indicator Buttons Button Function Description MINUS To set the time. PLUS To set the time. Setting the Minute Minder To cancel the Minute Minder function press Press or again and again to set the necessary time. The Minute Minder starts automatically after 5 seconds. When the set time is completed, an acoustic signal sounds. Press any button to stop the signal.
setting. The differences equalize during the baking procedure. • Trays in the oven can twist during baking. When the trays become cold again, the distortions disappear. Tips on baking Baking results Possible cause Remedy The bottom of the cake is not browned sufficiently. The shelf position is incorrect. Put the cake on a lower shelf. The cake sinks and becomes soggy, lumpy or streaky. The oven temperature is too high. The next time you bake, set a slightly lower oven temperature.
Food Temperature (°C) Time (min) Shelf position Cakes: Rich Fruit 140 - 150 120 - 150 2 Cakes: Gingerbread 140 - 150 80 - 90 2 Cakes: Meringues 90 - 100 150 - 180 2 Cakes: Flapjack 160 - 170 25 - 30 2 Cakes: Shortbread 130 - 150 45 - 60 2 Cakes: Apple Pie 170 - 180 50 - 60 2 Casseroles: Beef / Lamb 160 - 170 150 - 180 2 Casseroles: Chicken 160 - 180 80 - 90 2 Convenience Foods Follow manufacturer`s instructions.
Thermaflow® Baking - Main Oven Shelf positions are not critical but ensure that the oven accessories are evenly spaced when more than one is used.
• To keep meat more succulent: – roast lean meat in the roasting tin with the lid or use roasting bag. – baste large roasts and poultry with their juices several times during roasting. Thermaflow® - Main Oven Roasting Food Temperature (°C) Time (min) Beef / Beef boned 170 - 190 20 - 35 minutes per 0.5 kg (1 lb) and 20 - 30 minutes over Mutton / Lamb 170 - 190 20 - 35 minutes per 0.5 kg (1 lb) and 25 - 35 minutes over Pork / Veal / Ham 170 - 190 30 - 40 minutes per 0.
Pork Food Food core temperature (°C) Shelf position Roast pork 80 2-3 Neck fillets 75 - 80 2-3 Ham 70 - 75 1-2 Poultry Food Turkey breast Food core temperature (°C) 75 - 80 Grilling in general Shelf position 2-3 • Grill only flat pieces of meat or fish. WARNING! Always grill with the oven door closed. • • • Always grill with the maximum temperature setting. Set the shelf into the shelf position as recommended in the grilling table.
Food Time (min) Shelf position Steaks: Well Done 12 - 15 3 Toasted Sandwiches 3-4 3 Defrost • • Remove the food packaging. Put the food on a plate. Do not cover it with a bowl or a plate. This can extend the defrost time. • Use the first shelf position. The one on the bottom. Oven - Care and cleaning WARNING! Refer to Safety chapters. Notes on cleaning • • • • • • Clean the front of the appliance with a soft cloth with warm water and a cleaning agent.
Removing the shelf supports To clean the oven, remove the shelf supports. 1 1. Pull the front of the shelf support away from the side wall. 2 1 2. Pull the rear end of the shelf support away from the side wall and remove it. 1 3. Pull the door trim to the front to remove it. 4. Remove the glass panels. To install the panels, do the same steps in reverse.
Replacing the lamp The back lamp Put a cloth on the bottom of the interior of the appliance. It prevents damage to the lamp glass cover and the cavity. WARNING! Danger of electrocution! Disconnect the fuse before you replace the lamp. The lamp and the lamp glass cover can be hot. The lamp glass cover is at the back of the cavity. 1. Turn the lamp glass cover counterclockwise to remove it. 2. Clean the glass cover. 3. Replace the oven lamp with a suitable 300 °C heat-resistant oven lamp.
Problem Possible cause Steam and condensation settle on the food and in the cavity of the oven. You left the dish in the oven for too long. Service data If you cannot find a solution to the problem yourself, contact your dealer or an Authorised Service Centre. Remedy Do not leave the dishes in the oven for longer than 15 - 20 minutes after the cooking process ends. The necessary data for the service centre is on the rating plate. The rating plate is on the front frame of the appliance cavity.
Levelling of the appliance Covering terminal board Use small feet on the bottom of appliance to set the appliance top surface level with other surfaces. • • Electrical installation WARNING! The manufacturer is not responsible if you do not follow the safety precautions from Safety chapters. This appliance is supplied without a main plug or a main cable. Applicable types of cables for different phases: Phase Min. size cable 1 3x6.0 mm² 3 with neutral 5x1.
Energy efficiency Product information for hob according to EU 66/2014 Model identification ZCV664FPB ZCV664FPW ZCV664FPX Type of hob Hob inside Freestanding Cooker Number of cooking zones 4 Heating technology Radiant Heater Diameter of circular cooking zones (Ø) Left front Left rear Right front Right rear 18.0 cm 14.5 cm 14.5 cm 18.0 cm Energy consumption per cooking zone (EC electric cooking) Left front Left rear Right front Right rear 177.3 Wh/kg 180.3 Wh/kg 180.3 Wh/kg 179.
Energy consumption with a standard load, fan-forced mode Top oven: not applicable Main oven: 0.91 kWh/cycle Number of cavities 2 Heat source Electricity Volume Top oven: 39 l Main oven: 77 l Type of oven Oven inside Freestanding Cooker Mass EN 60350-1 - Household electric cooking appliances - Part 1: Ranges, ovens, steam ovens and grills - Methods for measuring performance. ZCV664FPB 53.6 kg ZCV664FPW 53.3 kg ZCV664FPX 57.
www.zanussi.
www.zanussi.
www.zanussi.
867337685-A-222017 www.zanussi.