User Manual GETTING STARTED? EASY.
SAFETY INFORMATION Before the installation and use of the appliance, carefully read the supplied instructions. The manufacturer is not responsible for any injuries or damages that are the result of incorrect installation or usage. Always keep the instructions in a safe and accessible location for future reference. CHILDREN AND VULNERABLE PEOPLE SAFETY WARNING! Risk of suffocation, injury or permanent disability.
• • • • • • • • • • • • • • • • This appliance is not intended to be used on a ships, boats or vessels. Do not install the appliance behind a decorative door in order to avoid overheating. Do not install the appliance on a platform. Do not operate the appliance by means of an external timer or separate remote-control system. WARNING: Unattended cooking on a hob with fat or oil can be dangerous and may result in fire.
• • • • If the mains power supply cable is damaged, it must be replaced by the manufacturer, its Authorised Service Centre or similarly qualified persons to avoid an electrical hazard. To remove the shelf supports first pull the front of the shelf support and then the rear end away from the side walls. Install the shelf supports in the opposite sequence. The means for disconnection must be incorporated in the fixed wiring in accordance with the wiring rules.
• from the mains at all poles. The isolation device must have a contact opening width of minimum 3 mm. Fully close the appliance door, before you connect the mains plug to the mains socket. USE WARNING! Risk of injury and burns. Risk of electrical shock. • • • • • • • • This appliance is for household use only. Do not change the specification of this appliance. Make sure that the ventilation openings are not blocked. Do not let the appliance stay unattended during operation.
INTERNAL LIGHTING • WARNING! Risk of electric shock. • • • Use original spare parts only. DISPOSAL The type of light bulb or halogen lamp used for this appliance is for household appliances only. Do not use it for house lighting. Before replacing the lamp, disconnect the appliance from the power supply. Only use lamps with the same specifications. SERVICE • To repair the appliance contact an Authorised Service Centre. WARNING! Risk of injury or suffocation.
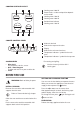
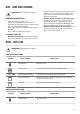
COOKING SURFACE LAYOUT 1 145 mm 1 Cooking zone 1200 W 2 Steam outlet - number and position depends on the model 3 Cooking zone 1700 W 3 2 180 mm 4 Cooking zone 1200 W 5 Residual heat indicator 6 Cooking zone 1700 W 180 mm 6 145 mm 5 4 COOKER CONTROL PANEL 1 2 3 6 4 1 5 ACCESSORIES • Wire shelf For cookware, cake tins, roasts. • Grill- / Roasting pan To bake and roast or as pan to collect fat.
Preheat the two ovens. Heat up one oven at a time. 1. Set the maximum temperature. 2. Let the appliance operate for 1 hour. 3. Set the function 4. Let the appliance operate for 15 minutes. Accessories can become hotter than usual. The appliance can emit an odour and smoke. This is normal. Make sure that the airflow is sufficient. . HOB - DAILY USE WARNING! Refer to Safety chapters.
HOB - CARE AND CLEANING WARNING! Refer to Safety chapters. GENERAL INFORMATION • Clean the hob after each use. • Always use cookware with a clean base. • Scratches or dark stains on the surface have no effect on how the hob operates. • Use a special cleaner suitable for the surface of the hob. • Use a special scraper for the glass. • • dirt can cause damage to the hob. Take care to avoid burns. Use a special hob scraper on the glass surface at an acute angle and move the blade on the surface.
Symbol 100 - 250 Oven function Application Oven Lamp To turn on the lamp without a cooking function. Defrost This function can be used for defrosting frozen foods, such as vegetables and fruits. The defrosting time depends on the amount and size of the frozen food. Thermaflow® To bake on up to three shelf positions at the same time and to dry food. Set the temperature 20 - 40 °C lower than for Conventional Cooking.
2. Put the deep pan into the oven on the necessary shelf position. You can use the trivet to grill flat dishes in large quantities and to toast. 1. Put the trivet into the deep pan so that the supports of the wire shelf point down. 2. Put the deep pan into the oven on the necessary shelf position. OVEN - CLOCK FUNCTIONS DISPLAY A B C A. Minute minder indicator B. Time display C. Time of day indicator BUTTONS Button Function MINUS To set the time. CLOCK To set a clock function.
OVEN - HINTS AND TIPS WARNING! Refer to Safety chapters. The temperature and baking times in the tables are guidelines only. They depend on the recipes and the quality and quantity of the ingredients used. Always preheat an empty oven at the temperature required for the food for 20 minutes before you start cooking. TOP OVEN The top oven is the smaller of the two ovens. It has 3 shelf positions. Use it to cook smaller quantities of food.
CONVENTIONAL BAKING - TOP OVEN Food Temperature (°C) Time (min) Shelf position Biscuits 170 - 190 10 - 20 2 Bread 200 - 220 30 - 35 2 Bread rolls / buns 200 - 220 10 - 15 2 Cakes: Small & Queen 160 - 180 18 - 25 2 Cakes: Sponges 160 - 175 20 - 30 2 Cakes: Victoria Sandwich 160 - 170 18 - 25 2 Cakes: Madeira 140 - 150 75 - 90 2 Cakes: Rich Fruit 140 - 150 120 - 150 2 Cakes: Gingerbread 140 - 150 80 - 90 2 Cakes: Meringues 90 - 100 150 - 180 2 Cakes: Flapjack 160 -
Food Temperature (°C) Time (min) Shelf position Vegetables: Roast Potatos 180 - 190 60 - 90 2 Yorkshire Pudding Large 220 - 210 25 - 40 2 Yorkshire Pudding Individual 210 - 220 15 - 25 2 Roasting Meat, Poultry Refer to the Roasting table. 2 THERMAFLOW® BAKING - MAIN OVEN Shelf positions are not critical but ensure that the oven accessories are evenly spaced when more than one is used.
ROASTING Use heat-resistant ovenware. Roast large roasting joints directly in the tray or on the wire shelf placed above the tray. Put some water in the tray to prevent the meat juices or fat from burning. Meat with crackling can be roasted in the roasting tin without the lid. Turn the roast after 1/2 - 2/3 of the cooking time. To keep meat more succulent: • roast lean meat in the roasting tin with the lid or use roasting bag.
Food Time (min) Shelf position Beefburgers 10 - 20 3 Chicken Joints 20 - 40 2 Chops - Lamb 15 - 25 2-3 Chops - Pork 20 - 25 2-3 Fish - Whole / Trout / Makarel 10 - 12 2 Fillets - Plaice / Cod 4-6 2 Kebabs 12 - 18 2-3 Kidneys - Lamb / Pig 6 - 10 2-3 Sausages 20 - 30 3 Steaks: Rare 4-6 3 Steaks: Medium 6-8 3 Steaks: Well Done 12 - 15 3 Toasted Sandwiches 3-4 3 DEFROST • Remove the food packaging. Put the food on a plate. • Do not cover it with a bowl or a plate.
1 2 2. Pull the rear end of the shelf support away from the side wall and remove it. 1 3. Pull the door trim to the front to remove it. 4. Remove the glass panels. To install the panels, do the same steps in reverse. 1 2 REMOVING AND CLEANING THE DOOR GLASSES - MAIN OVEN The door glass in your product can be different in type and shape from the example you see in the image. The number of glasses can also be different. Install the shelf supports in the opposite sequence.
REPLACING THE LAMP 1. Turn the lamp glass cover counterclockwise to remove it. 2. Clean the glass cover. 3. Replace the oven lamp with a suitable 300 °C heat-resistant oven lamp. Use the same oven lamp type. 4. Install the glass cover. WARNING! Risk of electric shock. The lamp can be hot. 1. Turn off the oven. Wait until the oven is cooled down. 2. Disconnect the oven from the mains. 3. Put a cloth on the bottom of the cavity. The back lamp The lamp glass cover is at the back of the cavity.
We recommend that you write the data here: Model (MOD.) ......................................... Product number (PNC) ......................................... Serial number (S.N.) ......................................... INSTALLATION WARNING! Refer to Safety chapters. LEVELLING OF THE APPLIANCE TECHNICAL DATA Dimensions Height 894 - 912 mm Width 550 mm Depth 600 mm LOCATION OF THE APPLIANCE You can install your freestanding appliance with cabinets on one or two sides and in the corner.
• bottom edge of the aperture, before you fix the two screws into the top edge of the mains terminal cover. Make sure that the cover is securely fastened. To open the cover of terminal board obey the procedure in opposite sequence. TERMINAL BOARD Do not remove blanking plates. COVERING TERMINAL BOARD Make sure that the links are fitted as shown. L • • L N N N The recommended cross-section area is six square millimetres (6 mm²).
• • • • If it is possible, always put the lids on the cookware. Before you activate the cooking zone put the cookware on it. The cookware bottom should have the same diameter as the cooking zone. Put the smaller cookware on the smaller cooking zones. • • Put the cookware directly in the centre of the cooking zone. Use the residual heat to keep the food warm or to melt it.
ENVIRONMENTAL CONCERNS with the symbol with the household waste. Return the product to your local recycling facility or contact your municipal office. Recycle materials with the symbol . Put the packaging in relevant containers to recycle it. Help protect the environment and human health by recycling waste of electrical and electronic appliances.
867337972-A-222018 WWW.ZANUSSI.