EN User manual Cooker ZCV560M
Contents Safety information _ _ _ _ _ _ _ _ _ _ _ _ _ _ Safety instructions _ _ _ _ _ _ _ _ _ _ _ _ _ _ Product description _ _ _ _ _ _ _ _ _ _ _ _ _ Before first use _ _ _ _ _ _ _ _ _ _ _ _ _ _ _ _ Hob - Daily use _ _ _ _ _ _ _ _ _ _ _ _ _ _ _ _ Hob - Helpful hints and tips _ _ _ _ _ _ _ _ _ Hob - Care and cleaning _ _ _ _ _ _ _ _ _ _ _ 2 3 6 7 7 7 8 Oven - Daily use _ _ _ _ _ _ _ _ _ _ _ _ _ _ _ 8 Oven - Helpful hints and tips _ _ _ _ _ _ _ _ _ 9 Oven - Care and cleaning _ _ _ _ _ _ _ _ _ 13 What to do
• Do not operate the appliance by means of an external timer or separate remote-control system. • Unattended cooking on a hob with fat or oil can be dangerous and may result in fire. • Never try to extinguish a fire with water, but switch off the appliance and then cover flame e.g. with a lid or a fire blanket. • Do not store items on the cooking surfaces. • Do not use a steam cleaner to clean the appliance.
• Do not let mains cables to come in touch with the appliance door, specially when the door is hot. • The shock protection of live and insulated parts must be fastened in such a way that it cannot be removed without tools. • Connect the mains plug to the mains socket only at the end of the installation. Make sure that there is access to the mains plug after the installation. • If the mains socket is loose, do not connect the mains plug. • Do not pull the mains cable to disconnect the appliance.
• • • • • • • • – Do not put aluminium foil directly on the bottom of the appliance. – do not put water directly into the hot appliance. – do not keep moist dishes and food in the appliance after you finish the cooking. – be careful when you remove or install the accessories. Discoloration of the enamel has no effect on the performance of the appliance. It is not a defect in the sense of the warranty law. Use a deep pan for moist cakes. Fruit juices cause stains that can be permanent.
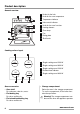
Product description General overview 1 2 5 3 Temperature indicator 4 Hob control indicator 6 5 Knob for the oven functions 6 Heating element 7 4 10 1 Knobs for the hob 2 Knob for the oven temperature 3 4 3 8 2 1 7 Oven lamp 8 Fan 9 Rating plate 10 Shelf levels 9 Cooking surface layout 1 2 140 180 mm mm 3 Single cooking zone 1200 W 4 Residual heat indicator 180 140 mm 5 mm 4 Oven accessories • Oven shelf For cookware, cake tins, roasts. • Flat baking tray For cakes and biscuits.
Before first use Warning! Refer to the Safety chapters. Caution! To open the oven door, always hold the handle in the centre. Initial Cleaning • Remove all parts from the appliance. • Clean the appliance before first use. Caution! Do not use abrasive cleaning agents! This can damage the surface. Refer to chapter "Care and Cleaning". 1. 2. 3. and the maximum temSet the function perature. Let the appliance operate for 45 minutes. . The maximum temperSet the function ature for this function is 210 °C. 4.
Examples of cooking applications Heat setting Use to: Time (min) Hints 1 Keep cooked food warm. as necessary Put a lid on the cookware. 1-2 Hollandaise sauce, melt: butter, chocolate, gelatine. 5 - 25 Mix from time to time. 1-2 Solidify: fluffy omelettes, baked eggs. 10 - 40 Put a lid on the cookware. 2-3 Simmer rice and milkbased dishes, heating up ready-cooked meals. 25 - 50 Add at least twice as much liquid as rice, mix milk dishes at some point during the procedure.
Activating and deactivating the appliance 1. Turn the oven functions control knob to an oven function. 2. Turn the temperature control knob to a temperature. The temperature indicator comes on while the temperature in the appliance increases. 3. To deactivate the appliance, turn the oven functions control knob and the temperature control knob to the Off position.
with aluminium foil when you cook. This can change the baking results and damage the enamel coating. Baking cakes • Preheat the oven for approximately 10 minutes before baking. • Do not open the oven door before 3/4 of the set cooking time is up. • If you use two baking trays at the same time, keep one level empty between them. Cooking meat and fish • Do not cook meat with weight below 1 kg. Cooking too small quantities makes the meat too dry.
Food Tray type and shelf level Preheating time (min) Temperature (°C) Cooking / baking time (min) Stuffed yeast cake (1200 g) enamelled tray at level 2 10 - 15 170 - 180 25 - 35 Pizza (1000 g) enamelled tray at level 2 10 - 15 200 - 220 30 - 40 Cheese cake (2600 g) enamelled tray at level 2 - 170 - 190 60 - 70 Swiss apple flan (1900 g) enamelled tray at level 1 10 - 15 200 - 220 30 - 40 Christmas cake (2400 g) enamelled tray at level 2 10 - 15 170 - 180 55 - 65 2) Quiche Lorrai
Food Tray type and shelf level Preheating time (minutes) Temperature (°C) Cooking / baking time (minutes) Flat cake (500 g) enamelled tray at level 2 10 150 - 160 30 - 35 Flat cake (500 + 500 g) enamelled tray at level 1 and 3 10 150 - 160 35 - 45 Flat cake (500 + 500 + 500 g) enamelled tray at level 1, 2 and 4 1) 10 155 - 165 40 - 50 Yeast cake with apples (2000 g) enamelled tray at level 3 - 170 - 180 40 - 50 Apple pie (1200 + 1200 g) 2 round aluminized trays (diameter: 20 cm) at
Tray type and shelf level Preheating time (minutes) Temperature (°C) Cooking / baking time (minutes) Peasant bread (750 + 750 g) 2 round aluminized trays (diameter: 20 cm) at level 1 15 - 20 3) 160 - 170 40 - 50 Romanian sponge cake (600 + 600 g) 2 round aluminized trays (diameter: 25 cm) at level 2 10 - 15 155 - 165 40 - 50 Romanian sponge cake - traditional (600 + 600 g) 2 round aluminized trays (diameter: 20 cm) at level 2 - 150 - 160 30 - 40 Yeast buns (800 g) enamelled tray at level
• To clean metal surfaces use a usual cleaning agent • Clean the oven interior after each use. Thus you can remove dirt more easily and it does not burn on. • Clean stubborn dirt with a special oven cleaner. • Clean all oven accessories (with a soft cloth with warm water and cleaning agent) after each use and let them dry. • If you have nonstick accessories, do not clean them using an aggressive agents, sharp edged objects or dishwasher.
6 Lift the inner door 7 Clean inner side of the door Clean the glass panel with water and soap. Dry it carefully. 3 2 2 Warning! Only clean the glass panel with water and a soap. Abrasive cleaning agents, stain removers and sharp objects (e.g. knives or scrapers) can cause damage to the glass. Inserting the door and the glass panel When the cleaning procedure is completed, insert the oven door. To do so, do the steps in opposite way. 4 6 5 5 Warning! Be careful when you change the oven lamp.
Problem Possible cause Remedy The appliance does not operate The fuse in the fuse box is released Control the fuse. If the fuse is released more than one time, refer to a qualified electrician.
4. the hole on the left side at the back of the appliance. See the illustration bellow. If you changed the dimensions of the cooker, you must align the non-tip device correctly. 80-85 mm Anti-tilt protection 317322 mm Warning! Install the anti-tilt protection to prevent the appliance to fall with incorrect loads. Important! If the space between the bench cupboards is larger than the width of the appliance, you must adjust the side measurement to center the appliance.
The power cable must not touch the part of the appliance shown in the illustration. Environment concerns The symbol on the product or on its packaging indicates that this product may not be treated as household waste. Instead it should be taken to the appropriate collection point for the recycling of electrical and electronic equipment.
www.zanussi.
892953685-A-432012 www.zanussi.