GB INSTRUCTIONS FOR THE USE AND CARE ZANUSSI MIXED FUEL COOKER ZCM 5200 W ZCM 5200 B Appliances class 2 sub class 1 and class 1 2
WARNINGS It is most important that this instruction book should be retained with the appliance for future reference. Should the appliance be sold or transferred to another owner, or should you move house and leave the appliance, always ensure that the book is supplied with the appliance in order that the new owner can be acquainted with the functioning of the appliance and the relevant warnings. THESE WARNINGS ARE PROVIDED IN THE INTEREST OF SAFETY.
CONTENTS Installation Technical Data Use and Care Use and Operation Cooking Chart Electronic Minute Minder Maintenance and Cleaning Removing the Oven Door Oven lamp replacement What Happens if Something Goes Wrong Zanussi Guarantee Conditions Page Page Page Page Page Page Page Page Page Page Page 4 5 5-6 7 10 13-14 15 17 17 18 19 Warning Please remember that an appliance used for cooking does get hot, so make sure that children are kept well away.
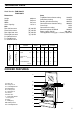
TECHNICAL DATA Model Number: ZCM 5200 W ZCM 5200 B Dimensions Height Depth Width Oven Capacity 900 mm 595 mm 597 mm 1.9 Cu. ft CHARACTERISTICS GROSS HEAT VALUE 37.
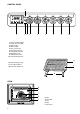
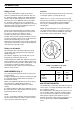
CONTROL PANEL 2 PUSH 1 1. 2. 3. 4. 5. 6. 7. 8. 9. 10. 150 BOTH 3 4 5 0 STOP SET TIME 20 + - 100 50 0 6 7 8 9 10 Electronic Minute Minder Thermostat control light Ignition button Mains-on light Oven selector knob Oven thermostat knob Semi-rapid burner knob Rapid burner knob Auxiliary burner knob Semi-rapid burner knob O O. Grill/roasting pan, large P. Reversible grill trivet Q. Removable handles (2) P Q OVEN R S T U V 6 R. S. T. U. V.
OPERATION Safety cut off Important Your cooker is fitted with a safety cut off device which is actuated when the lid is lowered. This cuts the electricity and gas supply to the whole appliance, and prevents the lid being lowered onto the burners when they are still on. When the lid is raised again, the electricity supply to the oven is automatically restored. The gas supply to the hob must be restored manually by depressing the pushbutton on the rear left hand corner of the hob surface.
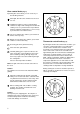
Oven control knob (Fig. 2) By turning this control knob, you can select any of the following functions: 0 Oven light, this will come on whenever the oven is in use. Traditional cooking, uses the top and bottom element for single shelf cooking; this function will enable you to use your favourite recipes without having to adapt the temperatures. It is necessary to pre-heat the oven in this instance. Top oven element only, enables you to finish off dishes on the top only.
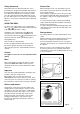
Safety thermostat Grease filter Should the main oven thermostat fail, the oven is protected by a safety thermostat which will operate if the temperature within the oven reaches too high a level. Once the temperature has returned to a safe level, the safety thermostat will switch back on and the oven will re-start. In cases where is a permanent failure it is necessary to contact the Zanussi Network Engineer.
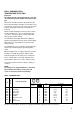
OVEN COOKING CHART Food to be cooked Quantity kg Cakes * Mixture in mould * Puff pastry, base * Mixture with rising agent * Small cakes * Victoria sandwich * Scones * Bread Meat Veal Beef Pork Chicken Chopped turkey Duck Stews Beef stew Veal stew Fish Dried cod, cod, sole Wrasse, sargo Oysters * Soufflè (sweet or savory) * Pizza Recommended level (starting from bottom) Temperature °C Time in minutes 1 2 1 2 2 2 1 2 (1and3) 2 (1and3) 2 (1and3) 2 (1and 3) 2 (1and3) 2 (1and3) 2 190 200 190 180 180 220
GRILL, ECONOMY GRILL TEMPERATURE SELECTION Important All grilling must be carried out with the oven door closed and the grill pan handle removed from the pan. Most foods should be placed on the grid in the grill pan to allow maximum circulation of air to lift the food out of the fats and juices. Food such as fish, liver and kidneys may be placed directly on the grill pan, if preferred Adjust the grid and grill pan runner position to allow for different thicknesses of food.
THERMAL GRILLING Use of thermal grilling Thermal grilling offers an alternative method of cooking food items normally associated with conventional grilling. The grill element and the oven fan operate alternately, circulating hot air around the food. The need to check and turn food is reduced. Thermal grilling helps to minimise cooking smells in the kitchen and allows you to grill with the oven door closed.
ELECTRONIC MINUTE MINDER 1. ( - ) Decrease control & minute minder setting button 2. ( + ) Increase control + ( ) Cookpot symbol SET TIME STOP ( ) PUSH BOTH CLOCK SETTING SYMBOL 1 PUSH BOTH 2 1. Set the time of day When the electricity supply is first switched ON, the display will flash 0.00. See Fig. 6.1. Press buttons (1) and (2) together. The display will momentarili read 88.88. See Fig. 6.2. Release buttons, 0.00 will appear in the display as Fig. 6.3. Within 5 seconds press button (2), 12.
2. The minute minder IMPORTANT The minute minder can be used to time a set cooking period. At the end of the cook time the minute minder will automatically switch off the oven if in use. The minute minder gives an audible reminder at the end of any period of cooking up to 23 hours and 59 minutes. To set, press button (1) and the display will read 0 . 00 , see Fig. 6.6. Release button (1) and press and hold button (2).
MAINTENANCE AND CLEANING Cleaning your gas hob The hob is best cleaned whilst it is still warm, as spillage can be removed more easily than if it is left to cool. The pan supports, burner caps and burner crowns can be lifted off for cleaning. Use hot detergent water and remove stubborn marks with a mild, non-scratch paste cleaner. A well moistened soap impregnated steel wool pad can be used with caution if the marks are particularly difficult to remove.
Oven Cavity The enamelled oven cavity is best cleaned whilst still warm. It is preferable/advisable to wipe the oven door with a soft cloth soaked in warm detergent water, after each use. However, occasionally, it will be necessary to do a more thorough cleaning using a proprietary oven cleaner. Do not use aerosol oven cleaners, abrasive scourers or steel wool. 'Stay Clean' oven lining This cooker is fitted with a set of coated liners. These are known as 'stay clean' or 'easy care'.
Removing the oven door (Fig. 11 & 12) Warning: It is important that the retaining discs are fully turned and located as the hinges are under high sprung tension. 1. Open the door completely so that it is in the horizontal position. 2. Raise the two bars. 3. Raise the door halfway. 4. At this stage, clasp the two hinges on either side of the door together simultaneously. The door can then be removed by pulling on and downwards., maintaining the angle. Fig. 11 FO 0417 Fig.
WHAT HAPPENS IF SOMETHING GOES WRONG If the appliance fails to operate: 1. If the oven does not come on, check that the programmer is properly set for manual operation, or that you have programmed any automatic cooking correctly. 2. Check that the hob cover, where present, is in the fully raised position. 3. Check that it is properly plugged in. If after all these checks, the oven still does not work, contact your local Zanussi Service Force Centre.
SERVICE AND SPARE PARTS CUSTOMER CARE If you require spare parts or an engineer contact your local Service Force Centre by telephoning: 0870 5 929929 Your call will be routed to your local Service Force Centre. For further details, please see the accompanying Customer Care Booklet.