EN User & Installation Manual Cooker ZCG91217XA 461308267_000 06-2013
IMPORTANT SAFETY INSTRUCTIONS You have purchased one of our products for which we thank you. We are confident that this new appliance, modern, functional and practical, made with top quality materials, will meet all your demands. This new appliance is easy to use but before installing and using it, it is important to read this handbook through carefully. It provides information for a safe installation, use and maintenance. Keep this handbook in a safe place for future reference.
IMPORTANT SAFETY INSTRUCTIONS • Before cooking for the first time, ensure the oven is empty and its door closed, heat the oven at maximum temperature for two hours. This will allow the protective coating on the interior of the oven to be burnt off and dissipate the associated smells. Ensure adequate ventilation in the kitchen whilst burning off and don’t be alarmed by a little bit of smoke during this process. • If the appliance is fitted with a glass lid, this can shatter when heated.
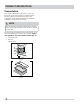
PRODUCT DESCRIPTION Presentation This cooker is fitted with a gas hob and a gas oven. Each knob on the front panel has a diagram printed above it showing to which burner it refers. The combination of the different sized burners offers the possibility of various types of cooking. NOTE When the appliance is provided with separate controls for the oven and grill burners, these cannot be used at the same time. The oven walls are fitted with various runners (fig.
PRODUCT DESCRIPTION Description of the controls C Hob gas burner knob (A) By rotating the knob in an anticlockwise direction, the following symbols appear: = Closed position = “Full on” position = “Reduced rate” position A Red warning light If present, when lit it indicates that one or more of the hob electric plates is on.
INSTRUCTIONS FOR THE USER Hob: general notes on safety When a gas cooker is being used it produces heat and humidity in the room where it is installed. For this reason the room must be well ventilated, keeping the natural ventilation openings free and switching on the mechanical aeration system (suction hood or electric fan, see the “Ventilation” and “Location and aeration” paragraphs).
INSTRUCTIONS FOR THE USER Oven: general safety instructions • Do not leave the oven unsupervised during use. Ensure that children do not play with the appliance. • Always keep the appliance lid open when using the oven, in order to prevent overheating. • Always grip the centre of the oven door when opening. Do not practice excessive pressures on the door when it is open. • Do not worry if condensation forms on the door and on the internal walls of the oven during cooking.
INSTRUCTIONS FOR THE USER How to use gas oven and grill The oven and grill burner are be fitted with a safety thermocouple so, once the burner has been lit, keep the knob pressed for about 15 seconds. If, at the end of this time, the burner fails to light, release the knob and wait at least 1 minute before trying again. Should the burner turn out accidentally, turn the knob round to the closed position and wait at least 1 minute before lighting it again.
INSTRUCTIONS FOR THE USER Useful cooking tips Cakes and bread: • Heat the oven for at least 15 minutes before you start cooking bread or cakes. • Do not open the door during baking because the cold air would stop the yeast from rising. • When the cake is cooked turn the oven off and leave it in for about 10 minutes. • Do not use the enamelled oven tray or drip pan, supplied with the oven, to cook cakes in.
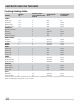
INSTRUCTIONS FOR THE USER Cooking/baking table FOODS CAKES Angel Cake Fruit Cake Almond Cake Chocolate Cake PASTRIES Biscuits in general Brioches Puff pastry Shortcrust pastry BAKED PASTE Lasagne Cannelloni PIZZA BREAD MEAT Roast beef Roast veal Roast lamb Roast pork GAME Roast hare Roast pheasant Roast partridge POULTRY Roast turkey Roast chicken Roast duck FISH Baked fish Casseroled fish Weight kg Position of the oven shelf from the bottom Temperature in °C Cooking time in minutes 0.8 0.8 0.8 0.
INSTRUCTIONS FOR THE USER Grilling table FOODS MEAT Chop Beefsteaks Half chicken (each half) FISH Trout Sole BREAD Toast SPIT CHICKEN Weight kg Position of the oven shelf from the bottom Cooking time in minutes 1st side 2nd side 0.50 0.15 1 4 4 4 15 5 25 15 5 25 0.42 0.20 4 4 18 10 18 10 4 2-3 2-3 1.3 60-80 The values given in the tables (temperatures and cooking times) are approximate and may vary according to each person’s cooking habits.
INSTRUCTIONS FOR THE USER • To reassemble proceed in the reverse order, paying attention to the correct position of sectors. Ud Replacing the oven lamp (fig.11) Ensure the appliance is switched off before replacing the lamp to avoid the possibility of electric shock. Bd In the event one or both oven lamps need replacing, the new lamps must comply with the following requisites: 15 W - 230 V~ - 50 Hz - E 14 - and must be resistant to high temperature (300°C). Fig.
INSTRUCTIONS FOR THE USER • Remove both side panels (PL) (fig.12). • Remove back panel by unscrewing respective locking screws (V) (fig. 13). • Repeat previous operations in reverse order to replace all elements. IMPORTANT Position both side panels (PL) by taking the locking pin (L) out of the hole (S) (fig. 12). PL S L P L S Fig. 12 D PL S L P L V S Fig. 13 Oven side-guide rails For an effective cleaning of the oven side-guide rails, these can be extracted unscrewing knurled nuts (G).
TECHNICAL FEATURES Burner disposition on the hob W Air Reg. Sleve Opening BY-Pass 1/100 mm Max “X”mm 1/100 mm 218 88 3000 3000 1800 Complete 44 131 117-Y 68 1800 1000 Complete 34 73 98-Z 51 1000 3800 Complete 28 276 75-X 98 3800 4800 Complete 65 364 135-K 108 4800 3400 3 55 247 161 92 142 3400 BURNERS Operating Pressure Gas Rate Diameter Injectors Sabaf Heat Input N.
BEFORE YOU CALL Some of the problems occur because of simple maintenance oversights or operation mistakes and can easily be resolved without having to call for technical assistance. PROBLEM The appliance is not working REMEDY • Make sure the gas cock is open • Check the plug is in • Check that the knobs are set correctly for cooking and then repeat the operations given in the handbook • Check the electrical system safety switches (RCD). If there is failure in the system call an electrician in.
INSTALLATION WARNING Always use safety gloves while handling the cooker • The installation, adjustments, conversions and maintenance operations listed in this part must only be carried out by qualified personnel. The manufacturer cannot be held responsible for any damage to persons or property resulting from an incorrect installation of the appliance. • The safety and automatic adjustment devices of the appliances may, during its life, only be modified by the manufacturer or duly authorised supplier.
INSTALLATION Ventilation The appliance should not be installed in a room of volume less than 20 m³. The quantity of air necessary is that required for a regular combustion of the gas and for the ventilation of the room. The natural flow of air must be direct through permanent openings in the walls of the room that open directly to the outside with a minimum cross section of 100 cm2 (fig. 15). These openings must be positioned so they cannot be obstructed. AIR INLET MIN. SECT. 100 cm2 Fig.
INSTALLATION Gas connection • with a copper pipe in accordance with the standard, whose joints must be made using sealed fittings in accordance with the standard. Before connecting the appliance check that the data on the rating plate affixed to the cooker, correspond to those of the gas mains. • with a flexible stainless steel, seamless pipe in accordance with the standard, with a maximum 2 metre extension and seals in accordance with the standard.
INSTALLATION CAUTION The hose must not be subject to any kind of torsional stress or tractive force, there must be no pinched parts or really sharp bends. CAUTION CAUTION This operation can be carried out also with the front panel fitted, but if the technician finds some difficulties to reach the adjustment screw, remove the front panel unscrewing the fixing screws, which are positioned in the inferior part of the same. It must not touch anything that can cut, that has sharp corners, etc.
INSTALLATION Gas information Replacing the injectors To tighten some components, see the information below: Our burners can be adapted to different types of gas by simply installing the injectors suitable for the gas you want to use. To help the installer, the table paragraph gives the burner nominal heat input, injector diameter and operating pressure of the different gas types.
INSTALLATION Maintenance • Reassemble all the parts following the same procedure but in the reverse order. Prior to any maintenance work or changing parts, disconnect the appliance from the gas and electricity power sources. Vt Vt Replacing the taps and thermostat Proceed in the following way when replacing a tap or the thermostat: • Remove pan supports, burner heads. Vb • Unscrew the burner fixing screws (Vc) (fig. 26). (four for ultrarapid burner and two for the other burners) Fig.
INSTALLATION Electrical connection Changing the flexible gas hose The electrical connection must be carried out in accordance with the current standards and laws in force. In order to guarantee that the gas hose is always in excellent condition we strongly recommend changing it on the date you will find printed on it.
ENVIRONMENT CONCERNS The appliance was designed and made in accordance with the European standards listed below: => EN 30-1-1, EN 30-2-1 and EN 437 plus subsequent amendments (gas) => EN 60 335-1 and EN 60 335-2-6 (electrical) plus relative amendments The appliance complies with the prescriptions of the European Directives as below: => 2006/95 EC concerning electrical safety (BT). => 2004/108 EC concerning electromagnetic compatibility (EMC) => 2009/142 EC concerning gas safety.
24
ﻣﺷﮑﻼﺕ ﻣﺣﻳﻁﯽ ﺍﻳﻥ ﺩﺳﺗﮕﺎﻩ ﺑﺎ ﺗﺑﻌﻳﺕ ﺍﺯ ﺍﺳﺗﺎﻧﺩﺍﺭﺩﻫﺎی ﺍﺭﻭﭘﺎﻳﯽ ﻓﻬﺭﺳﺕ ﺷﺩﻩ ﺩﺭ ﺯﻳﺭ ﻁﺭﺍﺣﯽ ﻭ ﺳﺎﺧﺗﻪ ﺷﺩﻩ ﺍﺳﺕ: =< EN 30-1-1ﻭ EN 30-2-1ﻭ EN 437ﺑﻪ ﻋﻼﻭﻩ ﺍﺻﻼﺣﻳﻪ ﻫﺎی ﺑﻌﺩی )ﻣﺭﺗﺑﻁ ﺑﺎ ﮔﺎﺯ( =< EN 60 335-1ﻭ ) EN 60 335-2-6ﺍﻟﮑﺗﺭﻳﮑﯽ( ﺑﻪ ﻋﻼﻭﻩ ﺍﺻﻼﺣﻳﻪ ﻫﺎی ﻣﺭﺗﺑﻁ ﺍﻳﻥ ﻭﺳﻳﻠﻪ ﺍﺯ ﺗﻭﺻﻳﻪ ﻫﺎی ﺑﻳﺎﻧﻳﻪ ﻫﺎی ﺍﺭﻭﭘﺎﻳﯽ ﻋﻧﻭﺍﻥ ﺷﺩﻩ ﺩﺭ ﺯﻳﺭ ﺗﺑﻌﻳﺕ ﻣﯽ ﮐﻧﺩ: =< 2006/95ﺑﻳﺎﻧﻳﻪ ﺍی ﺩﺭ ﺭﺍﺑﻁﻪ ﺑﺎ ﺍﻳﻣﻧﯽ ﺍﻟﮑﺗﺭﻳﮑﯽ ).(BT =< 2004/108ﺑﻳﺎﻧﻳﻪ ﺍی ﺩﺭ ﺭﺍﺑﻁﻪ ﺑﺎ ﺳﺎﺯﮔﺎﺭی ﺍﻟﮑﺗﺭﻭﻣﻐﻧﺎﻁﻳﺳﯽ )(EMC =< 2009/142ﺑﻳﺎﻧﻳﻪ ﺍی ﺩﺭ ﺭﺍﺑﻁﻪ ﺑﺎ ﺍﻳﻣﻧﯽ ﮔﺎﺯ.
ﻧﺻﺏ ﺍﺗﺻﺎﻝ ﻫﺎی ﺑﺭﻕ ﺗﻐﻳﻳﺭ ﺩﺍﺩﻥ ﺷﻠﻧﮓ ﮔﺎﺯ ﺍﻧﻌﻁﺎﻑ ﭘﺫﻳﺭ ﺍﺗﺻﺎﻝ ﺑﺭﻕ ﺭﺍ ﺑﺎﻳﺩ ﺑﺎ ﺗﻭﺟﻪ ﺑﻪ ﺍﺳﺗﺎﻧﺩﺍﺭﺩﻫﺎ ﻭ ﻗﻭﺍﻧﻳﻥ ﺍﺟﺭﺍﻳﯽ ﻣﻭﺟﻭﺩ ﺍﻧﺟﺎﻡ ﺩﻫﻳﺩ. ﺑﺭﺍی ﺍﻁﻣﻳﻧﺎﻥ ﺍﺯ ﺍﻳﻧﮑﻪ ﺷﻠﻧﮓ ﮔﺎﺯ ﻫﻣﻳﺷﻪ ﺩﺭ ﺑﻬﺗﺭﻳﻥ ﺷﺭﺍﻳﻁ ﺍﺳﺕ ،ﺗﻭﺻﻳﻪ ﻣﯽ ﮐﻧﻳﻡ ﮐﻪ ﺩﺭ ﺗﺎﺭﻳﺦ ﭼﺎپ ﺷﺩﻩ ﺑﺭ ﺭﻭی ﺷﻠﻧﮓ ،ﺁﻥ ﺭﺍ ﺗﻌﻭﻳﺽ ﮐﻧﻳﺩ. ﻗﺑﻝ ﺍﺯ ﺍﺗﺻﺎﻝ ،ﺑﺭﺭﺳﯽ ﮐﻧﻳﺩ ﮐﻪ: • ﻣﻳﺯﺍﻥ ﺁﻣﭘﺭ ﺳﻳﺳﺗﻡ ﻭ ﭘﺭﻳﺯﻫﺎی ﺑﺭﻕ ﺑﺭﺍی ﺣﺩﺍﮐﺛﺭ ﺗﻭﺍﻥ ﺩﺳﺗﮕﺎﻩ ﻣﻧﺎﺳﺏ ﺑﺎﺷﻧﺩ )ﺑﻪ ﺑﺭﭼﺳﺏ ﺍﻁﻼﻋﺎﺕ ﮐﻪ ﺩﺭ ﭘﺷﺕ ﺧﻭﺭﺍک ﭘﺯ ﻣﺗﺻﻝ ﺷﺩﻩ ﺍﺳﺕ ﻧﮕﺎﻩ ﮐﻧﻳﺩ(.
ﻧﺻﺏ ﻣﺭﺍﻗﺑﺕ ﻭ ﻧﮕﻬﺩﺍﺭی ﺍﺯ ﺩﺳﺗﮕﺎﻩ Vt ﻗﺑﻝ ﺍﺯ ﺍﻧﺟﺎﻡ ﻫﺭﮔﻭﻧﻪ ﻣﺭﺍﻗﺑﺕ ﻭ ﻧﮕﻬﺩﺍﺭی ﺍﺯ ﺩﺳﺗﮕﺎﻩ ﻳﺎ ﺗﻌﻭﻳﺽ ﻗﻁﻌﺎﺕ ،ﺍﺗﺻﺎﻝ ﺩﺳﺗﮕﺎﻩ ﺭﺍ ﺍﺯ ﮔﺎﺯ ﻭ ﻣﻧﺑﻊ ﺑﺭﻕ ﺟﺩﺍ ﮐﻧﻳﺩ. Vt ﺗﻌﻭﻳﺽ ﺷﻳﺭﻫﺎ ﻭ ﺗﺭﻣﻭﺳﺗﺎﺕ ﺩﺭ ﻫﻧﮕﺎﻡ ﺗﻌﻭﻳﺽ ﺷﻳﺭ ﻳﺎ ﺗﺭﻣﻭﺳﺗﺎﺕ ،ﻣﺎﻧﻧﺩ ﺯﻳﺭ ﻋﻣﻝ ﮐﻧﻳﺩ: • ﭘﺎﻳﻪ ﻫﺎﻳﯽ ﮐﻪ ﻅﺭﻭﻑ ﺑﺭ ﺭﻭی ﺁﻧﻬﺎ ﻗﺭﺍﺭ ﻣﯽ ﮔﻳﺭﻧﺩ ﻭ ﺳﺭﻫﺎی ﺷﻌﻠﻪ ﺭﺍ ﺑﺭﺩﺍﺭﻳﺩ. Vb • ﭘﻳﭻ ﻫﺎی ﻧﮕﻬﺩﺍﺭﻧﺩﻩ ﺷﻌﻠﻪ ) (Vcﺭﺍ ﺑﺎﺯ ﮐﻧﻳﺩ )ﺗﺻﻭﻳﺭ ) .
ﻧﺻﺏ ﺍﻁﻼﻋﺎﺕ ﮔﺎﺯ ﺗﺑﺩﻳﻝ ﻫﺎ ﺑﺭﺍی ﻣﺣﮑﻡ ﮐﺭﺩﻥ ﺑﺭﺧﯽ ﺍﺯ ﻗﻁﻌﺎﺕ ،ﺑﻪ ﺍﻁﻼﻋﺎﺕ ﺯﻳﺭ ﻣﺭﺍﺟﻌﻪ ﮐﻧﻳﺩ: ﺗﻌﻭﻳﺽ ﺍﻧژﮐﺗﻭﺭﻫﺎ ﻟﻭﻟﻪ ﻫﺎی ﺁﻟﻣﻳﻧﻳﻭﻣﯽ ﺑﻪ ﺳﻣﺕ ﺷﻌﻠﻪ ﻫﺎ ،ﺳﻭﭘﺎپ ﻫﺎ ،ﺗﺭﻣﻭﺳﺗﺎﺕ ﻫﺎ 15 :ﻧﻳﻭﺗﻥ ﻣﺗﺭ ﺷﻌﻠﻪ ﻫﺎ ﺭﺍ ﻣﯽ ﺗﻭﺍﻧﻳﺩ ﺑﻪ ﺳﺎﺩﮔﯽ ﻭ ﺑﺎ ﻧﺻﺏ ﺍﻧژﮐﺗﻭﺭﻫﺎی ﻣﻧﺎﺳﺏ ﺑﺎ ﮔﺎﺯ ﻣﻭﺭﺩ ﻧﻅﺭ ﺟﻬﺕ ﺍﺳﺗﻔﺎﺩﻩ ،ﺑﺎ ﻫﺭ ﻧﻭﻉ ﮔﺎﺯی ﺗﻁﺑﻳﻕ ﺩﻫﻳﺩ .ﺟﺩﻭﻝ ﺑﺧﺵ >ﻗﺎﺑﻠﻳﺕ ﻫﺎی ﻓﻧﯽ< ،ﺣﺭﺍﺭﺕ ﻭﺭﻭﺩی ،ﻗﻁﺭ ﺍﻧژﮐﺗﻭﺭ ﻭ ﻓﺷﺎﺭ ﮐﺎﺭﮐﺭﺩ ﻧﻣﻭﻧﻪ ﺭﺍ ﺑﺭﺍی ﮐﻣﮏ ﺑﻪ ﻧﺻﺏﮐﻧﻧﺩﻩ ﺩﺭ ﺍﻧﻭﺍﻉ ﻣﺧﺗﻠﻑ ﮔﺎﺯ ﺍﺭﺍﺋﻪ ﻣﯽ ﺩﻫﺩ.
ﻧﺻﺏ ﺍﺣﺗﻳﺎﻁ ﻫﻳﭻ ﻧﻭﻉ ﻓﺷﺎﺭ ﻧﺎﺷﯽ ﺍﺯ ﭘﻳﭻ ﺧﻭﺭﺩﮔﯽ ﻳﺎ ﮐﺷﻳﺩﮔﯽ ﻧﺑﺎﻳﺩ ﺑﻪ ﺷﻠﻧﮓ ﻭﺍﺭﺩ ﺷﻭﺩ، ﻫﻣﭼﻧﻳﻥ ﻫﻳﭻ ﺑﺧﺷﯽ ﺍﺯ ﺷﻠﻧﮓ ﻧﺑﺎﻳﺩ ﺩﺍﺭﺍی ﻓﺭﻭﺭﻓﺗﮕﯽ ﻳﺎ ﺗﺎ ﺧﻭﺭﺩﮔﯽ ﺷﺩﻳﺩ )ﮐﻪ ﺳﺑﺏ ﭘﺎﺭﮔﯽ ﺷﻭﺩ( ﺑﺎﺷﺩ. ﺍﺣﺗﻳﺎﻁ ﺍﻳﻥ ﻋﻣﻠﻳﺎﺕ ﺭﺍ ﺑﺎ ﻭﺟﻭﺩ ﺑﺳﺗﻪ ﺑﻭﺩﻥ ﭘﻧﻝ ﺟﻠﻭ ﻧﻳﺯ ﻣﯽ ﺗﻭﺍﻥ ﺍﻧﺟﺎﻡ ﺩﺍﺩ ﻭﻟﯽ ﺍﮔﺭ ﻓﺭﺩ ﻣﺗﺧﺻﺹ ﺩﺭ ﺭﺳﻳﺩﻥ ﺑﻪ ﭘﻳﭻ ﺗﻧﻅﻳﻡ ﻣﺷﮑﻝ ﺩﺍﺷﺕ ،ﭘﻳﭻ ﻫﺎی ﭘﻧﻝ ﺟﻠﻭ ﮐﻪ ﺩﺭ ﻗﺳﻣﺕ ﺩﺍﺧﻠﯽ ﻗﺭﺍﺭ ﺩﺍﺭﻧﺩ ﺭﺍ ﺑﺎﺯ ﮐﻧﻳﺩ. ﺍﺣﺗﻳﺎﻁ ﺷﻠﻧﮓ ﻧﺑﺎﻳﺩ ﺩﺭ ﺗﻣﺎﺱ ﺑﺎ ﻫﺭ ﺟﺳﻣﯽ ﺑﺎﺷﺩ ﮐﻪ ﺳﺑﺏ ﺑﺭﻳﺩﮔﯽ ﺁﻥ ﻣﯽ ﺷﻭﺩ ﻭ ﺩﺍﺭﺍی ﮔﻭﺷﻪ ﻫﺎی ﺗﻳﺯ ﻳﺎ ﺣﺎﻟﺕ ﻫﺎی ﻣﺷﺎﺑﻪ ﺍﺳﺕ.
ﻧﺻﺏ ﺍﺗﺻﺎﻝ ﮔﺎﺯ • ﺑﺎ ﻳﮏ ﻟﻭﻟﻪ ﻣﺳﯽ ﮐﻪ ﺍﺯ ﺍﺳﺗﺎﻧﺩﺍﺭﺩﻫﺎی ﻣﻭﺟﻭﺩ ﺗﺑﻌﻳﺕ ﮐﻧﺩ ﻭ ﺍﺗﺻﺎﻝ ﻫﺎی ﺁﻥ ﺑﺎﻳﺩ ﺑﺎ ﺍﺳﺗﻔﺎﺩﻩ ﺍﺯ ﺑﺳﺕ ﻫﺎی ﺩﺭﺯﺑﻧﺩی ﺷﺩﻩ ﺑﺎ ﺗﻭﺟﻪ ﺑﻪ ﺍﺳﺗﺎﻧﺩﺍﺭﺩﻫﺎی ﻣﻭﺟﻭﺩ ﺍﻧﺟﺎﻡ ﺷﻭﺩ. ﻗﺑﻝ ﺍﺯ ﺍﺗﺻﺎﻝ ﺩﺳﺗﮕﺎﻩ ،ﺑﺭﺭﺳﯽ ﮐﻧﻳﺩ ﮐﻪ ﺍﻁﻼﻋﺎﺕ ﻣﺷﺧﺹ ﺷﺩﻩ ﺑﺭ ﺭﻭی ﺻﻔﺣﻪ ﻣﺷﺧﺻﺎﺕ ﻣﺗﺻﻝ ﺑﻪ ﺧﻭﺭﺍک ﭘﺯ ،ﻣﻁﺎﺑﻕ ﺑﺎ ﻣﻭﺍﺭﺩ ﻋﻧﻭﺍﻥ ﺷﺩﻩ ﺑﺭ ﺭﻭی ﻣﻧﺑﻊ ﮔﺎﺯ ﺑﺎﺷﺩ. • ﻳﮏ ﻟﻭﻟﻪ ﻓﻭﻻﺩی ﺿﺩ ﺯﻧﮓ ﻭ ﻳﮏ ﺗﮑﻪ )ﺑﺩﻭﻥ ﻫﺭﮔﻭﻧﻪ ﺩﺭﺯ( ﻭ ﺣﺩﺍﮐﺛﺭ 2ﻣﺗﺭ ﻟﻭﻟﻪ ﺭﺍﺑﻁ ﻭ ﺑﺳﺕ ﮐﻪ ﻫﻣﮕﯽ ﺑﺎﻳﺩ ﺍﺯ ﺍﺳﺗﺎﻧﺩﺍﺭﺩﻫﺎی ﻣﻭﺟﻭﺩ ﺗﺑﻌﻳﺕ ﮐﻧﻧﺩ .
ﻧﺻﺏ ﺗﻬﻭﻳﻪ ﺍﺯ ﻗﺭﺍﺭ ﺩﺍﺩﻥ ﺩﺳﺗﮕﺎﻩ ﺩﺭ ﻓﺿﺎﻳﯽ ﮐﻭﭼﮏ ﺗﺭ ﺍﺯ 20ﻣﺗﺭ ﻣﮑﻌﺏ ﺧﻭﺩﺩﺍﺭی ﮐﻧﻳﺩ. ﻣﻳﺯﺍﻥ ﺣﺟﻡ ﻫﻭﺍی ﻣﻭﺭﺩ ﻧﻳﺎﺯ ﺑﺭﺍی ﺍﺷﺗﻌﺎﻝ ﻣﺩﺍﻭﻡ ﮔﺎﺯ ﻭ ﺗﻬﻭﻳﻪ ﺍﺗﺎﻕ ﺍﺳﺕ .ﺟﺭﻳﺎﻥ ﻁﺑﻳﻌﯽ ﻫﻭﺍ ﺑﺎﻳﺩ ﺍﺯ ﻁﺭﻳﻕ ﻣﺣﻔﻅﻪ ﻫﺎی ﺛﺎﺑﺕ ﻣﻭﺟﻭﺩ ﺩﺭ ﺩﻳﻭﺍﺭﻫﺎی ﺍﺗﺎﻕ ﺟﺭﻳﺎﻥ ﺩﺍﺷﺗﻪ ﺑﺎﺷﺩ ﮐﻪ ﺍﻳﻥ ﻣﺣﻔﻅﻪ ﻫﺎ ﻧﻳﺯ ﺑﺎﻳﺩ ﺑﺎ ﺣﺩﺍﻗﻝ ﺑﺭﺵ ﻣﻘﻁﻌﯽ 100ﺳﺎﻧﺗﯽ ﻣﺗﺭ ﺑﻪ ﺑﻳﺭﻭﻥ ﺭﺍﻩ ﺩﺍﺷﺗﻪ ﺑﺎﺷﻧﺩ) 2.ﺗﺻﻭﻳﺭ (15ﻣﺣﻔﻅﻪ ﻫﺎ ﺑﺎﻳﺩ ﺑﻪ ﮔﻭﻧﻪ ﺍی ﻗﺭﺍﺭ ﺑﮕﻳﺭﻧﺩ ﮐﻪ ﻣﺳﺩﻭﺩ ﻧﺷﻭﻧﺩ.
ﻧﺻﺏ ﺍﻁﻼﻋﺎﺕ ﻓﻧﯽ ﻫﺷﺩﺍﺭ ﻫﻧﮕﺎﻡ ﺍﺳﺗﻔﺎﺩﻩ ﺍﺯ ﺧﻭﺭﺍک ﭘﺯ ،ﻫﻣﻳﺷﻪ ﺍﺯ ﺩﺳﺗﮑﺵ ﺍﻳﻣﻧﯽ ﺍﺳﺗﻔﺎﺩﻩ ﮐﻧﻳﺩ • ﻣﺭﺍﺣﻝ ﻧﺻﺏ ،ﺗﻧﻅﻳﻡ ،ﺗﺑﺩﻳﻝ ﻭ ﻣﺭﺍﻗﺑﺕ ﻭ ﻧﮕﻬﺩﺍﺭی ﮐﻪ ﺩﺭ ﺍﻳﻥ ﺑﺧﺵ ﻋﻧﻭﺍﻥ ﺷﺩﻩ ﺍﻧﺩ ﻓﻘﻁ ﺑﺎﻳﺩ ﺗﻭﺳﻁ ﻣﺗﺧﺻﺻﻳﻥ ﻣﺟﺎﺯ ﺍﻧﺟﺎﻡ ﺷﻭﻧﺩ .ﺳﺎﺯﻧﺩﻩ ﺩﺭ ﻗﺑﺎﻝ ﻫﺭﮔﻭﻧﻪ ﺁﺳﻳﺏ ﻭﺍﺭﺩ ﺁﻣﺩﻩ ﺑﻪ ﺍﻓﺭﺍﺩ ﻳﺎ ﺍﻣﻭﺍﻝ ﮐﻪ ﺩﺭ ﻧﺗﻳﺟﻪ ﻧﺻﺏ ﺍﺷﺗﺑﺎﻩ ﺩﺳﺗﮕﺎﻩ ﺑﺎﺷﺩ ،ﻣﺳﺋﻭﻟﻳﺗﯽ ﻧﺧﻭﺍﻫﺩ ﺩﺍﺷﺕ. • ﺩﺳﺗﮕﺎﻩ ﻫﺎی ﺗﻧﻅﻳﻡ ﺍﻳﻣﻧﯽ ﻭ ﺩﺳﺗﮕﺎﻩ ﻫﺎی ﺧﻭﺩﮐﺎﺭ ﺩﺭ ﺍﻳﻥ ﻭﺳﻳﻠﻪ ﺩﺭ ﻁﻭﻝ ﻋﻣﺭ ﮐﺎﺭی ﺁﻧﻬﺎ ﻓﻘﻁ ﺑﺎﻳﺩ ﺗﻭﺳﻁ ﺳﺎﺯﻧﺩﻩ ﻳﺎ ﺗﻭﺯﻳﻊ ﮐﻧﻧﺩﻩ ﻣﺟﺎﺯ ﺗﻐﻳﻳﺭ ﺩﺍﺩﻩ ﺷﻭﻧﺩ.
ﭘﻳﺵ ﺍﺯ ﺗﻣﺎﺱ ﮔﺭﻓﺗﻥ ﺑﺭﺧﯽ ﺍﺯ ﻣﺷﮑﻼﺕ ﺑﻪ ﺩﻟﻳﻝ ﺳﻬﻝ ﺍﻧﮕﺎﺭی ﺩﺭ ﻧﮕﻬﺩﺍﺭی ﻳﺎ ﮐﺎﺭﺑﺭﺩ ﻧﺎﺩﺭﺳﺕ ﺭﺥ ﻣﯽ ﺩﻫﻧﺩ ﻭ ﺑﻪ ﺭﺍﺣﺗﯽ ﻭ ﺑﺩﻭﻥ ﮐﻣﮏ ﻓﻧﯽ ﻗﺎﺑﻝ ﺣﻝ ﻣﯽ ﺑﺎﺷﻧﺩ. ﻣﺷﮑﻝ ﺩﺳﺗﮕﺎﻩ ﮐﺎﺭ ﻧﻣﯽ ﮐﻧﺩ ﺭﺍﻩ ﺣﻝ • ﺑﺭﺭﺳﯽ ﮐﻧﻳﺩ ﮐﻪ ﺷﻳﺭ ﻓﻠﮑﻪ ﮔﺎﺯ ﺑﺎﺯ ﺑﺎﺷﺩ • ﺑﺭﺭﺳﯽ ﮐﻧﻳﺩ ﮐﻪ ﻟﻭﻟﻪ ﮔﺎﺯ ﻭﺻﻝ ﺑﺎﺷﺩ • ﺑﺭﺭﺳﯽ ﮐﻧﻳﺩ ﮐﻪ ﭘﻳﭻ ﻫﺎی ﮔﺎﺯ ﺑﻪ ﺩﺭﺳﺗﯽ ﺑﺭﺍی ﺁﺷﭘﺯی ﺗﻧﻅﻳﻡ ﺷﺩﻩ ﺑﺎﺷﻧﺩ ﻭ ﺳﭘﺱ ﻣﺭﺍﺣﻝ ﻋﻧﻭﺍﻥ ﺷﺩﻩ ﺩﺭ ﺩﻓﺗﺭﭼﻪ ﺭﺍ ﺗﮑﺭﺍﺭ ﮐﻧﻳﺩ ﺗﺭﻣﻭﺳﺗﺎﺕ ﮐﺎﺭ ﻧﻣﯽ ﮐﻧﺩ ﭼﺭﺍﻍ ﻓﺭ ﺭﻭﺷﻥ ﻧﻣﯽ ﺷﻭﺩ • ﺳﻭﻳﻳﭻ ﻫﺎی ﺍﻳﻣﻧﯽ ﺳﻳﺳﺗﻡ ﺍﻟﮑﺗﺭﻳﮑﯽ ) (RCDﺭﺍ ﺑﺭﺭﺳﯽ ﮐﻧﻳﺩ .
ﻣﺷﺧﺻﺎﺕ ﻓﻧﯽ ﺟﺎﺑﺟﺎﻳﯽ ﺷﻌﻠﻪ ﺭﻭی ﻗﺎﻟﺏ ﺷﻌﻠﻪ ﻫﺎی ﮔﺎﺯ ﺷﻣﺎﺭﻩ ﻧﻭﻉ 2 ﺳﺭﻳﻊ 3 ﻧﺳﺑﺗﺎ ً ﺳﺭﻳﻊ 4 ﮐﻣﮑﯽ 6 ﻓﻭﻕ ﺍﻟﻌﺎﺩﻩ ﺳﺭﻳﻊ ﺩﺭ ﻭﺳﻁ 7 ﻓﺭ ﺑﺭﻗﯽ 8 ﮐﺑﺎﺏ ﭘﺯ ﺑﺎ ﮐﻧﺗﺭﻝ ﺟﺩﺍﮔﺎﻧﻪ ﻓﺷﺎﺭ ﮐﺎﺭﮐﺭﺩ ﮔﺎﺯ ﺳﺭﻋﺕ ﻣﮕﺎﺑﺎﺭ GPL 30 ﮔﺭﻡ/ﺳﺎﻋﺕ 218 ﮔﺎﺯ ﻁﺑﻳﻌﯽ 20 GPL 30 131 ﮔﺎﺯ ﻁﺑﻳﻌﯽ 20 GPL 30 73 ﮔﺎﺯ ﻁﺑﻳﻌﯽ 20 GPL 30 276 ﮔﺎﺯ ﻁﺑﻳﻌﯽ 20 GPL 30 364 ﮔﺎﺯ ﻁﺑﻳﻌﯽ 20 GPL 30 247 ﮔﺎﺯ ﻁﺑﻳﻌﯽ 20 3 ﺣﺭﺍﺭﺕ ﻭﺭﻭﺩی ﺍﻧژﮐﺗ
ﺩﺳﺗﻭﺭﺍﻟﻌﻣﻝﻫﺎی ﻣﺭﺑﻭﻁ ﺑﻪ ﮐﺎﺭﺑﺭ • ﺻﻔﺣﻪ ﻫﺎی ﻫﺭ ﺩﻭ ﻁﺭﻑ ) (PLﺭﺍ ﺧﺎﺭﺝ ﮐﻧﻳﺩ )ﺗﺻﻭﻳﺭ .(12 • ﺑﺎ ﺑﺎﺯ ﮐﺭﺩﻥ ﭘﻳﭻ ﺍﺗﺻﺎﻝ ﻣﺭﺑﻭﻁﻪ ) ،(Vﺻﻔﺣﻪ ﭘﺷﺗﯽ ﺭﺍ ﺟﺩﺍ ﮐﻧﻳﺩ )ﺗﺻﻭﻳﺭ .(13 • ﺑﺭﺍی ﺟﺎﻳﮕﺯﻳﻥ ﮐﺭﺩﻥ ﺗﻣﺎﻡ ﻗﻁﻌﺎﺕ ،ﻋﻣﻠﻳﺎﺕ ﻫﺎی ﻗﺑﻠﯽ ﺭﺍ ﺑﻪ ﺻﻭﺭﺕ ﻣﻌﮑﻭﺱ ﺗﮑﺭﺍﺭ ﮐﻧﻳﺩ. ﻣﻬﻡ ﺑﺎ ﺑﻳﺭﻭﻥ ﮐﺷﻳﺩﻥ ﭘﻳﻥ ﺍﺗﺻﺎﻝ ) (Lﺍﺯ ﺳﻭﺭﺍﺥ ﻫﺎ ) ،(Sﺻﻔﺣﻪ ﻫﺎی ﻫﺭ ﺩﻭ ﻁﺭﻑ ) (PLﺭﺍ ﺩﺭ ﺟﺎی ﺧﻭﺩ ﻗﺭﺍﺭ ﺩﻫﻳﺩ )ﺗﺻﻭﻳﺭ .
ﺩﺳﺗﻭﺭﺍﻟﻌﻣﻝﻫﺎی ﻣﺭﺑﻭﻁ ﺑﻪ ﮐﺎﺭﺑﺭ Ud Bd ﺗﺻﻭﻳﺭ 8 • ﭘﺱ ﺍﺯ ﺭﻫﺎ ﺷﺩﻥ ﻟﻭﻻ ،ﺩﺭﺏ ﺭﺍ ﺑﻪ ﺳﻣﺕ ﺟﻠﻭ ﺑﮑﺷﻳﺩ ﻭ ﮐﻣﯽ ﺑﻪ ﺳﻣﺕ ﺑﺎﻻ ﺷﻳﺏ ﺩﻫﻳﺩ ﺗﺎ ﺍﻳﻥ ﻗﺳﻣﺕ ﺁﺯﺍﺩ ﺷﻭﺩ. • ﺑﺭﺍی ﺍﺗﺻﺎﻝ ﻣﺟﺩﺩ ،ﺍﻳﻥ ﻣﺭﺍﺣﻝ ﺭﺍ ﺑﻪ ﺻﻭﺭﺕ ﻣﻌﮑﻭﺱ ﺍﺟﺭﺍ ﮐﻧﻳﺩ ﻭ ﺑﻪ ﻣﺣﻝ ﺻﺣﻳﺢ ﻗﺭﺍﺭ ﮔﺭﻓﺗﻥ ﻗﻁﻌﺎﺕ ﺩﻗﺕ ﮐﻧﻳﺩ. ﺗﻌﻭﻳﺽ ﻻﻣپ ﻓﺭ )ﺗﺻﻭﻳﺭ (11 ﭘﻳﺵ ﺍﺯ ﻗﺭﺍﺭ ﺩﺍﺩﻥ ﻻﻣپ ﺑﺭﺭﺳﯽ ﮐﻧﻳﺩ ﮐﻪ ﺩﺳﺗﮕﺎﻩ ﺧﺎﻣﻭﺵ ﺑﺎﺷﺩ ﺗﺎ ﺑﺭﻕ ﮔﺭﻓﺗﮕﯽ ﺍﻳﺟﺎﺩ ﻧﺷﻭﺩ.
ﺩﺳﺗﻭﺭﺍﻟﻌﻣﻝﻫﺎی ﻣﺭﺑﻭﻁ ﺑﻪ ﮐﺎﺭﺑﺭ ﺟﺩﻭﻝ ﮐﺑﺎﺏ ﮐﺭﺩﻥ ﻭﺯﻥ ﮐﻳﻠﻭﮔﺭﻡ ﻏﺫﺍﻫﺎ ﮔﻭﺷﺕ ﮔﻭﺷﺕ ﻗﻳﻣﻪ ﺍﺳﺗﻳﮏ ﺑﻳﻑ ﻳﮏ ﻧﻳﻣﻪ ﻣﺭﻍ )ﻫﺭ ﻧﻳﻣﻪ ﺍی ﺍﺯ ﻣﺭﻍ( ﻣﺎﻫﯽ ﻣﺎﻫﯽ ﻗﺯﻝ ﺁﻻ ﮐﻔﺷﮏ ﻣﺎﻫﯽ )ﺳﻭﻝ( ﻧﺎﻥ ﺗﺳﺕ ﺳﻳﺦ ﮔﻭﺷﺕ ﻣﺭﻍ 0.50 0.15 1 0.42 0.20 ﻣﻭﻗﻌﻳﺕ ﻗﻔﺳﻪ ﻓﺭ ﺍﺯ ﭘﺎﻳﻳﻥ 4 4 4 ﺯﻣﺎﻥ ﭘﺧﺕ ﺑﻪ ﺩﻗﻳﻘﻪ ﻁﺭﻑ ﺍﻭﻝ 15 5 25 ﻁﺭﻑ ﺩﻭﻡ 15 5 25 4 4 18 10 18 10 4 3-2 3-2 80-60 1.
ﺩﺳﺗﻭﺭﺍﻟﻌﻣﻝﻫﺎی ﻣﺭﺑﻭﻁ ﺑﻪ ﮐﺎﺭﺑﺭ ﺟﺩﻭﻝ ﭘﺧﺕ ﻏﺫﺍﻫﺎ ﺍﻧﻭﺍﻉ ﮐﻳﮏ ﻫﺎ ﮐﻳﮏ ﻓﺭﺷﺗﻪ ﮐﻳﮏ ﻣﻳﻭﻩ ﺍی ﮐﻳﮏ ﺑﺎﺩﺍﻣﯽ ﮐﻳﮏ ﺷﮑﻼﺗﯽ ﺷﻳﺭﻳﻧﯽ ﺍﻧﻭﺍﻉ ﺑﻳﺳﮑﻭﻳﻳﺕ ﺑﺭﻳﻭﺵ ﺷﻳﺭﻳﻧﯽ ﻫﺯﺍﺭﻻ ﺷﻳﺭﻳﻧﯽ ﺑﺎ ﺧﻣﻳﺭ ﺗﺭﺩ ﺷﻳﺭﻳﻧﯽ ﭘﺧﺗﻪ ﺷﺩﻩ ﻻﺯﺍﻧﻳﺎ ﮐﺎﻧﻠﻭﻧﯽ ﭘﻳﺗﺯﺍ ﻧﺎﻥ ﮔﻭﺷﺕ ﮔﻭﺷﺕ ﮔﺎﻭ ﺑﺭﻳﺎﻥ ﺷﺩﻩ ﮔﻭﺷﺕ ﮔﻭﺳﺎﻟﻪ ﺑﺭﻳﺎﻥ ﺷﺩﻩ ﮔﻭﺷﺕ ﺑﺭﻩ ﺑﺭﻳﺎﻥ ﺷﺩﻩ ﮔﻭﺷﺕ ﺧﻭک ﺑﺭﻳﺎﻥ ﺷﺩﻩ ﮔﻭﺷﺕ ﺷﮑﺎﺭی ﮔﻭﺷﺕ ﺧﺭﮔﻭﺵ ﮐﺑﺎﺏ ﺷﺩﻩ ﻗﺭﻗﺎﻭﻝ ﮐﺑﺎﺏ ﺷﺩﻩ ﮐﺑﮏ ﮐﺑﺎﺏ ﺷﺩﻩ ﻣﺭﻍ ﺑﻭﻗﻠﻣﻭﻥ ﮐﺑﺎﺏ ﺷﺩﻩ ﺟﻭﺟﻪ ﮐﺑﺎﺏ ﺷﺩﻩ ﺍﺭﺩک ﮐﺑﺎﺏ ﺷﺩﻩ ﻣﺎﻫﯽ ﻣﺎﻫﯽ ﭘﺧﺗﻪ ﺷﺩﻩ ﻣﺎﻫﯽ ﮐﺎﺳﺭﻭﻝ ﻭﺯﻥ ﮐﻳﻠﻭﮔﺭﻡ
ﺩﺳﺗﻭﺭﺍﻟﻌﻣﻝﻫﺎی ﻣﺭﺑﻭﻁ ﺑﻪ ﮐﺎﺭﺑﺭ ﻧﮑﺗﻪﻫﺎی ﻣﻔﻳﺩ ﺁﺷﭘﺯی ﺍﻧﻭﺍﻉ ﮐﻳﮏ ﻭ ﻧﺎﻥ: • ﻗﺑﻝ ﺍﺯ ﺷﺭﻭﻉ ﭘﺧﺗﻥ ﻧﺎﻥ ﻳﺎ ﮐﻳﮏ ،ﻓﺭ ﺭﺍ ﺑﻪ ﻣﺩﺕ 15ﺩﻗﻳﻘﻪ ﮔﺭﻡ ﮐﻧﻳﺩ. • ﺩﺭ ﺣﻳﻥ ﭘﺧﺗﻥ ﺩﺭ ﻓﺭ ﺭﺍ ﺑﺎﺯ ﻧﮑﻧﻳﺩ ﺯﻳﺭﺍ ﻫﻭﺍی ﺳﺭﺩ ﻣﺎﻧﻊ ﺍﺯ ﺍﻳﻥ ﻣﯽ ﺷﻭﺩ ﮐﻪ ﻣﺧﻣﺭ ﭘﻑ ﮐﻧﺩ. • ﭘﺱ ﺍﺯ ﭘﺧﺗﻪ ﺷﺩﻥ ﮐﻳﮏ ،ﻓﺭ ﺭﺍ ﺧﺎﻣﻭﺵ ﮐﻧﻳﺩ ﻭ 10ﺩﻗﻳﻘﻪ ﺁﻥ ﺭﺍ ﺭﻫﺎ ﮐﻧﻳﺩ. • ﺍﺯ ﭘﺧﺗﻥ ﻏﺫﺍ ﺩﺭ ﺳﻳﻧﯽ ﻓﺭ ﺑﺎ ﭘﻭﺷﺵ ﻟﻌﺎﺑﯽ ﻳﺎ ﺻﻔﺣﻪ ﻣﺧﺻﻭﺹ ﺫﺭﺍﺕ ﺭﻳﺧﺗﻪ ﺷﺩﻩ ﮐﻪ ﻫﻣﺭﺍﻩ ﺑﺎ ﺩﺳﺗﮕﺎﻩ ﺍﺭﺍﺋﻪ ﺷﺩﻩ ﺍﺳﺕ ،ﺧﻭﺩﺩﺍﺭی ﮐﻧﻳﺩ.
ﺩﺳﺗﻭﺭﺍﻟﻌﻣﻝﻫﺎی ﻣﺭﺑﻭﻁ ﺑﻪ ﮐﺎﺭﺑﺭ ﭼﮕﻭﻧﮕﯽ ﺍﺳﺗﻔﺎﺩﻩ ﺍﺯ ﻓﺭ ﻭ ﮐﺑﺎﺏ ﭘﺯ ﺷﻌﻠﻪ ﻓﺭ ﻭ ﮐﺑﺎﺏ ﭘﺯ ﺩﺍﺭﺍی ﻳﮏ ﺗﺭﻣﻭﺳﺗﺎﺕ ﺍﻣﻧﻳﺗﯽ ﺍﺳﺕ ،ﺑﻧﺎﺑﺭﺍﻳﻥ ﺑﺎ ﺭﻭﺷﻥ ﺷﺩﻥ ﺷﻌﻠﻪ ،ﻫﻣﭼﻧﺎﻥ ﭘﻳﭻ ﮔﺎﺯ ﺭﺍ ﺑﻪ ﻣﺩﺕ ﺗﻘﺭﻳﺑﯽ 15ﺛﺎﻧﻳﻪ ﻓﺷﺎﺭ ﺩﻫﻳﺩ .ﺍﮔﺭ ﺩﺭ ﭘﺎﻳﺎﻥ ﺍﻧﺟﺎﻡ ﺍﻳﻥ ﮐﺎﺭ ﺷﻌﻠﻪ ﺭﻭﺷﻥ ﻧﺷﺩ ،ﭘﻳﭻ ﮔﺎﺯ ﺭﺍ ﺭﻫﺎ ﮐﻧﻳﺩ ﻭ ﺣﺩﺍﻗﻝ 1ﺩﻗﻳﻘﻪ ﻣﻧﺗﻅﺭ ﺑﻣﺎﻧﻳﺩ ﻭ ﺳﭘﺱ ﺩﻭﺑﺎﺭﻩ ﺍﻣﺗﺣﺎﻥ ﮐﻧﻳﺩ .ﺍﮔﺭ ﺷﻌﻠﻪ ﻧﺎﮔﻬﺎﻥ ﺧﺎﻣﻭﺵ ﻣﯽ ﺷﻭﺩ ،ﭘﻳﭻ ﮔﺎﺯ ﺭﺍ ﺭﻭی ﻣﻭﻗﻌﻳﺕ ﺧﺎﻣﻭﺵ ﺑﭼﺭﺧﺎﻧﻳﺩ ﻭ ﺣﺩﺍﻗﻝ 1ﺩﻗﻳﻘﻪ ﻣﻧﺗﻅﺭ ﺑﻣﺎﻧﻳﺩ ،ﺳﭘﺱ ﺩﻭﺑﺎﺭﻩ ﺁﻥ ﺭﺍ ﺭﻭﺷﻥ ﮐﻧﻳﺩ.
ﺩﺳﺗﻭﺭﺍﻟﻌﻣﻝﻫﺎی ﻣﺭﺑﻭﻁ ﺑﻪ ﮐﺎﺭﺑﺭ ﻓﺭ :ﺩﺳﺗﻭﺭﺍﻟﻌﻣﻝﻫﺎی ﻋﻣﻭﻣﯽ ﺍﻳﻣﻧﯽ • ﺩﺭ ﺣﻳﻥ ﺍﺳﺗﻔﺎﺩﻩ ،ﻓﺭ ﺭﺍ ﺑﺩﻭﻥ ﻧﻅﺎﺭﺕ ﺭﻫﺎ ﻧﮑﻧﻳﺩ .ﻣﻁﻣﺋﻥ ﺷﻭﻳﺩ ﮐﻪ ﮐﻭﺩﮐﺎﻥ ﺑﺎ ﺩﺳﺗﮕﺎﻩ ﺑﺎﺯی ﻧﮑﻧﻧﺩ. • ﻫﻧﮕﺎﻣﯽ ﮐﻪ ﺍﺯ ﻓﺭ ﺍﺳﺗﻔﺎﺩﻩ ﻣﯽ ﮐﻧﻳﺩ ،ﻫﻣﻳﺷﻪ ﺩﺭﺏ ﻅﺭﻭﻑ ﺭﺍ ﺑﺎﺯ ﺑﮕﺫﺍﺭﻳﺩ ﺗﺎ ﺍﺯ ﮔﺭﻡ ﺷﺩﻥ ﺑﻳﺵ ﺍﺯ ﺣﺩ ﺟﻠﻭﮔﻳﺭی ﺷﻭﺩ. • ﻫﻧﮕﺎﻡ ﺑﺎﺯ ﮐﺭﺩﻥ ﺩﺭ ﻓﺭ ،ﻫﻣﻳﺷﻪ ﻗﺳﻣﺕ ﻭﺳﻁ ﺩﺭ ﺭﺍ ﺑﮕﻳﺭﻳﺩ .ﻫﻧﮕﺎﻣﯽ ﮐﻪ ﺩﺭ ﺑﺎﺯ ﺍﺳﺕ ،ﺍﺯ ﻭﺍﺭﺩ ﺁﻭﺭﺩﻥ ﻓﺷﺎﺭ ﺯﻳﺎﺩ ﺑﺭ ﺭﻭی ﺁﻥ ﺧﻭﺩﺩﺍﺭی ﮐﻧﻳﺩ. • ﺍﮔﺭ ﺩﺭﺣﻳﻥ ﺁﺷﭘﺯی ﻗﻁﺭﺍﺕ ﺁﺏ ﺑﺭ ﺭﻭی ﺩﺭ ﻓﺭ ﻭ ﺑﺩﻧﻪ ﺩﺍﺧﻠﯽ ﻓﺭ ﺍﻳﺟﺎﺩ ﺷﺩﻩ ﺍﺳﺕ ،ﻧﮕﺭﺍﻥ ﻧﺷﻭﻳﺩ .
ﺩﺳﺗﻭﺭﺍﻟﻌﻣﻝﻫﺎی ﻣﺭﺑﻭﻁ ﺑﻪ ﮐﺎﺭﺑﺭ ﻗﺎﻟﺏ :ﻧﮑﺗﻪ ﻫﺎی ﻋﻣﻭﻣﯽ ﺩﺭ ﻣﻭﺭﺩ ﺍﻳﻣﻧﯽ ﻫﻧﮕﺎﻣﯽ ﮐﻪ ﺍﺯ ﺧﻭﺭﺍک ﭘﺯ ﮔﺎﺯی ﺍﺳﺗﻔﺎﺩﻩ ﻣﯽ ﮐﻧﻳﺩ ،ﺣﺭﺍﺭﺕ ﻭ ﮔﺭﻣﺎ ﺩﺭ ﺍﺗﺎﻕ ﻣﺣﻝ ﻧﺻﺏ ﺩﺳﺗﮕﺎﻩ ﺍﻳﺟﺎﺩ ﻣﯽ ﺷﻭﺩ .ﺑﻪ ﻫﻣﻳﻥ ﺩﻟﻳﻝ ﺍﺗﺎﻕ ﺑﺎﻳﺩ ﺑﻪ ﺧﻭﺑﯽ ﺗﻬﻭﻳﻪ ﺷﻭﺩ، ﻭﺭﻭﺩی ﻫﺎی ﺗﻬﻭﻳﻪ ﻁﺑﻳﻌﯽ ﺭﺍ ﺑﺎﺯ ﻧﮕﻬﺩﺍﺭﻳﺩ ﻭ ﺳﻳﺳﺗﻡ ﺟﺭﻳﺎﻥ ﻫﻭﺍی ﻣﮑﺎﻧﻳﮑﯽ ﺭﺍ ﻧﻳﺯ ﺭﻭﺷﻥ ﮐﻧﻳﺩ )ﻫﻭﺩ ﻣﮑﺵ ﻳﺎ ﭘﻧﮑﻪ ﺑﺭﻗﯽ ،ﺑﻪ ﭘﺎﺭﺍﮔﺭﺍﻑ ﻫﺎی "ﺗﻬﻭﻳﻪ" ﻭ "ﻣﺣﻝ ﻗﺭﺍﺭﮔﻳﺭی" ﻣﺭﺍﺟﻌﻪ ﮐﻧﻳﺩ(. ﺍﮔﺭ ﺍﺯ ﺩﺳﺗﮕﺎﻩ ﺧﻭﺭﺍک ﭘﺯ ﺑﺭﺍی ﻣﺩﺕ ﺯﻣﺎﻥ ﻁﻭﻻﻧﯽ ﺍﺳﺗﻔﺎﺩﻩ ﮐﺭﺩﻩ ﺍﻳﺩ ،ﺑﻪ ﺟﺭﻳﺎﻥ ﻫﻭﺍی ﺑﻳﺷﺗﺭی ﻧﻳﺎﺯ ﺍﺳﺕ .
ﺗﻭﺻﻳﻑ ﻣﺣﺻﻭﻝ ﺗﻭﺻﻳﻑ ﮐﻧﺗﺭﻝ ﻫﺎ C ﭘﻳﭻ ﺷﻌﻠﻪ ﮔﺎﺯ )(A ﺑﺎ ﭼﺭﺧﺎﻧﺩﻥ ﭘﻳﭻ ﮔﺎﺯ ﺩﺭ ﺧﻼﻑ ﺟﻬﺕ ﺣﺭﮐﺕ ﻋﻘﺭﺑﻪ ﻫﺎی ﺳﺎﻋﺕ ،ﻧﻣﺎﺩﻫﺎی ﺯﻳﺭ ﻧﺷﺎﻥ ﺩﺍﺩﻩ ﻣﯽ ﺷﻭﺩ: = ﻣﻭﻗﻌﻳﺕ ﺑﺳﺗﻪ = ﻣﻭﻗﻌﻳﺕ "ﮐﺎﻣﻼً ﺑﺎﺯ" = ﻣﻭﻗﻌﻳﺕ "ﺷﻌﻠﻪ ﮐﻡ" A ﭼﺭﺍﻍ ﻫﺷﺩﺍﺭ ﻗﺭﻣﺯﺭﻧﮓ ﺍﻳﻥ ﭼﺭﺍﻍ -ﺩﺭ ﺻﻭﺭﺕ ﻭﺟﻭﺩ -ﺍﮔﺭ ﺭﻭﺷﻥ ﺷﻭﺩ ﻧﺷﺎﻧﮕﺭ ﺍﻳﻥ ﺍﺳﺕ ﮐﻪ ﻳﮏ ﻳﺎ ﭼﻧﺩ ﺻﻔﺣﻪ ﺍﻟﮑﺗﺭﻳﮑﯽ ﻗﺎﻟﺏ ﺭﻭﺷﻥ ﺍﺳﺕ.
ﺗﻭﺻﻳﻑ ﻣﺣﺻﻭﻝ ﺍﺭﺍﺋﻪ ﺍﻳﻥ ﺧﻭﺭﺍک ﭘﺯ ﺑﻪ ﻳﮏ ﭼﺭﺥ ﮔﺎﺯ ﻭ ﻳﮏ ﻓﺭ ﮔﺎﺯ ﻣﺟﻬﺯ ﺍﺳﺕ. ﻫﺭ ﭘﻳﭻ ﮔﺎﺯ ﺩﺭ ﺟﻠﻭی ﺻﻔﺣﻪ ﺩﺍﺭﺍی ﻳﮏ ﺟﺩﻭﻝ ﺍﺳﺕ ﮐﻪ ﺩﺭ ﺑﺎﻻی ﺁﻥ ﻁﺭﺍﺣﯽ ﺷﺩﻩ ﺍﺳﺕ ﻭ ﻧﺷﺎﻥ ﻣﯽ ﺩﻫﺩ ﮐﻪ ﺑﻪ ﮐﺩﺍﻡ ﺷﻌﻠﻪ ﻣﺗﻌﻠﻕ ﺍﺳﺕ .ﺗﺭﮐﻳﺑﯽ ﺍﺯ ﺷﻌﻠﻪ ﻫﺎﻳﯽ ﺑﺎ ﺍﻧﺩﺍﺯﻩ ﻫﺎی ﻣﺧﺗﻠﻑ ﺑﻪ ﺷﻣﺎ ﺍﻳﻥ ﺍﻣﮑﺎﻥ ﺭﺍ ﻣﯽ ﺩﻫﺩ ﺗﺎ ﺍﻧﻭﺍﻉ ﻣﺧﺗﻠﻑ ﺁﺷﭘﺯی ﺭﺍ ﺍﻣﺗﺣﺎﻥ ﮐﻧﻳﺩ. ﺗﻭﺟﻪ ﺍﮔﺭ ﺩﺳﺗﮕﺎﻩ ﺩﺍﺭﺍی ﮐﻧﺗﺭﻝ ﻫﺎی ﺟﺩﺍﮔﺎﻧﻪ ﺑﺭﺍی ﺷﻌﻠﻪ ﻫﺎی ﻓﺭ ﻭ ﮐﺑﺎﺏ ﭘﺯ ﺍﺳﺕ، ﻧﻣﯽ ﺗﻭﺍﻥ ﺍﺯ ﺁﻧﻬﺎ ﺑﻪ ﺻﻭﺭﺕ ﻫﻣﺯﻣﺎﻥ ﺍﺳﺗﻔﺎﺩﻩ ﮐﺭﺩ.
ﺩﺳﺗﻭﺭﺍﻟﻌﻣﻝﻫﺎی ﻣﻬﻡ ﺍﻳﻣﻧﯽ • ﻗﺑﻝ ﺍﺯ ﭘﺧﺕ ﻏﺫﺍ ﺑﺭﺍی ﺍﻭﻟﻳﻥ ﺑﺎﺭ ،ﺑﺭﺭﺳﯽ ﮐﻧﻳﺩ ﮐﻪ ﻓﺭ ﺧﺎﻟﯽ ﺑﺎﺷﺩ ﻭ ﺩﺭ ﺁﻥ ﺑﺳﺗﻪ ﺑﺎﺷﺩ ،ﻫﻣﭼﻧﻳﻥ ﻓﺭ ﺭﺍ ﺑﻪ ﻣﺩﺕ ﺩﻭ ﺳﺎﻋﺕ ﺑﺎ ﺣﺩﺍﮐﺛﺭ ﺣﺭﺍﺭﺕ ﮔﺭﻡ ﮐﻧﻳﺩ .ﺑﺎ ﺍﻳﻥ ﮐﺎﺭ ﺭﻭﮐﺵ ﻣﺣﺎﻓﻅ ﻣﻭﺟﻭﺩ ﺩﺭ ﺩﺍﺧﻝ ﻓﺭ ﻣﯽ ﺳﻭﺯﺩ ﻭ ﺑﻭﻳﯽ ﻧﻳﺯ ﺗﻭﻟﻳﺩ ﻣﯽ ﮐﻧﺩ .ﺩﺭ ﺣﺎﻝ ﺳﻭﺧﺗﻥ ﺍﻳﻥ ﻻﻳﻪ ﺑﺭﺭﺳﯽ ﮐﻧﻳﺩ ﮐﻪ ﺗﻬﻭﻳﻪ ﻣﻧﺎﺳﺏ ﺩﺭ ﺁﺷﭘﺯﺧﺎﻧﻪ ﺍﻧﺟﺎﻡ ﺷﻭﺩ ﻭ ﺍﮔﺭ ﺩﺭ ﺍﻳﻥ ﺣﺎﻟﺕ ﮐﻣﯽ ﺩﻭﺩ ﺍﻳﺟﺎﺩ ﺷﺩ، ﻧﮕﺭﺍﻥ ﻧﺑﺎﺷﻳﺩ. • ﺩﺳﺗﻭﺭﺍﻟﻌﻣﻝ ﻫﺎی ﻣﻭﺟﻭﺩ ﺑﺭﺍی ﻓﺭﻫﺎﻳﯽ ﮐﻪ ﺩﺍﺭﺍی ﻁﺑﻘﻪ ﻫﺳﺗﻧﺩ ﺑﺎﻳﺩ ﻫﻣﺭﺍﻩ ﺑﺎ ﺟﺯﺋﻳﺎﺕ ﺩﻗﻳﻕ ﻧﺣﻭﻩ ﺻﺣﻳﺢ ﻧﺻﺏ ﮐﺭﺩﻥ ﻁﺑﻘﺎﺕ ﺭﺍ ﺑﻪ ﺷﻣﺎ ﻧﺷﺎﻥ ﺩﻫﺩ.
ﺩﺳﺗﻭﺭﺍﻟﻌﻣﻝﻫﺎی ﻣﻬﻡ ﺍﻳﻣﻧﯽ ﺷﻣﺎ ﻳﮑﯽ ﺍﺯ ﻣﺣﺻﻭﻻﺕ ﻣﺎ ﺭﺍ ﺧﺭﻳﺩﺍﺭی ﮐﺭﺩﻩ ﺍﻳﺩ ﻭ ﺍﺯ ﺍﻳﻥ ﺑﺎﺑﺕ ﺍﺯ ﺷﻣﺎ ﻣﺗﺷﮑﺭﻳﻡ .ﻣﺎ ﻣﻁﻣﺋﻥ ﻫﺳﺗﻳﻡ ﮐﻪ ﺍﻳﻥ ﺩﺳﺗﮕﺎﻩ ﺟﺩﻳﺩ ،ﮐﺎﺭﺁﻣﺩ ﻭ ﻣﺅﺛﺭ ﺍﺯ ﻣﻭﺍﺩی ﺑﺎ ﺑﻬﺗﺭﻳﻥ ﮐﻳﻔﻳﺕ ﺳﺎﺧﺗﻪ ﺷﺩﻩ ﺍﺳﺕ ﮐﻪ ﭘﺎﺳﺧﮕﻭی ﻧﻳﺎﺯﻫﺎی ﺷﻣﺎﺳﺕ .ﺍﻳﻥ ﺩﺳﺗﮕﺎﻩ ﺟﺩﻳﺩ ﺩﺍﺭﺍی ﮐﺎﺭﺑﺭﺩی ﺁﺳﺎﻥ ﺍﺳﺕ ،ﺍﻣﺎ ﻗﺑﻝ ﺍﺯ ﻧﺻﺏ ﻭ ﺍﺳﺗﻔﺎﺩﻩ ﺍﺯ ﺁﻥ ،ﻣﻬﻡ ﺍﺳﺕ ﮐﻪ ﺍﻳﻥ ﺩﻓﺗﺭﭼﻪ ﺭﺍ ﺑﻪ ﺩﻗﺕ ﻭ ﺑﻪ ﻁﻭﺭ ﮐﺎﻣﻝ ﻣﻁﺎﻟﻌﻪ ﮐﻧﻳﺩ .ﺩﺭ ﺍﻳﻥ ﺩﻓﺗﺭﭼﻪ ﺍﻁﻼﻋﺎﺗﯽ ﺩﺭﺑﺎﺭﻩ ﻧﺻﺏ ،ﺍﺳﺗﻔﺎﺩﻩ ﻭ ﺗﻌﻣﻳﺭ ﺍﻳﻣﻥ ﺩﺳﺗﮕﺎﻩ ﺍﺭﺍﺋﻪ ﺷﺩﻩ ﺍﺳﺕ .ﺍﻳﻥ ﺩﻓﺗﺭﭼﻪ ﺭﺍ ﺑﺭﺍی ﻣﺭﺍﺟﻌﺎﺕ ﺑﻌﺩی ﺧﻭﺩ ﺩﺭ ﻣﺣﻠﯽ ﺍﻣﻥ ﻧﮕﻬﺩﺍﺭی ﮐﻧﻳﺩ.
FA راهنمای استفاده و نصب اجاق ZCG91217XA 461308267_000 06-2013