User Manual GETTING STARTED? EASY.
SAFETY INFORMATION Before the installation and use of the appliance, carefully read the supplied instructions. The manufacturer is not responsible for any injuries or damages that are the result of incorrect installation or usage. Always keep the instructions in a safe and accessible location for future reference. CHILDREN AND VULNERABLE PEOPLE SAFETY WARNING! Risk of suffocation, injury or permanent disability.
• • • • • • • • • • • • • • • • • Do not install the appliance behind a decorative door in order to avoid overheating. Do not install the appliance on a platform. Do not operate the appliance by means of an external timer or separate remote-control system. WARNING: Unattended cooking on a hob with fat or oil can be dangerous and may result in fire. NEVER try to extinguish a fire with water, but switch off the appliance and then cover flame e.g. with a lid or a fire blanket.
guards incorporated in the appliance. The use of inappropriate guards can cause accidents. SAFETY INSTRUCTIONS This appliance is suitable for the following markets: • GB IE • INSTALLATION WARNING! Only a qualified person must install this appliance. • • • • • • • • • • • • Remove all the packaging. Do not install or use a damaged appliance. Follow the installation instructions supplied with the appliance. Always take care when moving the appliance as it is heavy.
• • • • • • Make sure that the ventilation openings are not blocked. Do not let the appliance stay unattended during operation. Deactivate the appliance after each use. Be careful when you open the appliance door while the appliance is in operation. Hot air can release. Do not operate the appliance with wet hands or when it has contact with water. Do not use the appliance as a work surface or as a storage surface.
LID • Do not change the specification of the lid. • Clean the lid regularly. • Do not open the lid, when there are spills on the surface. • Before you close the lid turn all burners off. • Do not close the lid until the hob and oven are completely cold. • Glass lid can shatter, when heated (if applicable). • • • • Do not leave the appliance unattended during grilling. Accessible parts become hot. Keep children away when the grill is in use. Never use the grill with the oven door closed.
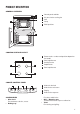
PRODUCT DESCRIPTION GENERAL OVERVIEW 1 2 3 3 2 1 5 1 Control panel and hob 2 Air vents for the cooling fan 3 Grill 4 Lamp 5 Shelf positions 5 4 3 2 1 4 COOKING SURFACE LAYOUT 1 Steam outlet - number and position depend on the model 2 Semi-rapid burner 1 5 2 4 3 3 Auxiliary burner 4 Rapid burner 5 Semi-rapid burner COOKER CONTROL PANEL 1 2 3 4 1 1 Knobs for the hob 2 Knob for the main oven 3 Display 4 Knob for the top oven ACCESSORIES • Wire shelf For cookware, cake tins, roasts.
Use the trivet only with the Grill- / roasting pan. BEFORE FIRST USE WARNING! Refer to Safety chapters. INITIAL CLEANING Remove all accessories from the oven. Refer to "Care and cleaning" chapter. Clean the oven and the accessories before first use. Put the accessories back to their initial position. SETTING AND CHANGING THE TIME You must set the time before you operate the oven. When you connect the appliance to the electrical supply or after a power cut, flashes. or to set the correct time.
The spark generator can start automatically when you switch on the mains, after installation or a power cut. It is normal. BURNER OVERVIEW A B G A. B. C. D. E. F. G. Burner cap Burner crown Slots Thermocouple Ignition candle Burner body Hole for the ignition candle C D E F REPLACING BURNER PARTS 1. Put carefully the burner crown on the burner body. Let the crown fall freely onto the body. Do not use force. Make sure that the hole in the crown is above the ignition candle.
DIAMETERS OF COOKWARE WARNING! Use cookware with diameters applicable to the size of burners. Burner Diameter of cookware (mm) Rapid Burner Diameter of cookware (mm) Semi-rapid 120 - 220 Auxiliary 80 - 160 180 - 260 HOB - CARE AND CLEANING WARNING! Refer to Safety chapters. GENERAL INFORMATION • Clean the hob after each use. • Always use cookware with a clean base. • Scratches or dark stains on the surface have no effect on how the hob operates.
TOP OVEN FUNCTIONS Oven function 1 - 8 1) Application Off position The oven is off. Heat settings Heat settings for Conventional Cooking. Grilling To grill flat food in the middle of the grill and to toast. 1) 1 - 140 °C, 2 - 145°C, 3 - 150°C, 4 -160°C, 5 - 180°C, 6 - 220°C, 7 - 245°C, 8 - 260°C MAIN OVEN FUNCTIONS Oven function 1 - 91) Application Off position The oven is off. Minimum temperature To set the minimum temperature. Heat settings Heat settings for Conventional Cooking.
If the oven burner accidentally goes out, turn the knob for the oven functions to the off position and try to light the burner again after minimum 1 minute. Check if the burner holes are not blocked. TURNING OFF THE OVEN BURNERS To put out the flame, turn the knob to the off position. COOLING FAN When the oven operates, the cooling fan turns on automatically to keep the surfaces of the oven cool. If you turn off the oven, the cooling fan can continues to operate until the oven cools down.
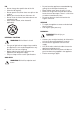
OVEN - CLOCK FUNCTIONS DISPLAY A B C A. Minute minder indicator B. Time display C. Time of day indicator BUTTONS Button Function MINUS To set the time. CLOCK To set a clock function. PLUS To set the time. SETTING THE MINUTE MINDER 1. Press flash. Description again and again until starts to 2. Press or to set the necessary time. The Minute Minder starts automatically after 5 seconds. 3. When the set time ends, an acoustic signal sounds. Press any button to stop the acoustic signal. 4.
change the temperature setting if an unequal browning occurs. The differences equalize during baking. • Trays in the oven can twist during baking. When the trays become cold again, the distortions disappear. TIPS ON BAKING Baking results Possible cause Remedy The bottom of the cake is not browned sufficiently. The shelf position is incorrect. Put the cake on a lower shelf. The cake sinks and becomes soggy, lumpy or streaky. The oven temperature is too high.
Food Heat setting Total preparation Shelf position time (min) Milk Puddings 3 90 - 180 2 Scones 7 8 - 12 2 Choux Pastry 6 30 - 35 2 Éclairs / Profiteroles 5 20 - 30 2 Flaky Pastry 6 25 - 40 2 Mince Pies 5 15 - 20 2 Pasta Lasagne etc.
Food Heat setting Total preparation Shelf position time (min) Madeira Cake 4 75 - 90 2-3 Rich Fruit Cake 2 135 - 150 2-3 Christmas Cake 2 180 - 270 2-3 Gingerbread 2 75 - 90 2-3 Flapjack 5 25 - 30 3 Shortbread 3 45 - 65 3 Fruit Pies, Crumbles 6 40 - 60 3 Milk Puddings 3 90 - 120 3 Scones 7 8 - 12 1+4 Choux Pastry 6 30 - 35 3 Éclairs / Profiteroles 5 20 - 30 3 Flaky Pastry 6 25 - 40 3 Mince Pies 5 15 - 20 1+4 Pasta Lasagne etc.
Turn the roast after 1/2 - 2/3 of the cooking time. To keep meat more succulent: • roast lean meat in the roasting tin with the lid or use roasting bag. • baste large roasts and poultry with their juices several times during roasting.
Food Total preparation time (min) Shelf position Whole Trout / Mackerel 15 - 25 2-3 Plaice / Cod Fillets 10 - 15 2-3 Kebabs 20 - 30 2-3 Kidneys – Lamb / Pig 8 - 12 2-3 Liver – Lamb / Pig 10 - 20 2-3 Sausages 20 - 30 2-3 Steak – Rare 6 - 12 2-3 Steak – Medium 12 - 16 2-3 Steak – Well Done 14 - 20 2-3 Toasted Sandwiches 1-3 2-3 OVEN - CARE AND CLEANING WARNING! Refer to Safety chapters.
1. Clean the oven floor with warm water and washing up liquid, then dry it. 2. Set the maximum temperature and let oven operate for 1 hour. 3. Set the oven temperature to 250 °C and let the oven operate for 1 hour. 4. When the appliance is cool, clean it with a soft and moist sponge. REMOVING AND CLEANING THE DOOR GLASSES - TOP OVEN A 2 1 The door glass in your product can be different in type and shape from the examples you see in the image. The number of glasses can also be different. 1. Open the door.
WHAT TO DO IF... Problem Possible cause You cannot activate the appliance. The appliance is not connected to an electrical supply or it is connected incorrectly. Check if the appliance is correctly connected to the electrical supply. You cannot activate the appliance. The fuse is blown. Make sure that the fuse is the cause of the malfunction. If the fuse is blown again and again, contact a qualified electrician. You cannot activate the appliance. The appliance is too hot.
SERVICE DATA If you cannot find a solution to the problem yourself, contact your dealer or an Authorised Service Centre. The necessary data for the service centre is on the rating plate. The rating plate is on the front frame of the oven cavity. Do not remove the rating plate from the oven cavity. We recommend that you write the data here: Model (MOD.) ......................................... Product number (PNC) ......................................... Serial number (S.N.) ........................
OTHER TECHNICAL DATA CAUTION! Install the stability chain to prevent the appliance from tilting. The stability chain only works when the appliance is put in a correct area. 1. Measure down 180 mm from the appliance top surface, then measure right 30 mm. 2. Mark the position of the wall and this gives anchor point for the stability chain. WARNING! These instructions are only valid in the countries whose symbols appear on this booklet's cover.
WARNING! Only liquid sealants can be used when the inlet gas pipe is fitted i.e.: do not use the P.T.F.E. sealant tape. When the installation is complete, carry out a gas tightness test and make sure that the seal of each pipe fitting does not leak. Use flexible tubing, which comply with the BS.669 current edition. A E D B C C WARNING! The gas bayonet connector must be in the marked area.
ENERGY EFFICIENCY PRODUCT INFORMATION FOR HOB ACCORDING TO EU 66/2014 Model identification ZCG63200BA ZCG63200WA ZCG63200XA Type of hob Hob inside Freestanding Cooker Number of gas burners 4 Energy efficiency per gas burner (EE gas burner) Left Front - Rapid 55.0 % Left rear - Semi Rapid 55.6 % Right front - Auxiliary not applicable Right rear- Semi Rapid 55.
Energy consumption with a standard load, conventional mode Top oven: 1.26 kWh/cycle 4.53 MJ/cycle Main oven: 1.73 kWh/cycle 6.23 MJ/cycle Number of cavities 2 Heat source Gas Volume Top oven: 33 l Main oven: 77 l Type of oven Oven inside Freestanding Cooker Mass EN 15181 Measuring method of the energy consumption of gas fired ovens. ZCG63200BA 60.2 kg ZCG63200WA 59.7 kg ZCG63200XA 60.5 kg When possible, do not preheat the oven before you put the food inside.
867338001-A-312018 WWW.ZANUSSI.