EN User manual Cooker ZCG552GW2 2
Contents Safety Information Description of the appliance Before first use Operating instruction Accessories delivered with the appliance 2 3 4 4 8 Hints and tips Cleaning and care Something not working Technical data Installation 8 9 11 12 14 Subject to change without notice Safety Information It is most important that this instruction book should be retained with the appliance for future reference.
• The grill pan will become hot during use, always use oven gloves when removing or replacing a hot grill pan. • Ensure the control knobs are in the ‘OFF’ position when not in use. • When using other electrical appliances, ensure the cable does not come into contact with the hot surfaces of the cooker. • Unstable or misshapen pans should not be used on the hob burners as unstable pans can cause an accident by tipping or spillage. • Never leave the cooker unattended when cooking with oil and fat.
Hob Hot plate ∅ 145 – 1000W Hot plate ∅ 180 – 1500W Hot plate ∅ 145 – 1000W Hot plate ∅ 180 – 2000W Before first use • Open a window for ventilation. Remove all packaging, both inside and outside • Allow the oven to run empty for approximately the oven, before using the oven. Before first 45 minutes. use, the oven should be heated without food. This procedure should be repeated with the grill Before the first use, ensure that the room is function for approximately 5-10 minutes. well ventilated: V.M.C.
I Using the Grill Off When grilling, the accessible parts of the appliance are hot and the appliance should not Minimum position be left unattended. Take care that children do not play near it. Grill function While the grill is operating leave the oven door Oven ignition half open and put the grill deflector “A” into place. Attention: when turning on the oven burner the During use the appliance becomes hot. Care oven door has to be opened.
Adjust the grid and pan position to allow for different thickness of food. Position the food closer to the grill for faster cooking and further away for slower cooking. Heat comes from the top of the oven. It is suitable for grilling meat (beef bacon, pork bacon …) that remains tender, for toast or to brown already cooked dishes. Grilling meat • Push and turn the oven control knob to the grill symbol.
Oven light The oven is equipped with a lamp. To switch on the light in the oven press the switch on the control panel. The Ignition electrode The electric ignition is obtained through a ceramic electrode which contains a metal electrode. Keep the ignition electrod very clean, to avoid difficult lighting, and check that the burner crown holes are not obstructed. Burner cap The Hob Burners Burner ring Each burner has a safety device. In case the flame dies out the safety device stops the gas supply.
The following diameter pans can be used: Burner Power Diameter (mm) (kW) min. max. Rapid 2.60 165 260 Semi-Rapid 2.00 140 240 Auxiliary 1.00 120 180 Good use Bad use (Power waste) Accessories delivered with the appliance Beside the accessories delivered with the appliance we advise you to use only heat proof pots (according to the instructions of the manufacturer).
Cooking / baking parameters There are authoritative tables referring to the cooking and baking conditions. You can make same changes in it based on your cooking and baking experience. Remarks: The dripping pan can be introduced on the first level in order to reach more even browning. The cooking / baking time can be different in function of the quality, homogeneity, quantity of the dishes.
• • • • • Household detergent and bleaches Impregnated pads unsuitable for non stick saucepans Chemical oven pads or aerosols Rust removers Bath/Sink stain removers Oven Cavity The enamelled oven cavity is best cleaned whilst the oven is still warm. Wipe the oven over with a soft cloth soaked in warm soapy water after each use. From time to time it will be necessary to do a more thorough cleaning, using a proprietary oven cleaner.
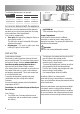
Burners The burner caps and crowns can be removed for cleaning. Wash the burners caps and crowns using hot soapy water, and remove marks with a mild paste cleaner. A well-moistened soap impregnated steel wool pad can be used with caution, if the marks are particularly difficult to remove. To replace the faulty bulb. • Turn the glass cover anticlockwise and remove. • Remove the faulty bulb and replace with a new one. • Refit the glass cover. Reconnect the appliance to the electricity supply.
Symptoms Cooking results are not satisfactory The oven smokes Solutions Check: The correct temperature has been selected The cooking time is adapted The grill is placed correctly in the oven Check: The oven does not need cleaning The food does not spill over There is no excessive fat / juice on the oven sides IMPORTANT: If you call out an engineer to a fault listed below, or to repair a fault caused by incorrect use or installation, a charge will be made even if the appliance is under guarantee.
Advice for safety Gas connections • Before installation ensure that the local distribution conditions (gas type and pressure) and the pre-setting of the appliance are consistent. • This appliance must be installed only in a room with good ventilation. • This appliance must not connected to a chimney. It has to be installed and connected in accordance with the rules in force. Special attention should be paid to the applicable disposal concerning ventilation.
Installation Positioning It is necessary to renew the air and that the Remove all the packaging and install the cooker in a combustion products be discharged. dry, ventilated room not near curtains, paper, alcohol, This appliance is not connected to a combustion petrol etc. products evacuation device. It shall be installed and connected in accordance with current installation The cooker should be placed only on the regulations. Particular attention shall be given to the floor, but not on the base.
Gas feeding pipe fitting is Gc1/2. For this type of installation, connection to the gas supply should be carried out using only and exclusively flexible metallic tubes in conformity with rules in force. Connection using flexible, non metal pipes When the connection can be easily inspected in its full extent, there is the chance to use a flexible pipe according to the rules in force.
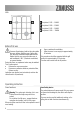
SPECIFICATION NOZZLES Table no.
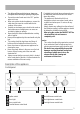
no air correct adjusting excess of air Hob burners To adjust the minimum level: • Light the burner • Turn the knob to the position of the minimum flame; • Remove the knob; • Unscrew or screw the by-pass screw (on the right above of tap shaft or below of tap shaft) until a regular small flame is reached. • For LPG screw completely the by-pass screw. Reassemble the parts following the same procedure in reverse.
Tighten the fixing screw M. air adjusting • by-pass M A Grill burner • Loosen the screw fixing the Venturi. • Move the adjusting collar left or right until achieving the correct flame picture. • Tighten the fixing screw. opening adjusting collar screw Adjustment of minimum level Oven burner • • • • • • Remove the top pan support as well as the burner caps and the burner crowns. Light the burner knob in the maximum position and leave the oven door closed for about 10 mins.
Environmental Information After installation, please dispose of the packaging with due regard to safety and the environment. • When disposing of an old appliance, make it unusable, by cutting off the cable. In case of intervention on your appliance ask the Manufacturer after sales service only the spare parts certifies you. • on the product or on its packaging The symbol indicates that this product may not be treated as household waste.
www.zanussi.