User manual EN Cooker ZCG550 GB IE
Contents Safety information _ _ _ _ _ _ _ _ _ _ _ _ _ _ _ _ _ _ 2 Product description _ _ _ _ _ _ _ _ _ _ _ _ _ _ _ _ _ 5 Before first use _ _ _ _ _ _ _ _ _ _ _ _ _ _ _ _ _ _ _ 6 Hob - Daily Use _ _ _ _ _ _ _ _ _ _ _ _ _ _ _ _ _ _ _ 6 Hob - Helpful hints and tips _ _ _ _ _ _ _ _ _ _ _ _ _ 7 Hob - Care and Cleaning _ _ _ _ _ _ _ _ _ _ _ _ _ _ 7 Oven - Daily Use _ _ _ _ _ _ _ _ _ _ _ _ _ _ _ _ _ _ 8 Oven - Helpful hints and tips _ _ _ _ _ _ _ _ _ _ _ _ 10 Oven - Care and Cleaning _ _ _ _ _ _ _ _ _ _ _ _ _ Wh
• The electrical installation must have an isolation device which lets you disconnect the appliance from the mains at all poles. The isolation device must have a contact opening width of minimum 3 mm. • The shock protection parts must be fixed in such a way that they cannot be undone without tools. • Always use a correctly installed shockproof socket. • When you connect electrical appliances to mains sockets, do not let cables touch or come near the hot appliance door.
• Do not apply pressure on the open door. • Do not put flammable materials in the compartment below the oven. Keep there only heat-resistant accessories (if applicable). • Do not cover oven steam outlets. They are at the rear side of the top surface (if applicable). • This appliance is for cooking purposes only. It must not be used for other purposes, for example room heating. • Use only stable cookware with the correct shape and diameter to prevent accidental tilting or spilling. There is a risk of burns.
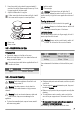
Product description General overview 1 7 2 3 2 1 6 5 4 3 4 1 2 3 4 5 6 7 Hob Grill Rating plate Top oven lamp Main oven lamp Shelf positions Shelf positions 1 2 3 4 5 Steam outlet Semi-rapid burner Auxiliary burner Rapid burner Semi-rapid burner 5 3 2 1 Cooking surface layout 1 5 2 4 3 5
Control panel 1 1 2 3 4 2 Hob control knobs Main oven temperature control Electronic programmer Top oven / Grill control Accessories 3 4 1 For cookware, cake tins, roasts. • Deep grill roasting pan To bake and roast or as pan to collect fat. • The roasting pan grid To put in the deep roasting pan. • Oven shelf Before first use Important! Refer to safety information in chapter "Safety". Remove all packaging, both inside and outside the oven, before using the appliance.
2. Keep the control knob pushed for approximately 5 seconds; this will let thermocouple to warm up. If not, the gas supply will be interrupted. 3. Adjust the flame after it is regular. If after some tries the burner does not light, check if the crown and its cap are in correct positions. 1 2 3 4 3 Ignition candle 4 Thermocouple Warning! If the burner does not light after 15 seconds, release the control knob, turn it into off position and try to light the burner again after minimum 1 minute.
Oven - Daily Use Cooling fan Turn the gas oven control knob to When the appliance operates, the cooling fan switches on automatically to keep the surfaces of the appliance cool. If you switch off the appliance, the cooling fan continues to operate until the appliance cools down. If the oven gas burner does not come on or if it accidentally goes out: 1. Turn the gas oven control knob to the “ Off“ position. 2. Open the oven door. 3. After one minute, try to light the oven gas burner again.
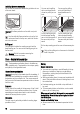
Oven function Application Range of temperature adjustment Gas mark 1 - 9 Range of temperature adjustment for conventional cooking. To prepare very lean, tender roasted food. Slow Cook Display 1 8 2 7 3 6 5 Time of day Function Indicators Time display Function Indicators Button "+" Selector Button Button "-" 4 Clock function Minute minder 1 2 3 4 5 6 Application Shows the time. To set, change or check the time. To set a countdown time. A signal sounds, after the time period is completed.
Installing the oven accessories Put the slide-in accessories between the guide bars of one of the oven levels. Important! The flame protection on the shelf must point up. Use the shelf with flame protection only on the first and second level in the top oven, and on all the levels in the main oven. Grilling set The grilling set includes the roasting pan grid and the deep roasting pan. You can use the roasting pan grid on the two sides. Warning! Risk of burns when removing the accessories from a hot oven.
• If you cannot find the settings for a special recipe, look for the one that is almost the same. • Baking time can be extended by 10-15 minutes, if you bake cakes on more than one level. • Cakes and pastries at different heights do not always brown equally at first. If this occurs, do not change the temperature setting. The differences equalize during the baking procedure.
Food Shelf position Gas mark Cooking Time (Total Hours) Choux Pastry 1-2 6 0:30 - 0:35 Éclairs / Profiteroles 1-2 5 0:20 - 0:30 Flaky Pastry 1-2 6 0:25 - 0:40 Mince Pies 1-2 5 0:15 - 0:20 Pasta Lasagne etc.
Food Shelf position Gas mark Cooking Time (Total Hours) 3-4 1 2:30 - 3:00 Flapjack 3 5 0:25 - 0:30 Shortbread 3 3 0:45 - 1:05 Fruit Pies, Crumbles 3 6 0:40 - 0:60 Meringues Milk Puddings 3 3 1:30 - 2:00 1+4 7 0:08 - 0:12 Choux Pastry 3 6 0:30 - 0:35 Éclairs / Profiteroles 3 5 0:20 - 0:30 Flaky Pastry 3 6 0:25 - 0:40 Mince Pies 1+4 5 0:15 - 0:20 Pasta Lasagne etc.
Roasting chart Meat Shelf Level Gas Mark Cooking time Beef/ Beef boned 2 5 20-35 minutes per 500g (1lb) and 20-35 minutes over Mutton/Lamb 2 5 25-35 minutes per 500g (1lb) and 25-35 minutes over Pork/Veal/Ham 2 5 30-40 minutes per 500g (1lb) Chicken 2 5 15-20 minutes per 500g (1lb) and 20 minutes over Turkey/Goose 2 5 15-20 minutes per 500g (1lb) up to 3500g (7lb) then 10 minutes per 500g (1lb) over 3500g (7lb) Duck 2 5 25-35 minutes per 500g (1lb) and 25-30 minutes over Pheasant
Food Shelf position Grilling Time (Total Hours) Whole Trout/Mackerel 2-3 0:15 - 0:25 Plaice/Cod Fillets 2-3 0:10 - 0:15 Kebabs 2-3 0:20 - 0:30 Kidneys – Lamb/Pig 2-3 0:08 - 0:12 Liver – Lamb/Pig 2-3 0:10 - 0:20 Sausages 2-3 0:20 - 0:30 Steak – Rare 2-3 0:06 - 0:12 Steak – Medium 2-3 0:12 - 0:16 Steak – Well Done 2-3 0:14 - 0:20 Toasted Sandwiches 2-3 0:01 - 0:03 Slow Cook Use the function to prepare soups stews, casseroles or lean, tender pieces of meat and fish.
• For good air circulation always put the joints on a rack in a roasting tin or casserole. • Thaw all frozen meat and poultry before you cook it. • Remove unwanted fat and skin unless it is browned first. Soups, casseroles and stews • Do not cook casseroles which are more than 2,7 (6lb). • Let the dish boil on the hob and then cook it on the slow cook setting. • Cook on or above the middle shelf of the oven. • Use a lid or tin foil when you use slow cook setting.
Cleaning the oven door The door glass on your product can be different in type and shape from what you see in diagrams. The number of glasses can be different. Removing the glass: 1. Push the door trim at one side to remove it. Refer to the picture. 2. Pull up the trim. 3. Remove the glass panels. To replace the glass panels obey the procedure in opposite sequence. Before you lower the trim attach the A trim part to the door. Refer to picture.
Problem Possible cause Remedy Only main oven does not work. Time is not set. Set the time There is no spark when lighting the gas. Burner cap and crown are placed uneven. Make sure that the burner cap and crown are in correct positions. The flame is blow out immediately af- Thermocouple is not heated suffiter ignition. cient. After lightning the flame, keep the knob pushed for approximately 5 seconds. The gas ring burns unevenly. Burner crown is blocked with food residue.
Model (MOD.) ......................................... Product number (PNC) ......................................... Serial number (S.N.) ......................................... Installation Important! First read "Safety information" chapter carefully.
Warning! These instructions are only valid in the countries whose symbols appear on this booklet's cover. Gas Category Gas Supply G30 - 29 mbar I3+ Gas burners BURNER NORMAL POWER LPG kW inj. 100/mm g/h Auxiliary burner 1,0 50 71,8 Semi-rapid burner 2,0 71 136,5 Rapid burner 3,4 88 244,12 Grill 2,7 95 194 Top Oven 1,9 70 136,5 Main Oven 1,9 70 136,5 Warning! Only a qualified and competent person must do the gas installation.
Pressure test Checking the main oven The Rapid injector is used as a pressure test point. 1. Connect the pressure gauge to the Rapid injector. 2. Examine the supply pressure by turning the Rapid burner and one other burner fully on, and lighting them. The pressure must be: a) 20 mbar for Natural Gas b) 29 mbar for LPG, butane only c) 37 mbar for LPG, propane only. 3. Turn the taps off and disconnect the pressure gauge. 4. Make sure that all burners work correctly. 1.
Packaging material The packaging material is environmentally-friendly and recyclable. Plastic parts are marked with international abbreviations such as PE, PS, etc. Dispose of the packaging material in the containers provided for this purpose at your local waste management facility. Warning! Your appliance should be made inoperable before it is disposed of, so that it does not constitute a danger. To do this, take the mains plug from the socket and remove the mains cable from the appliance.
• The appliance guarantee starts from the date you first purchased the appliance which will be evidenced by production of a valid purchase document issued by the seller of the appliance. • The appliance guarantee is for the same period and to the same extent for labour and parts as exists in your new country of residence for this particular model or range of appliances. • The appliance guarantee is personal to the original purchaser of the appliance and cannot be transferred to another user.
Portugal +35 12 14 40 39 39 Quinta da Fonte - Edificio Gonçalves Zarco - Q 35 -2774-518 Paço de Arcos Romania +40 21 451 20 30 Str. Garii Progresului 2, S4, 040671 RO Schweiz - Suisse - Svizzera +41 62 88 99 111 Industriestrasse 10, CH-5506 Mägenwil Slovenija +38 61 24 25 731 Gerbičeva ulica 98, 1000 Ljubljana Slovensko +421 (02) 32141334 Electrolux Slovakia s.r.o., Electrolux Domáce spotrebiče SK, Seberíniho 1, 821 03 Bratislava Suomi www.electrolux.
892937875-M-372010 www.zanussi.