EN User Manual Cooker ZCG51011WA CH
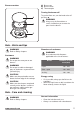
Contents Safety information Safety instructions Product description Before first use Hob - Daily use Hob - Hints and tips Hob - Care and cleaning 2 3 5 6 6 7 7 Oven - Daily use Oven - Using the accessories Oven - Hints and tips Oven - Care and cleaning Troubleshooting Installation Guarantee 8 9 9 13 14 15 19 Subject to change without notice. Safety information Before the installation and use of the appliance, carefully read the supplied instructions.
• • • • • • • Never try to extinguish a fire with water, but switch off the appliance and then cover flame e.g. with a lid or a fire blanket. Do not store items on the cooking surfaces. Do not use a steam cleaner to clean the appliance. Metallic objects such as knives, forks, spoons and lids should not be placed on the hob surface since they can get hot. Remove any spillage from the lid before opening. Let the hob surface cool down before closing the lid.
• • • Be careful when you open the appliance door while the appliance is in operation. Hot air can release. Do not operate the appliance with wet hands or when it has contact with water. Do not use the appliance as a work surface or as a storage surface. WARNING! Risk of fire and explosion • • • • • • Fats and oil when heated can release flammable vapours. Keep flames or heated objects away from fats and oils when you cook with them.
• • Do not close the lid until the hob and oven are completely cold. Glass lid can shatter, when heated (if applicable). Disposal WARNING! Risk of injury or suffocation. • • • Contact your municipal authority for information on how to discard the appliance correctly. Remove the door catch to prevent children and pets to get closed in the appliance. Flat the external gas pipes.
• • For cakes and biscuits. Aluminium baking tray For cakes and biscuits. Storage compartment The storage compartment is below the oven cavity. To use the compartment, lift the lower front door then pull it down. WARNING! The storage compartment can become hot when the appliance operates. Before first use WARNING! Refer to Safety chapters. Initial Cleaning Remove all accessories from the appliance. Refer to "Care and cleaning" chapter. Clean the appliance before first use.
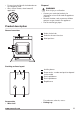
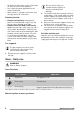
Burner overview A) Burner cap B) Burner crown C) Thermocouple Turning the burner off To put the flame out, turn the knob to the off A position . WARNING! Always turn the flame down or switch it off before you remove the pans from the burner. B C Hob - Hints and tips WARNING! Diameters of cookware Refer to Safety chapters. WARNING! Use cookware with diameters applicable to the size of burners. Cookware WARNING! Do not put the same pan on two burners.
• • • Scratches or dark stains on the surface have no effect on how the hob operates. Use a special cleaner applicable for the surface of the hob. Wash stainless steel parts with water, and then dry them with a soft cloth. Cleaning the hob • • • Remove immediately: melted plastic, plastic foil, and food with sugar. If not, the dirt can cause damage to the hob. Remove when the hob is sufficiently cool: limescale rings, water rings, fat stains, shiny metallic discoloration.
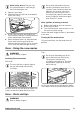
Oven safety device: The gas oven has a thermocouple. It stops the gas flow if the flame goes out. Do not keep the knob for the oven functions pushed for more than 15 seconds. If the oven burner does not light after 15 seconds, release the knob for the oven functions, turn it into off position, open the oven door and try to light the oven burner again after minimum 1 minute. 1. Open the oven door. 2. Hold the flame near the hole in the bottom of the oven cavity. After ignition of oven gas burner 3.
The temperature and baking times in the tables are guidelines only. They depend on the recipes and the quality and quantity of the ingredients used. General information • The appliance has four shelf positions. Count the shelf positions from the bottom of the appliance floor. Moisture can condense in the appliance or on the door glass panels. This is normal. Always stand back from the appliance when you open the appliance door while cooking.
Food Quantity (g) Thermostat position Time (min) Shelf position Accessories Flat cake1) 1000 2 35 - 40 3 baking tray Yeast cake with 2000 5 50 - 60 3 aluminium baking tray Apple pie 1) 1200 + 1200 6 55 - 65 3 2 round aluminized tray (diameter: 20 cm) Small cakes1) 500 2-3 25 - 30 3 aluminium baking tray baking tray Fatless sponge 350 3 30 - 35 3 1 round tray (diameter: 26 cm) Drip pan cake 1500 2-3 45 - 55 2) 3 aluminium baking tray Drip pan cake 1500 2-3 40 - 50
Food Quantity (g) Thermostat position Time (min) Shelf position Accessories Peasant bread 6) 750 + 750 4-5 50 - 60 3 2 round aluminized tray (diameter: 20 cm) Romanian sponge 600 + 600 2-3 50 - 60 3 2 round aluminized trays (diameter: 25 cm) 600 + 600 2-3 40 - 50 3 2 round aluminized trays (diameter: 25 cm) Swiss roll1) 500 2-3 20 - 30 3 aluminium baking tray Swiss roll1) 500 2-3 20 - 25 3 baking tray Meringue 400 1-2 40 - 50 3 aluminium baking tray Meringue 400 1
Oven - Care and cleaning WARNING! Refer to Safety chapters. Notes on cleaning • • • • • • Clean the front of the appliance with a soft cloth with warm water and a cleaning agent. To clean metal surfaces, use a usual cleaning agent. Clean the appliance interior after each use. Fat accumulation or other food remains may result in a fire. Clean stubborn dirt with a special oven cleaner. Clean all accessories after each use and let them dry. Use a soft cloth with warm water and a cleaning agent.
CAUTION! CAUTION! Make sure that after installation the surface of the frame of the glass panel on the screen with a printing is not rough when you touch it. Make sure that you install the internal glass panel in the appropriate seats. Troubleshooting WARNING! Refer to Safety chapters. What to do if... Problem Possible cause Remedy The flame extinguishes immediately after ignition. Thermocouple is not heated up sufficiently.
We recommend that you write the data here: Model (MOD.) ......................................... Product number (PNC) ......................................... Serial number (S.N.) ......................................... Installation Minimum distances WARNING! Refer to Safety chapters. Dimension Location of the appliance You can install your freestanding appliance with cabinets on one or two sides and in the corner.
Bypass diameters BURNER Ø BYPASS1) 1/100 mm Auxiliary 0,25 Semi-rapid 0,29 Rapid 0,35 Oven 0,39 / 0,40 1) Type of bypass depends on model. Gas burners for NATURAL GAS G20 20 mbar BURNER NORMAL POWER kW REDUCED POWER kW INJECTOR MARK 1/100 mm 3,0 0,72 / 0,751) 119 2,0 / 1,91) 0,43 / 0,451) 96 Auxiliary 1,0 0,35 70 Oven 2,7 0,90 120 Rapid Semi-rapid 1) Type of bypass (Copreci / BSI) depends on model.
Gas Connection Use a fixed connections or use a flexible stainless steel pipes in compliance with the regulation in force. If you use flexible metallic pipes, make sure they do not come in touch with mobile parts and they are not squeezed. CAUTION! When you install and connect the appliance, obey the directives: • SVGW- Gas principles G1: Gas installation • EKAS- Form. 1942: Liquid gas directive, Part 2 • Cantonal instances regulations (e.g.
WARNING! Before you replace the injectors, make sure that the gas knobs are in the Off position. Let the appliance cool down. There is a risk of injury. Hob injectors replacement Replace the injectors when you change the gas type. 1. Remove the pan supports. 2. Remove the caps and crowns of the burner. 3. Remove the injectors with a socket spanner 7. 4. Replace injectors with the ones necessary for the type of gas you use. 5.
Change form liquid gas to natural gas D E 4. Slowly move it to the left side. Make sure that the burner bush stays on the burner mouthpiece. Do not apply force to the wire of the thermocouple conductor (E). 5. Release the burner injector (D) with a 7 mm socket spanner and replace it with a different one. Assemble the burner in a revers sequence. Replace the gas type sticker near the gas supply ramp with the one related to the new gas type. Adjustment of minimum level at the oven burner 1.
Point of Service 5506 Mägenwil/Zürich Industriestrasse 10 3018 Bern Morgenstrasse 131 1028 Préverenges Le Trési 6 6928 Manno Via Violino 11 9000 St. Gallen Zürcherstrasse 204e 4052 Basel St. JakobTurm Birsstrasse 320B 6020 Emmenbrücke Seetalstrasse 11 7000 Chur Comercialstrasse 19 Spare parts service 5506 Mägenwil, Industriestrasse 10, Tel. 0848 848 111 proof). The guarantee covers the costs of materials, labour and travel.
www.zanussi.
www.zanussi.
www.zanussi.
867306341-A-242014 www.zanussi.