
User manual


16
The yellow-green grounding cable has not to be
interrupted by the switch.
NOTE: The earth wire should be more 4 cm
longer than the live and neutral wires.
Before connecting check that:
• fuse and household electric installation can
bear the charge of the appliance (see rating
plate);
• The socket or the omnipolar switch used for
connection is easily reachable when the
appliance is installed.
How to proceed?
• Unscrew and remove the protective cover at
the back of the appliance;
• Connect the power cord to the terminal of the
cooker according to the table no.1;
• Fix by means of cable clamp;
• Make sure that the connection to the terminal
is matching the network power;
• Remount and screw the protective cover at the
back of the appliance
Important
If the supply cord is damaged it must be
replaced by the manufacturer or its service
agent or a similarly qualified person in order to
avoid a hazard.
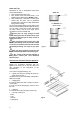
Ensure that the hob supply cord does not
come into contact with any part of the hatched
area shown in the diagram.
BACK OF THE COOKER
fig. 18
Table no. 1
Connection type Single phase Tri-phase
Tri-phase Y 3 ph. +
neutral
Tri-phase Y 2 ph. +
neutral
Cable connection to the
terminal plate
1 2 3 4 5
L1
N PE
L3
5
1 2
3 4
L1 L2
PE
3
1
L3L1
PE
4 5
N
L2
2
4 5
N
PE
2 3
L2L1
1
Network voltage
230 V 230 V 230 V / 400 V 230 V / 400 V
Voltage of heating
elements
230 V 230 V 230 V 230 V
Fusible capacity
35 A 20 A 16 A 25 A
Cable section
3 x 6 mm
2
4 x 4 mm
2
5 x 2,5 mm
2
4 x 4 mm
2
OVEN LAMP REPLACEMENT
Before replacing the lamp take care that
all control knobs be on “off” position
« 0 ».
Disconnect the appliance; watch that the
oven be cool.
This lamp of 15 W, convection E 14 (230/240V)
is a special lamp for “higher” temperature, up
to 300˚C. It is supplied on order, by your After
Sales Service.
The lamp is fixed in front of the oven and is
accessible from inside.
For reaching the lamp:
1. Unscrew the glass lamp protection (fig. 19);
2. Unscrew the lamp;
3. Replace the lamp;
4. Remount the lamp protection
fig. 19