
User manual


4
Limpieza de las partes internas
Antes del empleo limpiar todas las partes internas
con agua tibia y jabón neutro, a fin de eliminar el
característico olor de nuevo y secarlas luego
cuidadosamente.
No emplear detergentes o polvos
abrasivos que podrían dañar las
superficies.
Arranque
Introduzca el enchute eléctrico en la toma de
corriente de pared más cercana
Gire el botón del termostato (B) hacia la derecha
inasta una posición intermedia (se encenderá la luz
de la temperatura (A)).
Regulación de la temperatura
La temperatura se regula automaticámente y puede
ser aumentada (menos frío) girando el mando hacia
los ● o bien se puede disminuir (más frío) girándolo
hacia ● . De todos modos, la colocación del mando
se determina teniendo en cuenta que la temperatura
interna depende:
• de la temperatura ambiente;
• de la frecuencia de aperatura de la puerta;
• de la cantidad de alimentos conservados;
• de la colocación del aparato.
USO
Importante:
En las posiciones de máximo frío, con
temperatura ambiente elevada, el
funcionamiento puede ser continuo, con
consiguiente formación de escarcha en la parte
posterior del compartimiento; en tal caso es
necesario girar el mando a una posición de
menor frío, a fin de consentir la eliminacíon
automática de la escarcha y, como
consecuencia, obtener un consumo menor de
energía eléctrica.
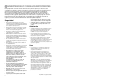
El tablero de control
A - Luz de control de funcionamiento
B - Botón del termostato
AB
17
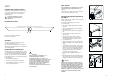
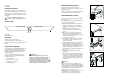
Rear spacers
In the bag with the documentation, there are two
spacers which must be fitted in the two top
corners.
Slacken the screws and insert the spacer under the
screw head, then re-tighten the screws.
D594
Changing the opening direction of
the doors
Before carrying out any operations, remove the plug
from the power socket.
To change the opening direction of the door,
proceed as follows:
1. pull off the ventilation grille (D) which is clipped
into place;
2. remove the bottom hinge (E) by unscrewing its
three fixing screws;
3. remove the door, releasing it from the upper pin
(G);
4. unscrew the upper pin (G) and refit it on the
opposite side;
5. remove the two plugs of the door (where
available), discovering the holes for the hinge
pins, assemble them on the opposite side;
6. reassemble the door;
7. using a 10 mm spanner, unscrew the hinge pin
(E) and reassemble it on the opposite side of the
hinge;
8. reassemble the lower hinge (E) on the opposite
side, using the screws previously removed; insert
the hole cover (G) on the lower hinge. Slide the
hole cover (F) out of the ventilation grille (D) by
pushing it in the direction of the arrow and
reassemble it on the opposite side;
9. refit the ventilation grille (D), clipping it into
place.
10.Dismantle the handles and reassemble them on
the opposite side. Cover the holes left open with
the plugs contained in the documentation pack.
Warning:
After having reversed the opening direction of
the doors check that all the screws are properly
tightened and that the magnetic seal adheres to
the cabinet. If the ambient temperature is cold
(i.e. in Winter), the gasket may not fit perfectly to
the cabinet. In that case, wait for the natural
fitting of the gasket or accelerate this process by
heating up the part involved with a normal
hairdrier.
G
F
D
PR18
F
F
F
E
E
D162/a