EN EL ES User manual Οδηγίες Χρήσης Manual de instrucciones Fridge-Freezer Ψυγειοκαταψύκτης Frigorífico-congelador ZBT2234R ZBT2234L 2 13 28
Contents Safety information _ _ _ _ _ _ _ _ _ _ _ _ _ _ _ _ _ _ Operation _ _ _ _ _ _ _ _ _ _ _ _ _ _ _ _ _ _ _ _ _ _ First use _ _ _ _ _ _ _ _ _ _ _ _ _ _ _ _ _ _ _ _ _ _ Daily use _ _ _ _ _ _ _ _ _ _ _ _ _ _ _ _ _ _ _ _ _ _ Helpful hints and tips _ _ _ _ _ _ _ _ _ _ _ _ _ _ _ _ 2 4 4 4 5 Care and cleaning _ _ _ _ _ _ _ _ _ _ _ _ _ _ _ _ _ _ 6 What to do if… _ _ _ _ _ _ _ _ _ _ _ _ _ _ _ _ _ _ _ 7 Technical data _ _ _ _ _ _ _ _ _ _ _ _ _ _ _ _ _ _ _ 9 Installation _ _ _ _ _ _ _ _ _ _ _ _ _ _ _ _ _ _ _ _
or damaged power plug may overheat and cause a fire. 3. Make sure that you can come to the mains plug of the appliance. 4. Do not pull the mains cable. 5. If the power plug socket is loose, do not insert the power plug. There is a risk of electric shock or fire. 6. You must not operate the appliance without the lamp cover1) of interior lighting. • This appliance is heavy. Care should be taken when moving it.
Environment Protection This appliance does not contain gasses which could damage the ozone layer, in either its refrigerant circuit or insulation materials. The appliance shall not be discarded together with the urban refuse and rubbish. The insulation foam contains flammable gases: the appliance shall be disposed according to the applicable regulations to obtain from your local authorities. Avoid damaging the cooling unit, especially at the rear near the heat exchanger.
Frozen Food Calendar Movable shelves The walls of the refrigerator are equipped with a series of runners so that the shelves can be positioned as desired. The symbols show different types of frozen goods. The numbers indicate storage times in months for the appropriate types of frozen goods. Whether the upper or lower value of the indicated storage time is valid depends on the quality of the foods and treating before freezing.
Butter and cheese: these should be placed in special airtight containers or wrapped in aluminium foil or polythene bags to exclude as much air as possible. Milk bottles: these should have a cap and should be stored in the bottle rack on the door. Bananas, potatoes, onions and garlic, if not packed, must not be kept in the refrigerator. Hints for freezing To help you make the most of the freezing process, here are some important hints: • the maximum quantity of food which can be frozen in 24 hrs.
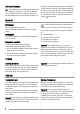
It is important to periodically clean the defrost water drain hole in the middle of the refrigerator compartment channel to prevent the water overflowing and dripping onto the food inside. Use the special cleaner provided, which you will find already inserted into the drain hole. 5. Switch on the appliance. 6. Set the temperature regulator to obtain the maximum coldness and run the appliance for two or three hours using this setting. 7. Reload the previously removed food into the compartment.
Problem The compressor operates continually. Possible cause Solution The lamp is defective. Refer to "Replacing the lamp". The temperature is not set correctly. Set a higher temperature. The door is not closed correctly. Refer to "Closing the door". The door has been opened too frequently. Do not keep the door open longer than necessary. The product temperature is too high. Let the product temperature decrease to room temperature before storage. The room temperature is too high.
4. 5. 6. 7. Install the lamp cover. Tighten the screw to the lamp cover. Connect the plug to the mains socket. Open the door. Make sure that the light comes on. 2. If necessary, adjust the door. Refer to "Installation". 3. If necessary, replace the defective door gaskets. Contact the Service Center. Closing the door 1. Clean the door gaskets.
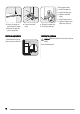
• Loosen the upper pin and remove the spacer. • Remove the upper pin and the upper door. • Loosen the middle hinge. Ventilation requirements The airflow behind the appliance must be sufficient. Installing the appliance 50 mm Caution! Make sure that the mains cable can move freely. min. 200 cm2 Do the following steps: min. 200 cm2 10 • Remove the lower door. • Loosen the lower pin. On the opposite side: • Install the lower pin. • Install the lower door. • Tighten the middle hinge.
x 2 I 4mm x 1 44mm I If necessary cut the adhesive sealing strip and then apply it to the appliance as shown in figure. Install the appliance in the niche. Push the appliance in the direction of the arrows (1) until the upper gap cover stops against the kitchen furniture. Push the appliance in the direction of the arrows (2) against the cupboard on the opposite side of the hinge. Adjust the appliance in the Attach the appliance to the niche. niche with 4 screws.
8 mm 8 mm Ha Ha Hc K Ha Hb Push the part (Hc) on the part (Ha). Open the appliance door and the kitchen furniture door at an angle of 90°. Insert the small square (Hb) into guide (Ha). Put together the appliance door and the furniture door and mark the holes. Remove the brackets and mark a distance of 8 mm from the outer edge of the door where the nail must be fitted (K). Hb Place the small square on the guide again and fix it with the screws supplied.
Περιεχόμενα Πληροφορίες ασφαλείας _ _ _ _ _ _ _ _ _ _ Λειτουργία _ _ _ _ _ _ _ _ _ _ _ _ _ _ _ _ _ Πρώτη χρήση _ _ _ _ _ _ _ _ _ _ _ _ _ _ _ _ Καθημερινή χρήση _ _ _ _ _ _ _ _ _ _ _ _ _ Χρήσιμες συμβουλές _ _ _ _ _ _ _ _ _ _ _ _ 13 15 16 16 18 Φροντίδα και καθάρισμα _ _ _ _ _ _ _ _ _ _ Τι να κάνετε αν...
επίπεδο περιβαλλοντικής συμβατότητας, το οποίο ωστόσο είναι εύφλεκτο. Κατά τη μεταφορά και εγκατάσταση της συ‐ σκευής, βεβαιωθείτε ότι δεν προκαλείται ζη‐ μιά σε κανένα εξάρτημα του κυκλώματος ψυκτικού υγρού. Εάν προκληθεί ζημιά στο κύκλωμα ψυκτι‐ κού υγρού: – αποφύγετε τις γυμνές φλόγες και τις πη‐ γές ανάφλεξης – εξαερίστε καλά το χώρο στον οποίο βρί‐ σκεται η συσκευή • Η οποιαδήποτε αλλαγή των τεχνικών χαρα‐ κτηριστικών ή η τροποποίηση αυτού του προϊόντος είναι επικίνδυνη.
• Μη χρησιμοποιείτε αιχμηρά αντικείμενα για να αφαιρείτε τον πάγο από τη συσκευή. Χρησιμοποιείτε πλαστική ξύστρα. • Ελέγχετε τακτικά την αποστράγγιση του ψυγείου για νερό απόψυξης. Εάν χρειαστεί, καθαρίστε την αποστράγγιση. Εάν η απο‐ στράγγιση είναι φραγμένη, θα συσσωρεύε‐ ται νερό στο κάτω μέρος της συσκευής. Εγκατάσταση ΣΗΜΑΝΤΙΚΟ Για τη σύνδεση του ηλεκτρικού ακολουθήστε προσεκτικά τις οδηγίες που δίνονται στις αντίστοιχες παραγράφους. • Αποσυσκευάστε τη συσκευή και ελέγξτε αν έχει υποστεί ζημιές.
• Περιστρέψτε το ρυθμιστή θερμοκρασίας στις υψηλότερες ρυθμίσεις για την επίτευξη των μεγαλύτερων θερμοκρασιών. Μια μεσαία ρύθμιση είναι σε γενικές γραμμές η πλέον κατάλληλη. Ωστόσο, η ακριβής ρύθμιση πρέπει να επιλε‐ γεί έχοντας υπόψη ότι η θερμοκρασία στο εσωτερικό του ψυγείου εξαρτάται από: • τη θερμοκρασία του δωματίου • πόσο συχνά ανοίγει η πόρτα • την ποσότητα των τροφίμων που αποθη‐ κεύονται • τη θέση της συσκευής.
πους κατεψυγμένων τροφίμων. Κατά πόσο ισχύει η ανώτερη ή η κατώτερη τιμή του εμφα‐ νιζόμενου χρόνου αποθήκευσης εξαρτάται από την ποιότητα των τροφίμων και την επε‐ ξεργασία τους πριν την κατάψυξή τους. Ξεπάγωμα Τα τρόφιμα βαθιάς ή μη κατάψυξης, πριν τη χρήση τους, μπορούν να ξεπαγώνονται στο θάλαμο ψύξης ή σε θερμοκρασία δωματίου, ανάλογα το διαθέσιμο χρόνο ξεπαγώματος.
Χρήσιμες συμβουλές Συμβουλές εξοικονόμησης ενέργειας • Μην ανοίγετε την πόρτα συχνά και μην την αφήνετε ανοικτή για περισσότερο από ότι είναι απολύτως απαραίτητο. • Εάν η θερμοκρασία περιβάλλοντος είναι υψηλή, ο ρυθμιστής θερμοκρασίας βρίσκε‐ ται στην υψηλότερη ρύθμιση και η συσκευή είναι εντελώς φορτωμένη, ο συμπιεστής ίσως λειτουργεί συνεχώς δημιουργώντας πάγο στον εξατμιστήρα.
Συμβουλές για την αποθήκευση κατεψυγμένων τροφίμων Για να πετύχετε την καλύτερη απόδοση από αυτή τη συσκευή, θα πρέπει: • να είστε σίγουροι ότι οι συνθήκες διατήρη‐ σης των κατεψυγμένων τροφίμων του εμπορίου ήταν κατάλληλες στο κατάστημα αγοράς; • να εξασφαλίζετε την ταχύτερη δυνατή μετα‐ φορά των κατεψυγμένων τροφίμων από το κατάστημα αγοράς τους στον καταψύκτη; • μην ανοίγετε την πόρτα συχνά και μην την αφήνετε ανοικτή για περισσότερο από ότι είναι απολύτως απαραίτητο.
7. Τοποθετήστε ξανά στο θάλαμο τα τρόφιμα που είχατε αφαιρέσει. Απόψυξη του καταψύκτη Πάντα θα δημιουργείται μικρή ποσότητα πάγου στα ράφια του καταψύκτη και γύ‐ ρω από τον πάνω θάλαμο. ΣΗΜΑΝΤΙΚΟ Κάντε απόψυξη του καταψύκτη όταν το στρώμα πάγου φθάσει πάγος περίπου 3 έως 5 mm. Για να αφαιρέσετε τον πάγο, ακολουθήστε αυ‐ τά τα βήματα: 1. Απενεργοποιήστε τη συσκευή. 2. Απομακρύνετε τα αποθηκευμένα τρόφιμα, τυλίξτε τα με πολλές εφημερίδες και τοπο‐ θετήστε τα σε ένα δροσερό μέρος. 3. Αφήστε την πόρτα ανοιχτή.
Πρόβλημα Η συσκευή δεν λειτουργεί. Ο λαμπτήρας δεν λειτουρ‐ γεί. Πιθανή αιτία Επίλυση Η συσκευή είναι απενεργο‐ ποιημένη. Ενεργοποιήστε τη συσκευή. Το φις δεν έχει συνδεθεί σω‐ στά στην πρίζα. Συνδέστε σωστά το φις στην πρίζα. Η συσκευή δεν έχει ισχύ. Δεν υπάρχει τάση ρεύματος στην πρίζα. Συνδέστε μια άλλη ηλεκτρική συσκευή στην πρίζα. Επικοινωνήστε με επαγγελματία ηλεκτρολόγο. Ο λαμπτήρας είναι σε αναμο‐ νή. Κλείστε και ανοίξτε την πόρτα. Ο λαμπτήρας είναι ελαττωμα‐ τικός.
Πρόβλημα Η θερμοκρασία στη συ‐ σκευή είναι πολύ υψηλή. Πιθανή αιτία Δεν έχει ρυθμιστεί σωστά η θερμοκρασία. Ρυθμίστε χαμηλότερη θερμο‐ κρασία. Η πόρτα δεν έχει κλείσει σω‐ στά. Ανατρέξτε στην παράγραφο "Κλείσιμο της πόρτας". Η θερμοκρασία του προϊόντος είναι πολύ υψηλή. Αφήστε τη θερμοκρασία του προϊόντος να μειωθεί σε θερμο‐ κρασία δωματίου πριν από τη φύλαξη. Πολλά προϊόντα αποθηκεύο‐ νται ταυτόχρονα. Αποθηκεύστε λιγότερα προϊό‐ ντα. Δεν υπάρχει καθόλου κυκλο‐ φορία κρύου αέρα στη συ‐ σκευή.
Τεχνικά χαρακτηριστικά Διαστάσεις εσοχής Ύψος 1446 mm Πλάτος 560 mm Βάθος 550 mm Χρόνος ανόδου 20 h Τάση 230-240 V Συχνότητα 50 Hz Τα τεχνικά στοιχεία βρίσκονται στην πινακίδα τεχνικών στοιχείων στην εσωτερική αριστερή πλευρά της συσκευής και στην ετικέτα ενέρ‐ γειας. Εγκατάσταση ΠΡΟΣΟΧΗ Πριν την εγκατάσταση της συσκευής διαβάστε προσεκτικά τις "Πληροφορίες ασφάλειας" για την ασφάλειά σας και τη σωστή λειτουργία της συσκευής.
• Χαλαρώστε τον • Χαλαρώστε το με‐ πάνω πείρο και σαίο μεντεσέ. αφαιρέστε τον απο‐ στάτη. • Αφαιρέστε τον πά‐ νω πείρο και την πάνω πόρτα Απαιτήσεις εξαερισμού Πρέπει να υπάρχει επαρκής ροή αέρα πίσω από τη συ‐ σκευή. Εγκατάσταση της συσκευής 50 mm ΠΡΟΣΟΧΗ Βεβαιωθείτε ότι το καλώδιο τροφοδοσίας κινείται ελεύθερα. min. 200 cm2 Ακολουθήστε τα παρακάτω βήματα: min. 200 cm2 24 Στην άλλη πλευρά: • Τοποθετήστε τον κάτω πείρο. • Τοποθετήστε την κάτω πόρτα. • Σφίξτε το μεσαίο μεντεσέ.
x 2 x I 4mm 1 44mm I Εάν απαιτείται, κόψτε την αυτοκόλλητη στε‐ γανοποιητική λωρίδα και στη συνέχεια εφαρμόστε την στη συσκευή, όπως φαί‐ νεται στο σχήμα. Τοποθετήστε τη συ‐ σκευή στη θέση της. Σπρώξτε τη συσκευή προς την κατεύθυνση που δείχνουν τα βέλη (1), μέχρι το κάλυμμα του άνω διάκενου να σταματήσει στο ντου‐ λάπι κουζίνας. Σπρώξτε τη συσκευή προς την κατεύθυνση που δείχνουν τα βέλη (2), προς την πλευρά του ντουλαπιού που βρίσκεται στην αντί‐ θετη πλευρά του με‐ ντεσέ.
ca. 50 mm Ha D C Hb 21 mm E E Αφαιρέστε το σωστό τμήμα από το κάλυμ‐ μα του μεντεσέ (E). Βεβαιωθείτε ότι έχετε αφαιρέσει το ΔΞ τμή‐ μα για το δεξιό μεντε‐ σέ και το ΑΡ τμήμα για τον αριστερό με‐ ντεσέ. Ha B Στερεώστε τα καλύμ‐ ματα (C, D) στις γλωττίδες και στις οπές του μεντεσέ. Τοποθετήστε τη γρί‐ λια εξαερισμού (B). Στερεώστε τα καλύμ‐ ματα του μεντεσέ (E) στο μεντεσέ. 90° Hc Hd ca. 50 mm 21 mm Αποσυνδέστε τα τμή‐ ματα (Ha), (Hb), (Hc) και (Hd).
Hb Hd Πιέστε το τμήμα (Hd) πάνω στο τμήμα (Hb). Για να ανοίξετε τις πόρτες, ακολουθήστε την παρακάτω διαδι‐ κασία. Χρησιμοποιήστε το συρόμενο σύστημα που αναφέρθηκε προηγουμένως ή ανοίξτε μία από τις δύο πόρτες τοποθε‐ τώντας τη μικρή λαβή που παρέχεται με τα εξαρτήματα. Κάντε ένα τελικό έλεγχο για να βεβαιωθείτε ότι: • Όλες οι βίδες είναι σφιγμένες. • Η μαγνητική στεγανοποιητική ταινία είναι σωστά στερεωμένη στο ντουλάπι. το χειμώνα), το μέγεθος του λάστιχου μειώνεται.
Índice de materias Información sobre seguridad _ _ _ _ _ _ _ _ _ _ _ _ Funcionamiento _ _ _ _ _ _ _ _ _ _ _ _ _ _ _ _ _ _ Primer uso _ _ _ _ _ _ _ _ _ _ _ _ _ _ _ _ _ _ _ _ Uso diario _ _ _ _ _ _ _ _ _ _ _ _ _ _ _ _ _ _ _ _ _ Consejos útiles _ _ _ _ _ _ _ _ _ _ _ _ _ _ _ _ _ _ 28 30 30 31 32 Mantenimiento y limpieza _ _ _ _ _ _ _ _ _ _ _ _ _ Qué hacer si… _ _ _ _ _ _ _ _ _ _ _ _ _ _ _ _ _ _ Datos técnicos _ _ _ _ _ _ _ _ _ _ _ _ _ _ _ _ _ _ _ Instalación _ _ _ _ _ _ _ _ _ _ _ _ _ _ _ _ _ _ _ _ _ Aspectos
1. No se debe prolongar el cable de alimentación. 2. Compruebe que la parte posterior del aparato no aplaste ni dañe el enchufe. Un enchufe aplastado o dañado puede recalentarse y provocar un incendio. 3. Cerciórese de que tiene acceso al enchufe del aparato. 4. No tire del cable de alimentación. 5. Si la toma de corriente está floja, no inserte el enchufe. Existe riesgo de descarga eléctrica o incendio. 6. No debe utilizar el aparato sin la tapa de la bombilla11) para la iluminación interior.
• Realice la conexión sólo con el suministro de agua potable. 14) Servicio técnico • Un electricista homologado deberá realizar las tareas que se requieran para ejecutar el servicio o mantenimiento de este electrodoméstico. • Las reparaciones de este aparato debe realizarlas un centro de servicio técnico autorizado y sólo se deben utilizar recambios originales. los materiales aislantes. El aparato no se debe desechar junto con los residuos urbanos.
Uso diario Congelación de alimentos frescos Descongelación El compartimento congelador está ideado para la congelación de alimentos frescos y para la conservación a largo plazo de alimentos congelados y ultracongelados. Para congelar alimentos frescos no es necesario cambiar el ajuste intermedio. Sin embargo, para lograr una congelación más rápida, gire el regulador de temperatura a un ajuste más alto para obtener el frío máximo.
Colocación de los estantes de la puerta Para poder guardar alimentos de distintos tamaños, los estantes de la puerta se pueden colocar a diferentes alturas. Eleve paulatinamente el estante en la dirección de las flechas hasta retirarlo del soporte y colóquelo en la posición que prefiera. Consejos útiles Consejos para ahorrar energía • No abra la puerta con frecuencia ni la deje abierta más tiempo del estrictamente necesario.
• no permita que alimentos frescos y sin congelar entren en contacto con alimentos ya congelados, para evitar el aumento de temperatura de los segundos; • los alimentos magros se congelan mejor que los grasos; la sal reduce el tiempo de almacenamiento de los alimentos; • el hielo, si se consume inmediatamente después de retirarlo del compartimento congelador, puede provocar quemaduras por congelación en la piel; • es recomendable etiquetar cada paquete con la fecha de congelación para controlar el tiempo qu
7. Vuelva a introducir los alimentos que retiró previamente. Descongelación del congelador Siempre se forma un poco de escarcha en los estantes del congelador y en torno al compartimento superior. Importante Descongele el congelador sólo cuando la capa de escarcha alcance un grosor de unos 3 a 5 mm. Para eliminar la escarcha, siga estos pasos: 1. Apague el aparato. 2. Retire los alimentos congelados, envuélvalos en varias hojas de papel periódico y colóquelos en un sitio fresco. 3. Deje la puerta abierta.
Problema La bombilla no funciona. Causa probable Solución La bombilla está en espera. Cierre y abra la puerta. La bombilla está defectuosa. Consulte "Cambio de la bombilla". La temperatura no se ha ajustado correctamente. Seleccione una temperatura más alta. La puerta no está bien cerrada. Consulte "Cierre de la puerta". La puerta se ha abierto con excesiva frecuencia. No mantenga abierta la puerta más tiempo del necesario. La temperatura de los productos es demasiado alta.
1. Retire el tornillo de la tapa de la bombilla. 2. Extraiga la tapa de la bombilla (consulte la ilustración). 3. Cambie la bombilla por una nueva de la misma potencia y específicamente diseñada para electrodomésticos (la potencia máxima se indica en la tapa de la bombilla). 4. Instale la tapa de la bombilla. 5. Apriete el tornillo de la tapa de la bombilla. 6. Enchufe el aparato a la toma de corriente. 7. Abra la puerta. Compruebe que la bombilla se enciende. Cierre de la puerta 1.
tierra, conecte el aparato a una toma de tierra conforme con la normativa, después de consultar a un electricista profesional. El fabricante rechaza toda responsabilidad si no se toman las precauciones antes indicadas. Este aparato es conforme con las directivas de la CEE. • Afloje y extraiga el sepa- • Afloje la bisagra interrador superior. media. • Retire el pasador superior y la puerta superior. Requisitos de ventilación El aire debe poder circular libremente por la parte posterior del aparato.
x 2 I 4mm x 1 44mm I Si es necesario, corte la cinta selladora adhesiva y péguela al aparato como se muestra en la figura. Instale el aparato en el hueco. Empuje el aparato en el sentido de las flechas (1) hasta que la cubierta de separación superior haga tope contra el mueble de cocina. Empuje el aparato en el sentido de las flechas (2) contra el mueble en el lado opuesto de la bisagra. Ajuste el aparato en el hue- Fije el aparato al hueco con co. 4 tornillos.
Ha 8 mm 8 mm Ha Hc K Ha Hb Empuje la pieza (Hc) contra Abra la puerta del aparato y la pieza (Ha). la del mueble de cocina en un ángulo de 90°. Introduzca el cuadrado pequeño (Hb) en la guía (Ha). Coloque juntas las puertas del aparato y del mueble y marque los orificios. Quite las escuadras y ponga una marca a una distancia de 8 mm desde el borde exterior de la puerta en la que se debe colocar el clavo (K).
212331501-B-442010 www.zanussi.