35662 - 8803 INSTRUCTIONS FOR THE INSTALLATION AND USE ZANUSSI BUILT-IN OVEN ZBS 703 B ZBS 703 W ZBS 703 BL 2
WARNINGS AND GUIDANCE It is most important that this instruction book should be retained with the appliance for future reference. Should the appliance be sold or transferred, always ensure that the book is left with the appliance in order that the new owner can get to know the functions of the appliance and the relevant warnings. These warnings are provided in the interest of safety. You MUST read them carefully before installing or using the appliance.
AFTER USE • Ensure that all control knobs are in the OFF position when not in use. • For hygiene and safety reasons, this oven should be kept clean at all times. A build-up of fats or other foodstuffs could result in a fire, especially in the grill pan. • Always allow the cooling fan to cool the oven down before switching off at the electrical supply prior to carrying out any cleaning or maintenance work. • Do not leave utensils containing foodstuffs, e.g.
CONTENTS Warnings & Guidance Technical Data Installation and Electrical Connections General information Control Panel How to set the main functions Timer display Using the Programmes Oven functions Cooking tips Grilling Pizza oven - Bread proving Helpful hints when buying and preparing food Cleaning the oven Care of catalytic liners Cleaning the hinged grill What happens if Something Goes Wrong Zanussi Guarantee - Peace of mind for 24 Months Page Page Page Page Page Page Page Page Page Page Page Page Page
INSTALLATION AND ELECTRICAL CONNECTION It is mandatory that all operations required for the installation be carried out by a qualified or competent person - in accordance with existing rules and regulations. Please ensure that when the appliance is installed it is easily accessible for the engineer in the event of a breakdown.
ELECTRICAL CONNECTION We strongly recommend that all operations for the installation of your oven be carried out by QUALIFIED PERSONNEL to the relevant British Standards. The oven designed to be connected to 240V (50Hz) electricity supply.
GENERAL INFORMATION RATING PLATE MEAT PAN AND GRID These numbers can be found on the rating plate on the lower front frame of the cooker upon opening the oven door. The oven must be protected by a suitable rated fuse or circuit breaker. The rating of the oven is given on the rating plate. When grilling and roasting, food can be placed on the grid in the pan. Fat and meat juices will drain into the base and can be poured off and used to make gravy.
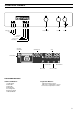
CONTROL PANEL PM BUILT 11 22 33 5 6 7 44 5 67 Child Safety Oven Off Oven On IN 88 99 10 10 Function Selector Decrease Increase Meat Probe Cooking Time End Of Cooking Minute Minder TECHNICAL ASSISTANCE TIME TEMPERATURE CHILD SAFETY PM COOKING TIME MEAT PROBE MINUTE MINDER END OF COOKING PROGRAMME BUTTONS Small Push Buttons 1 2 3 4 5 6 7 Child Safety Oven Off Oven On Meat Probe Cooking Time End of Cooking Minute Minder Large Push Buttons 8 Oven Function Selector 9 Decrease Temperature
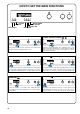
HOW TO SET THE MAIN FUNCTIONS PM 1 2 3 4 5 6 7 8 9 10 OVEN ON OVEN OFF MINUTE MINDER END OF COOKING COOKING TIME MEAT PROBE CHILD SAFETY CLOCK-SETTING THE TIME OF DAY 1 2 3 4 5 6 7 AUTOMATIC FUNCTION (COOKING TIME END OF COOKING) 1 2 3 4 5 6 7 Press button 5 and 6 at the same time, release them and enter the time pressing large buttons 9 or 10. Select the required programme and temperature.
TIMER DISPLAY Meaning Of Symbols FAN DUCTED OVEN CONVENTIONAL OVEN GRILL ECONOMY GRILL THERMAL GRILLING PIZZA OVEN TOP ELEMENT BOTTOM ELEMENT BREAD PROVING DEFROST COLD FAN 11
USING THE PROGRAMMES ELECTRONIC PROGRAMMER All the oven functions are controlled by an electronic programmer, this programmer permits you to select a particular type or combination of heating elements, cooking temperature and automatic timing. The function selected will be displayed on the programme display panel as shown on page 9. Different ways of using each programme are detailed under the individual cooking functions. SETTING THE TIME OF DAY The oven has 24hr clock.
AUTOMATIC COOKING It is possible to programme a delay cook start and cook time so that the food can be cooked automatically. It is also possible to programme the oven to switch off only (semi automatic). TO SET THE COOKING TIME Select the required programme and temperature as previously described on page 11. Press button 5 and select the cooking time using buttons 9 and 10. If a selection is not made within 5 seconds, the oven will revert back to the time of day.
AUTOMATIC SWITCH OFF Should you forget to switch the oven off after a programme, or if the "ON" button is pressed accidentally, the oven will switch off automatically. In fact, in the case of manual functioning, the programmer will switch the oven off automatically if no other button is activated after a certain time. This time varies according to the temperature setting of the oven, and ranges from a minimum of 2 hours for temperatures above 230°C, up to 8 hours for those below 120°C.
MEAT PROBE The meat probe is a feature which will control the cooking of meats by informing you of the exact temperature at the centre of the meat. It is not necessary to weigh the meat, the sensor determines the cooking time. However, the cooking time is obviously influenced by the cooking temperature. 1 2 The probe consists of a skewer like sensor at one end of a heat resistant cable, and a plug at the other end.
OVEN FUNCTIONS The following table lists the functions available for each type of programme. OVEN FUNCTION Meat Probe Auto - Timer FAN DUCTED X X CONVENTIONAL OVEN X X X X GRILL ECONOMY GRILL THERMAL GRILLING PIZZA OVEN X TOP ELEMENT X X BOTTOM ELEMENT X X BREAD PROVING X DEFROST COLD FAN X Should any of the functions not be available for a particular programme you will hear an audible signal.
COOKING TIPS With this type of oven, it is possible to cook by using fan ducted, conventional, thermal grilling and grilling functions. We have also added two extra functions Pizza and Bread Proving. The following pages contain an explanation of each type or cook function and methods of using them. Further guidelines can be found in your Zanussi Cookbook. FAN DUCTED OVEN The air inside the oven is heated by the element around the fan situated behind the back panel.
OVEN COOKING CHART The oven temperatures are intended as a guide only. It may be necessary to increase or decrease the temperatures by 10 °C to suit individual preferences and requirements. NOTE: Shelf positions are counted from bottom of the oven.
CONVENTIONAL OVEN This function uses the top and lower elements to give single level cooking. This is particularly suitable for disches which require extra base browning such as pizzas, quiches and flans. Gratins, lasagnes and hotpots which require extra top browning also cook well in the conventional oven. This form of cooking gives you the opportunity to cook without the fan in operation. HINTS AND TIPS The middle shelf position allows for the best heat distribution.
GRILL, ECONOMY GRILL TEMPERATURE SELECTION Important All grilling must be carried out with the oven door closed and the grill pan handle removed from the pan. Most foods should be placed on the grid in the grill pan to allow maximum circulation of air to lift the food out of the fats and juices.
THERMAL GRILLING Used of thermal grilling Thermal grilling offers an alternative method of cooking food items normally associated with conventional grilling. The grill element and the oven fan operate alternately, circulating hot air around the food. The need to check and turn food is reduced. Thermal grilling helps to minimise cooking smells in the kitchen and allows you to grill with the oven door closed.
PIZZA OVEN The botton element provides direct heat to the base of pizzas, quiches or pies, while the fan ensure air is circulated to cook the pizza toppings or pie fillings. To obtain the best results use the lower shelf levels.
HELPFUL HINTS WHEN BUYING AND PREPARING FOOD Care must be taken when handling foods in the home. Always follow the basic rules of food hygiene to prevent bacterial and microbial growth and cross contamination when preparing, reheating, cooking, cooling, defrosting and freezing foods: 1. Always ensure food you purchase is of good quality and in prime condition. Shop at a reliable source and buy the 'freshest' looking package - avoid shopworn labels or produce covered in dust. 2.
CLEANING THE OVEN Before cleaning always allow the cooling fan to cool the oven down before switching off at the electricity supply Cleaning materials Before using any cleaning materials on your oven, check that they are suitable and that their use is recommended by the manufacturer. Cleaners that contain bleach should NOT be used as they may dull the surface finishes. Harsh abrasives should also be avoided. Glass Panel This should be cleaned with a soft cloth soaked in warm soapy water.
CARE OF CATALYTIC LINERS Catalytic liners destroy splashes of food and fats when the oven temperature is raised to around 220°C. To aid this process it is a good idea to run the oven for an hour or two per week, without food, to ensure continued good performance from the Catalytic liners. Hints and tips • Manual cleaning of the Catalytic liner is not recommended. Damage will occur if soap impregnated steel wool pads, aerosol cleaners and any other abrasives are used.
WHAT HAPPENS IF SOMETHING GOES WRONG? CALL FOR SERVICE The programmer display carries out a self check, in order to verify that it is working correctly. If a problem is identified, the spanner symbol will be displayed. In the event of a breakdown, a NUMBER will appear. If numbers 001 or 002 appear, it means that the meat probe is at fault and needs to be replaced. If the appears when you plug in the meat probe, ensure the interior of the oven does not exceed the pre-set temperature of the meat probe.
PEACE OF MIND FOR 24 MONTHS ZANUSSI GUARANTEE CONDITIONS This guarantee is in addition to your statutory and other legal rights. We, Zanussi Ltd.