GB User Guide Microwave Oven ZBG26542
CONTENTS CONTENTS Important safety instructions . . . . . . . . . . . . . . . . . . . . . . . . 4 Appliance overview . . . . . . . . . . . . . . . . . . . . . . . . . . . . . . . 7 Before first use . . . . . . . . . . . . . . . . . . . . . . . . . . . . . . . . . . . 8 Microwave cooking advice . . . . . . . . . . . . . . . . . . . . . . . . 10 Microwave operation . . . . . . . . . . . . . . . . . . . . . . . . . . . . . 11 Programme charts . . . . . . . . . . . . . . . . . . . . . . . . . . . . . . .
IMPORTANT SAFETY INSTRUCTIONS IMPORTANT SAFETY INSTRUCTIONS IMPORTANT SAFETY INSTRUCTIONS: READ CAREFULLY AND KEEP FOR FUTURE REFERENCE To avoid the danger of fire The microwave oven should not be left unattended during operation. Power levels that are too high or cooking times that are too long may overheat foods resulting in a fire. The electrical outlet must be readily accessible so that the unit can be unplugged easily in an emergency.
IMPORTANT SAFETY INSTRUCTIONS IMPORTANT SAFETY INSTRUCTIONS Do not allow grease or dirt to build up on the door seals and adjacent parts. Follow the instructions for “Care & Cleaning”. Failure to maintain the oven in a clean condition could lead to a deterioration of the surface that could adversely affect the life of the appliance and possibly result in a hazardous situation. Microwave heating of beverages can result in delayed eruptive boiling, therefore care has to be taken when handling the container.
IMPORTANT SAFETY INSTRUCTIONS Keep children away from the door and accessible parts that may become hot when the grill is in use. Children should be kept away to prevent them burning themselves. Do not touch the oven door, outer cabinet, rear cabinet, oven cavity, ventilation openings, accessories and dishes during GRILL mode, DUAL GRILL mode and AUTO COOK operation as they will become hot. Before cleaning make sure they are not hot. Keep children away from the door to prevent them burning themselves.
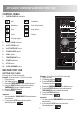
APPLIANCE OVERVIEW MICROWAVE OVEN & ACCESSORIES 1 2 3 4 5 9 8 1. Grill heating element 2. Front trim 3. Oven lamp 4. Control panel 5. Door opening button 6. Waveguide cover 7. Oven cavity 8. Seal packing 9. Door seals and sealing surfaces 10. Fixing points (4 points) 11. Ventilation openings 12. Outer cover 13. Rear cabinet 14. Power supply cord 7 6 10 14 11 12 13 Check to make sure the following accessories are provided: 1. Turntable 2. Turntable support 3. High rack 4. Low rack 5.
APPLIANCE OVERVIEW & BEFORE FIRST USE CONTROL PANEL 1. DIGITAL DISPLAY indicators 1 Grill Plus/Minus Microwave Auto defrost bread Dual Auto defrost Clock Weight 2 3 4 5 6 Cooking stages 2. AUTO COOK indicators 3. AUTO COOK button 4. AUTO DEFROST button 5. POWER LEVEL button 6. GRILL button 7. TIMER/WEIGHT knob 8. START/+30 button 9. STOP button 10. DOOR OPENING button 7 8 9 10 BEFORE FIRST USE SETTING THE CLOCK The oven has a 12 and 24 hour clock.
BEFORE FIRST USE ADJUSTING THE TIME WHEN THE CLOCK IS SET Example: To set the clock to 11:45 (12 hour clock). 1. Open the door. 2. Press and hold the START/+30 button for 5 seconds. The oven will beep. Rotate the TIMER/WEIGHT knob to adjust the hour. 3. Press the START/+30 button once then rotate the TIMER/WEIGHT knob to adjust the minutes. 4. Press the START/+30 button once. 5. Check the display: Example: To set the clock to 23:45 (24 hour clock). 1. Open the door. 2.
MICROWAVE COOKING ADVICE MICROWAVE COOKING To cook/defrost food in a microwave oven, the microwave energy must be able to pass through the container to penetrate the food. Therefore it is important to choose suitable cookware. Round/oval dishes are preferable to square/oblong ones as the food in the corners tends to overcook. It is important to turn, rearrange or stir food to ensure even heating. Standing time is necessary after cooking as it enables the heat to disperse equally throughout the food.
MICROWAVE COOKING ADVICE & MICROWAVE OPERATION MICROWAVE SAFE COOKWARE Cookware Aluminium foil/containers Browning dishes China and ceramics Glassware e.g. Pyrex ® Metal Plastic/polystyrene e.g. fast food containers Cling film Freezer/roasting bags Paper - plates, cups and kitchen paper Straw and wooden containers Recycled paper and newspaper Microwave Comments safe ✔ / ✘ Small pieces of aluminium foil can be used to shield food from overheating.
MICROWAVE OPERATION Example: To heat soup for 2 minutes and 30 seconds on 630 W microwave power. 1. Press the POWER 2. Enter the time by rotating 3. Press the START/+30 button. LEVEL button twice. the TIMER/WEIGHT knob clockwise/anti-clockwise until 2.30 is displayed. x2 4. Check the display: x1 Important: If the power level is not selected, 900 W/HIGH is automatically set. Note: • When the door is opened during the cooking process, the cooking time on the digital display stops automatically.
MICROWAVE OPERATION PLUS & MINUS The PLUS and MINUS function enables you to decrease or increase the cooking time when using the automatic programmes. If you prefer boiled potatoes which are cooked but still firm, use MINUS . Alternatively, if you prefer boiled potatoes softer, use PLUS . Example: To cook 0.3 kg of boiled potatoes, well done. 1. Select the menu required 2. Turn the TIMER/WEIGHT 3. Press the POWER LEVEL 4. Press the START/+30 knob until 0.3 is displayed. button once to select the button.
MICROWAVE OPERATION 2. DUAL GRILL COOKING This mode uses a combination of grill power and microwave power (90 W to 630 W). The microwave power level is preset to 270 W. Button Grill x 1 Grill x 2 Grill x 3 Grill x 4 Grill x 5 Example: To cook grill skewers for 7 minutes on DUAL GRILL (450 W). 2. Enter the time by rotating 3. Press the START/+30 1. Press the GRILL button the TIMER/WEIGHT knob three times. button. clockwise/anti-clockwise until 7.00 is displayed.
MICROWAVE OPERATION AUTO COOK & AUTO DEFROST OPERATION AUTO COOK and AUTO DEFROST automatically works out the correct cooking mode and cooking time. You can choose from 6 AUTO COOK and 2 AUTO DEFROST menus. AUTO COOK Food Symbol Setting Beverage Microwave Boiled potatoes/Jacket potatoes Microwave Grilled skewers Microwave + grill Gratinated fish fillet Microwave + grill Grilled chicken Microwave + grill Gratin Microwave + grill Example: To cook 0.3 kg of boiled potatoes. 1.
PROGRAMME CHARTS AUTO COOK & AUTO DEFROST CHARTS Auto cook Weight (Increasing Unit)/Utensils Beverage (Tea/Coffee) 1 - 6 cups 1 cup = 200 ml Button Procedure • Place cup towards edge of turntable. x1 Boiled and jacket potatoes 0.2 - 1.0 kg (100 g) Bowl and lid x2 Grilled skewers 0.2 - 0.8 kg (100 g) High rack x3 Gratinated fish fillet Grilled chicken Gratin 0.5 - 1.5 kg* (100 g) Gratin dish Low rack 0.9 - 1.8 kg (100 g) Flan dish Low rack 0.5 - 1.
PROGRAMME CHARTS Auto defrost Meat/fish/poultry Weight (Increasing Unit)/Utensils 0.2 - 1.0 kg (100 g) Flan dish (Whole fish, fish steaks, fish fillets, chicken legs, chicken breast, minced meat, steak, chops, burgers, sausages) Button Procedure • • x1 • • Bread 0.1 - 1.0 kg (100 g) Flan dish • x2 • • Place the food in a flan dish in the centre of the turntable. When the audible bell sounds, turn the food over, rearrange and separate. Shield thin parts and warm spots with aluminium foil.
PROGRAMME CHARTS RECIPES FOR AUTO COOK Grill skewers 1. Thread meat and vegetables alternately on 4 wooden skewers. 2. Mix the oil with the spices and brush over the kebabs. 3. Place the kebabs on the high rack and cook on AUTO COOK “Grill skewers”. 4 pieces 400 g 100 g 100 g 250 g 100 g 2 tbsp 4 tsp 1 tsp 1 tsp pork cutlets, cubed streaky bacon onions, quartered tomatoes, quartered green pepper, cubed oil paprika salt cayenne pepper Worcester sauce Gratinated fish fillet ‘Esterhazy’ 1.
PROGRAMME CHARTS Spinach gratin 1. Mix together the leaf spinach with the onion and season with salt, pepper and nutmeg. 2. Grease the gratin dish. Place alternate layers of potato slices, diced ham and spinach in the dish. The top layer should be spinach. 3. Mix the eggs with crème fraîche, add salt and pepper and pour over the gratin. 4. Cover the gratin with the grated cheese. 5. Place on the low rack and cook on AUTO COOK “Gratin”. 6. After cooking, stand for 5-10 min. 0.5 kg 150 g 15 g 1.
PROGRAMME CHARTS COOKING CHARTS Abbreviations used tbsp = tablespoon tsp = teaspoon cup = cupful kg = kilogram g = gram l = litre ml = millilitre cm = centimetre min = minutes Heating food & drink Food/Drink Quantity Setting Power Time Method -g/mlLevel -MinMilk, 1 cup 150 Micro 900 W approx. 1 do not cover Water, 1 cup 150 Micro 900 W approx.
PROGRAMME CHARTS Cooking, grilling & browning Food Quantity Setting -g500 Micro Power Level 900 W Peas 500 Micro 900 W Carrots 500 Micro 900 W Roasts (pork, veal, lamb) 1000 Micro Dual Grill Micro Dual Grill 450 W 450 W 450 W 450 W Time Method Standing time -Min-Min6-8 add 4-5 tbsps water, cover, stir halfway through cooking 6-8 add 4-5 tbsps water, cover, stir halfway through cooking 9-11 cut into rings, add 4-5 tbsps water, cover, stir halfway through cooking 16-18 season to taste, place on
RECIPES RECIPES such as platters of food, should have the surface moistened prior to heating or cooking. The amount of liquid to be added to raw foods, which are to be braised, should be reduced to about two thirds of the quantity in the original recipe. If necessary, add more liquid during cooking. The amount of fat to be added can be reduced considerably. A small amount of butter, margarine or oil is sufficient to flavour food.
RECIPES Mushrooms with rosemary Utensils: Bowl with lid (1 l capacity) Shallow round dish with lid (approx. 22 cm diameter) 8 large mushrooms (approx. 225 g), whole 20 g butter or margarine 50 g onion, finely chopped 50 g bacon, finely diced black pepper fresh rosemary, chopped 125 ml dry white wine 125 ml cream 20 g flour 1. Remove the stalks from the mushrooms. Chop the stalks into small pieces. 2. Grease the shallow dish. Add the onions, the diced bacon and the mushroom stalks.
RECIPES Fish fillet with cheese sauce Utensils: Bowl with lid (1 l capacity) Shallow round gratin dish (approx. 25 cm long) 800 g fish fillets 2 tbsp lemon juice salt 10 g butter or margarine 50 g onion, finely chopped 20 g flour 100 ml white wine 1 tsp vegetable oil to grease the dish 100 g Emmental cheese, grated 2 tbsp parsley, chopped 1. Wash the fish, pat dry and sprinkle with lemon juice. Rub with salt. 2. Grease the bowl. Add the diced onion, cover and cook. 1-2 min. 900 W 3.
RECIPES Veal cutlets with mozzarella Utensils: Shallow square gratin dish with lid (approx. 25 cm long) 150 g Mozzarella cheese, sliced 500 g tinned tomatoes, drained 4 veal cutlets (600 g) 20 ml olive oil 2 cloves of garlic, chopped 20 g capers oregano salt and pepper 1. Wash the veal, dry and beat them flat. 2. Purée the tomatoes, add garlic, oil, salt, pepper, capers and oregano and pour over the veal. Cover and cook. 15-19 min. 630 W Turn the meat slices over. 3.
RECIPES Pears in chocolate sauce Utensils: Bowl with lid (2 l capacity) Bowl with lid (1 l capacity) 4 whole pears, peeled (600 g) 60 g sugar 10 g vanilla sugar 1 tbsp pear liqueur 150 ml water 130 g dark chocolate, chopped 100 g crème fraîche 1. Place the sugar, vanilla sugar, pear liqueur and water into the bowl, stir, cover and cook. 1-2 min. 900 W 2. Place the pears in the liquid, cover and cook. 5-8 min. 900 W Take the pears out of the cooking liquid and place in the refrigerator. 3.
CARE & CLEANING CARE & CLEANING times with a damp cloth until all residues are removed. Do not remove the waveguide cover. 2. Make sure that mild soap or water does not penetrate the small vents in the walls which may cause damage to the oven. 3. Do not use spray type cleaners on the oven interior. 4. Heat up your oven regularly by using the grill. Remaining food or fat splashed can cause smoke or a bad smell. Turntable & turntable support Remove the turntable and turntable support from the oven.
WHAT TO DO IF... & SPECIFICATIONS WHAT TO DO IF... Problem The microwave appliance is not working properly? The microwave mode is not working? The turntable is not turning? The microwave will not switch off? The interior light is not working? • • • • • • • • • • • • • The food is taking longer to heat through and cook • than before? • • Check if ... The fuses in the fuse box are working. There has not been a power outage. If the fuses continue to blow, please contact a qualified electrician.
INSTALLATION The microwave can be fitted in position A or B: POSITION NICHE SIZE W D H A 560 x 550 x 450 B 560 x 500 x 450 Measurements in (mm) Position A Position B D Conventional oven INSTALLING THE APPLIANCE 1. Remove all packaging and check carefully for any signs of damage. 2. Fit the appliance into the kitchen cupboard slowly, and without force, until the front frame of the oven seals against the front opening of the cupboard. 3. Ensure the appliance is stable and not leaning.
INSTALLATION CONNECTING THE APPLIANCE TO THE POWER SUPPLY • The electrical outlet should be readily accessible so that the unit can be (A) unplugged easily in an emergency. Or it should be possible to isolate the oven from the supply by incorporating a switch in the fixed wiring in accordance with the wiring rules. • The socket should not be positioned behind the cupboard. • The best position is above the cupboard, see (A).
ENVIRONMENTAL INFORMATION Ecologically responsible disposal of packaging materials and old appliances Packaging materials ZANUSSI microwave ovens require effective packaging to protect them during transportation. Only the minimum packaging necessary is used. Packaging materials (e.g. foil or styrofoam) can place children at risk. Danger of suffocation. Keep packaging material away from children. All packaging materials used are environment friendly and can be recycled.
SERVICE & SPARE PARTS & CUSTOMER CARE SERVICE & SPARE PARTS In the event of your appliance requiring service, or if you wish to purchase spare parts, please contact your local Service Force Centre by telephoning: 08445 616 616 Your telephone call will be automatically routed to the Service Force Centre covering your post code area. For the address of your local Service Force Centre and further information about Service Force, please visit the website at www.serviceforce.co.uk.
GUARANTEE CONDITIONS STANDARD GUARANTEE CONDITIONS We, Zanussi, undertake that if within 12 months of the date of the purchase this Zanussi appliance or any part thereof is proved to be defective by reason only of faulty workmanship or materials, we will, at our option repair or replace the same FREE OF CHARGE for labour, materials or carriage on condition that: • The appliance has been correctly installed and used only on the electricity supply stated on the rating plate.
www.electrolux.com ˚ ☎ ✉ Albania Belgique/België/Belgien Ceská republika Danmark Deutschland Eesti España +35 5 4 261 450 +32 2 363 04 44 +420 2 61 12 61 12 +45 70 11 74 00 +49 180 32 26 622 +37 2 66 50 030 +34 902 11 63 88 France Great Britain Hellas Hrvatska Ireland Italia Latvija Lietuva Luxembourg Magyarország Nederland Norge Österreich Polska Portugal www.electrolux.
TINS-A670URR0 Subject to change without notice www.zanussi.