CONGELADOR FREEZER ZBF 7226 LIBRO DE INSTRUCCIONES INSTRUCTION BOOKLET 2223 362-03
ADVERTENCIASY CONSEJOS IMPORTANTES Es muy importante conservar este libro de instrucciones junto al aparato por si fuera necesario consultarlo. Si el aparato se vendiese o transfiriese a otra persona, acuérdese de entregarlo junto con él para que el nuevo propietario conozca el funcionamiento de la máquina y sus advertencias. En caso de que este aparato, dotado de cierre magnético, sustituya uno con cierre automático, aconsejamos que la cerradura de este último quede inservible, antes de deshacerse de él.
• • En todos los aparatos de refrigeración y congelación existen superficies que se cubren con escarcha. Según el modelo, la escarcha puede ser eliminada automáticamente (desescarche automático) o manualmente. No intentar nunca quitar la escarcha con un objeto puntiagudo ya que se podría dañar irremediablemente el evaporador. Utilizar para ello sólo el rascador de plástico que se suministra con el aparato.
USO Limpieza de las partes internas No emplear detergentes o polvos abrasivos que podrían dañar las superficies. Antes del empleo limpiar todas las partes internas con agua tibia y jabón neutro, a fin de eliminar el característico olor de nuevo y secarlas luego cuidadosamente.
Funcionamiento Después de haber introducido el enchufe en la toma de corriente, si el display no se ilumina apretar la tecla (A), encendido del aparato. Una vez encendido el aparato, aparecerán las siguientes indicaciones en el panel de mandos: • El símbolo (2) será positivo para indicar que la temperatura es positiva. • la temperatura parpadea, el fondo del display es rojo y se oye un sonido (timbre). Apretar la tecla (C) y se apaga el sonido (véase párrafo "alarma por sobretemperatura").
Conservación de los alimentos congelados En el momento de la puesta en funcionamiento o después de un periodo de inactividad, espere al menos 12 horas antes de introducir los alimentos en el aparato. Se aconseja que mantenga el asa en posición intermedia.
CONSEJOS Consejos para congelación • Todos los productos por congelar tienen que ser frescos y de buena calidad. • Los alimentos por congelar tienen que estar confeccionados en porciones suficientes al consumo familiar, para que puedan utilizarse en una sola vez. • Las confecciones pequeñas permiten una congelación más rápida y uniforme. No hay que olvidar que una vez descongelados, la calidad de los alimentos se deteriora rápidamente.
MANUTENCIÓN Desenchufar siempre el aparato antes de proceder a cualquier operación de limpieza. Atención Este aparato contiene hidrocarburos en el circuito refrigerante; por lo tanto el mantenimiento y la recarga deben ser efectuados exclusivamente por personal autorizado por la empresa.
INSTALACIÓN Colocación Situar el aparato lejos de fuentes de calor, como: radiadores, estufas, exposición directa a los rayos del sol, etc. Conexión eléctrica Antes de enchufar el aparato, asegurarse de que la tensión y la frecuencia indicadas en la tarjeta matrícula, correspondan a las de la instalación doméstica. Se admite una oscilación de 6% sobre la tensión nominal. Para el funcionamiento a tensiones distintas, habrá que utilizar un autotransformador de potencia adecuada.
50 mm Instrucciones para la instalación min. 200 cm 2 Dimensiones del hueco Altura (1) 1780 mm Profundidad (2) 550 mm Anchura (3) 560 mm Para una adecuada ventilación seguir les indicaciones de la Fig. Atención: mantener las aperuras para la ventilación libres de cualquier obstáculo. min.
Fijar el aparato con los 4 tornillos en dotación. (I = corto) (P = largo) I P Colocar a presión el cubrejuntas entre el aparato y el mueble. D724 Colocar les tapas (C-D) sobre los extremos del perfil y en los agujeros para la bisagra. Colocar la parrilla de aireación (B) encajándola a presión y engornar la tapa (E) en posición. D C E B Separar las piezas Ha, Hb, Hc, Hd según se indica en la figura. Hb Ha Hc Hd PR266 ca.
Introducir la tapa (Hc), presionándola hasta oír el resorte, en la guía (Ha). Ha Hc PR33 8mm Abrir la puerta del aparato y la del mueble a 90° aprox. Introducir la escuadrita (Hb) en la guía (Ha). Mantener unidas la puerta del aparato y la del mueble y marcar los agujeros según se indica en la figura. Quitar las escuadritas y hacer unos agujeros de 2 mm de Ø a 8 mm desde el borde exterior de la puerta. Colocar otra vez la escuadrita sobre la guía y fijarla con los tornillos presentes en el equipo base.
WARNINGS It is most important that this instruction book should be retained with the appliance for future reference. Should the appliance be sold or transferred to another owner, or should you move house and leave the appliance, always ensure that the book is supplied with the appliance in order that the new owner can be acquainted with the functioning of the appliance and the relevant warnings.
• Do not place carbonated or fizzy drinks in the freezer as it creates pressure on the container, which may cause it to explode, resulting in damage to the appliance. Installation • During normal operation, the condenser and compressor at the back of the appliance heat up considerably. For safety reasons, minimum ventilation must be as shown in the instructions. Attention: keep ventilation openings clear of obstruction.
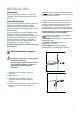
USE Do not use detergents or abrasive powders, as these will damage the finish. Cleaning the interior Before using the appliance for the first time, wash the interior and all internal accessories with lukewarm water and some neutral soap so as to remove the typical smell of a brand-new product, then dry thoroughly. Control panel A ABCD- B C D Appliance button ON/OFF Temperature and function indicator Function button Freezer Thermostat control knob DISPLAY 1 1. 2. 3. 4.
Operation Activation of functions After plugging the plug into the power outlet, if the display is not illuminated, press key (A), appliance on. Each time key C is pressed, the following functions are activated in a clockwise direction: As soon as the appliance is turned on, the following signals will appear on the control panel: Symbol 4 : rapid freezing function. • symbol (2) will be positive, indicating that the temperature is positive.
Excessive temperature alarm Door open acoustic alarm An increase in the temperature in the freezer compartment (for example due to an electricity outage) is indicated by: - flashing temperature; - freezer compartment flashing (symbol 2); - red illumination of display; - sounding of buzzer. - alarm symbol. When normal conditions are restored: - the acoustic signal shuts off; - the temperature value continues to flash; - the display illumination remains red.
HINTS Hints for freezing Hints for storage of frozen food To help you make the most of the freezing process, here are some important hints: To obtain the best performance from this appliance, you should: • the maximum quantity of food which can be frozen in 24 hrs. is shown on the rating plate; • make sure that the commercially frozen foodstuffs were adequately stored by the retailer; • the freezing process takes 24 hours.
MAINTENANCE Unplug the appliance before carrying out any maintenance operation. Warning This appliance contains hydrocarbons in its cooling unit; maintenance and recharging must therefore only be carried out by authorized technicians.
INSTALLATION Location The appliance should be installed well away from sources of heat such as radiators, boilers, direct sunlight etc. For building into kitchen units follow the special “ Building-in” instructions given. Electrical connection Before plugging in, ensure that the voltage and frequency shown on the serial number plate correspond to your domestic power supply. Voltage can vary by ±6% of the rated voltage. For operation with different voltages, a suitably sized auto-transformer must be used.
Instructions for totally built-in appliances 50 mm min. 200 cm 2 Dimensions of the recess Height (1) 1780 mm Depth (2) 550 mm Width (3) 560 mm For safety reasons, minimum ventilation must be as shown in Fig. min. 200 cm2 D567 Attention: keep ventilation openings clear of obstruction. 50 540 Furthermore, it is necessary that the niche is provid with a conduct of ventilation having the following dimensions: depth 50 mm width 540 mm 3 2 1 PR01 Ø 2,5 Drill the unit using a Ø 2.
Fasten the appliance with 4 screws provided in the kit included with the appliance (I = short) (P = long) I P Press in the joint covers between the appliance and the kitchen unit. D724 Apply covers (C-D) on joint cover lugs and into hinge holes. Snap vent grille (B) and hinge cover (E) into position.
Fix cover (Hc) on guide (Ha) until it clips into place. Ha Hc PR33 Open the appliance door and the furniture door at 90°. Insert the small square (Hb) into guide (Ha). Put together the appliance door and the furniture door and mark the holes as indicated in the figure. Remove the squares and drill holes with ø 2 mm at 8 mm from the outer edge of the door. Place the small square on the guide again and fix it with the screws supplied.
www.electrolux.com www.zanussi.com.