HR CS NL EN ET FR DE Upute za uporabu Návod k použití Gebruiksaanwijzing User manual Kasutusjuhend Notice d'utilisation Benutzerinformation Zamrzivač hladnjak Chladnička s mrazničkou Koelkast-Vriezer Fridge-Freezer Külmik-sügavkülmuti Réfrigérateur-congélateur Kühl - Gefrierschrank ZBB3244 2 15 28 41 52 65 78
Sadržaj Informacije o sigurnosti _ _ _ _ _ _ _ _ _ _ Rad uređaja _ _ _ _ _ _ _ _ _ _ _ _ _ _ _ _ Prva uporaba _ _ _ _ _ _ _ _ _ _ _ _ _ _ _ Svakodnevna uporaba _ _ _ _ _ _ _ _ _ _ Korisni savjeti i preporuke _ _ _ _ _ _ _ _ _ 2 4 4 5 6 Čišćenje i održavanje _ _ _ _ _ _ _ _ _ _ _ 7 Rješavanje problema _ _ _ _ _ _ _ _ _ _ _ 8 Tehnički podaci _ _ _ _ _ _ _ _ _ _ _ _ _ 10 Postavljanje _ _ _ _ _ _ _ _ _ _ _ _ _ _ _ 11 Briga za okoliš _ _ _ _ _ _ _ _ _ _ _ _ _ _ 14 Zadržava se pravo na izmjene Informacije o si
oštećenje kabela može prouzročiti kratki spoj, požar i/ili strujni udar. Upozorenje Sve električne komponente (električni kabel, utikač, kompresor) mora zamijeniti ovlašteni serviser ili kvalificirani servisni tehničar kako bi se izbjegle opasnosti. 1. Strujni kabel ne smije se produživati. 2. Provjerite je li stražnji dio uređaja prignječio ili oštetio utikač. Prignječen ili oštećen utikač može se pregrijati i prouzročiti požar. 3. Provjerite imate li pristup do električnog utikača uređaja. 4.
izbjegli dodirivanje toplih dijelova (kompresor, kondenzator) i spriječili mogućnost opeklina. • Uređaj se ne smije postavljati pored radijatora ili štednjaka. • Uvjerite se da je nakon postavljanja uređaja električni utikač dostupan. • Spojite isključivo na pitku vodu. 4) Servisiranje • Sve električarske radove potrebne za servisiranje ovog uređaja mora izvršiti kvalificirani električar ili kompetentna osoba. • Ovaj proizvod mora servisirati ovlašteni Servis, a smiju se koristiti samo originalni dijelovi.
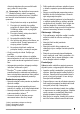
Svakodnevna uporaba Zamrzavanje svježih namirnica Odjeljak zamrzivača je prikladan za dugotrajno zamrzavanje svježe hrane i za čuvanje zamrznutih i duboko zamrznutih namirnica. Za zamrzavanje svježih namirnica nije potrebno mijenjati središnje postavke. Međutim, radi bržeg zamrzavanja, okrenite regulator temperature prema višim postavkama kako biste postigli najviši stupanj hladnoće. Važno U tim uvjetima, temperatura u odjeljku hladnjaka može pasti ispod 0°C.
Stavljanje polica vrata Za spremanja pakiranja hrane različitih veličina, police vrata mogu se postaviti na različitim visinama. Postupno povucite policu u smjeru strelica dok se ne oslobodi, a zatim je ponovo postavite prema vlastitim potrebama. Korisni savjeti i preporuke Savjeti za uštedu energije • Nemojte često otvarati vrata ili ih ostavljati otvorena duže no što je potrebno.
• • • • • ćili naknadno otapanje samo željene količine; zamotajte namirnice u aluminijsku foliju ili polietilensku foliju kako biste osigurali da je pakovanje nepropusno; nemojte dozvoliti da svježa, nezamrznuta hrana dođe u dodir s već zamrznutom hranom, tako ćete spriječiti porast temperature potonje; nemasne namirnice se bolje čuvaju od masnih namirnica; sol smanjuje rok čuvanja namirnica; vodeni led, ako ga konzumirate odmah nakon vađenja iz odjela zamrzivača, može prouzročiti smrzotine na koži; pr
stvo za čišćenje koje ćete naći već umetnuto u otvor za ispuštanje. Odmrzavanje zamrzivača Određena količina inja uvijek će se stvarati na policama zamrzivača i oko gornjeg odjeljka. Odmrznite odjeljak zamrzivača kada razina inja dostigne debljinu od otprilike 3-5 mm. Važno Otprilike 12 sati prije odmrzavanja postavite regulator temperature na više postavke, kako bi se nakupilo dovoljno rezervne hladnoće za slučaj prekida rada. Za uklanjanje inja poduzmite sljedeće korake: 1. Isključite uređaj. 2.
Važno Tijekom normalnog rada čuju se razni zvukovi (kompresor, kruženje rashladnog medija). Problem Uređaj ne radi. Žarulja ne radi. Žarulja ne radi. Kompresor neprekidno radi. Mogući uzrok Rješenje Uređaj je isključen. Uključite uređaj. Električni utikač nije dobro utaknut u utičnicu mrežnog napajanja. Ispravno utaknite električni utikač u utičnicu mrežnog napajanja. Uređaj nema napajanja. Nema napona u utičnici mrežnog napajanja. Spojite drugi električni uređaj na utičnicu mrežnog napajanja.
Problem Mogući uzrok Vrata nisu dobro zatvorena. Rješenje Vidi poglavlje "Zatvaranje vrata". Temperatura proizvoda je pre- Prije pohranjivanja ostavite visoka. namirnice da se ohlade na sobnu temperaturu. U uređaj stavljate mnogo proizvoda odjednom. Stavljajte manje proizvoda istovremeno. Nema kruženja hladnog zraka u uređaju. Provjerite kruži li hladni zrak po uređaju. Zamjena žarulje Pozor Iskopčajte utikač iz električne utičnice. 1. Izvadite vijak iz poklopca žarulje. 2.
Postavljanje Pozor Pozorno pročitajte "Informacije o sigurnosti" za siguran i ispravan rad uređaja prije postavljanja uređaja. Pozicioniranje Postavite uređaj na mjesto gdje sobna temperatura odgovara klimatskoj klasi označenoj na nazivnoj pločici uređaja: Klimats ka klasa Temperatura okoline Uređaj mora biti uzemljen. Utikač na kabelu električne energije isporučen je s kontaktom za tu svrhu.
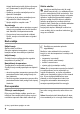
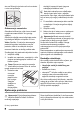
Ventilacijski zahtjevi Protok zraka iza uređaja mora biti dovoljan. Postavljanje uređaja 50 mm Pozor Osigurajte da se kabel napajanja može slobodno pomicati. min. 200 cm2 Obavite sljedeće korake: min. 200 cm2 x 2 x I 4mm 1 44mm I Po potrebi odrežite ljepljivu traku za brtvljenje i zatim je zalijepite na uređaj kako je prikazano na slici. 12 Postavite uređaj u nišu. Gurajte uređaj u smjeru strelica (1) dok se pokrov gornjeg prostora ne priljubi uz kuhinjski element.
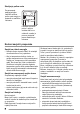
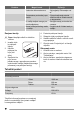
D C H E E Skinite odgovarajući dio s poklopca šarke (E). Provjerite da ste izvadili DX dio u slučaju desne šarke, ili SX u suprotnom slučaju. Ha G Hc B Pričvrstite poklopce (C, D) na nosače i otvore šarke. Postavite ventilacijsku rešetku (B) Stavite poklopce šarki (E) na šarke. ca. 50 mm Ha 90° Hb Hd Spojite uređaj bočno Odvojite dijelove (Ha), (Hb), (Hc) i na bočnu stijenku kuhinjskog elementa: (Hd). 1. Otpustite vijke dijela (G) i pomaknite dio (G) do bočne stijenke kuhinjskog elementa. 2.
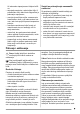
Hb Hb Stavite mali kvadrat ponovno na vodilicu i pričvrstite ga isporučenim vijcima. Poravnajte vrata namještaja i vrata uređaja tako da namjestite dio Hb. Hd Pritisnite dio (Hd) na dio (Hb). Izvršite završnu provjeru kako biste bili sigurni da: • Su svi vijci pritegnuti. • Magnetska brtva čvrsto je spojena na uređaj. Važno Ako je okolna temperatura niska (na primjer zimi) veličina brtve se smanjuje. Veličina brtve se povećava kada okolna temperatura raste.
Obsah Bezpečnostní informace _ _ _ _ _ _ _ _ _ Provoz _ _ _ _ _ _ _ _ _ _ _ _ _ _ _ _ _ _ Při prvním použití _ _ _ _ _ _ _ _ _ _ _ _ Denní používání _ _ _ _ _ _ _ _ _ _ _ _ _ Užitečné rady a tipy _ _ _ _ _ _ _ _ _ _ _ 15 17 17 18 19 Čištění a údržba _ _ _ _ _ _ _ _ _ _ _ _ _ Co dělat, když...
– důkladně vyvětrejte místnost, ve které je spotřebič umístěný. • Změna technických parametrů nebo jakákoli jiná úprava spotřebiče je nebezpečná. Jakékoli poškození kabelu může způsobit zkrat, požár nebo úraz elektrickým proudem. Upozornění Jakoukoliv elektrickou součást (napájecí kabel, zástrčku, kompresor) smí z důvodu možného rizika vyměňovat pouze autorizovaný zástupce nebo kvalifikovaný pracovník servisu. 1. Napájecí kabel se nesmí nastavovat. 2.
• Okolo spotřebiče musí být dostatečná cirkulace vzduchu, jinak by se přehříval. K dosažení dostatečného větrání se řiďte pokyny k instalaci. • Pokud je to možné, měl by spotřebič stát zadní stranou ke stěně, aby byly jeho horké části nepřístupné (kompresor, kondenzátor), a nemohli jste o ně zachytit nebo se spálit. • Spotřebič nesmí být umístěn v blízkosti radiátorů nebo sporáků. • Zkontrolujte, zda je zástrčka po instalaci spotřebiče přístupná. • Spotřebič připojte výhradně k přívodu pitné vody.
vého výrobku, a pak vše důkladně utřete do sucha. Důležité Nepoužívejte čisticí prostředky nebo abrazivní prášky, které mohou poškodit povrch spotřebiče. Denní používání Zmrazování čerstvých potravin Kalendář zmrazování potravin Mrazicí oddíl se hodí pro zmrazování čerstvých potravin a dlouhodobé uložení zmrazených a hlubokozmrazených potravin. Chcete-li zmrazovat čerstvé potraviny, je nutné změnit střední nastavení.
Přemístitelné police Umístění dveřních poliček Na stěnách chladničky jsou kolejničky, do kterých se podle přání zasunují police. Dveřní poličky můžete umístit do různé výšky a vkládat tak do nich různě velká balení potravin. Pomalu posunujte polici ve směru šipek, až se uvolní, a pak ji zasuňte do zvolené polohy. Užitečné rady a tipy Tipy pro úsporu energie • Neotvírejte často dveře, ani je nenechávejte otevřené déle, než je nezbytně nutné.
• čerstvé, nezmrazené potraviny se nesmí dotýkat již zmrazených potravin, protože by zvýšily jejich teplotu; • libové potraviny vydrží uložené déle a v lepším stavu, než tučné; sůl zkracuje délku bezpečného skladování potravin; • vodové zmrzliny mohou při konzumaci okamžitě po vyjmutí z mrazicího oddílu způsobit popáleniny v ústech; • doporučujeme napsat na každý balíček viditelně datum uskladnění, abyste mohli správně dodržet dobu uchování potravin.
Odmrazování mrazničky Na policích mrazničky a okolo horního oddílu se vždy bude tvořit určité množství námrazy. Mrazničku odmrazujte, když vrstva námrazy dosáhne tloušťky kolem 3 - 5 mm. Důležité Asi 12 h před rozmrazováním nastavte regulátor teploty na vyšší nastavení, aby se vytvořila dostatečná zásoba chladu pro případ přerušení postupu. Námrazu odstraníte v následujících krocích: 1. Vypněte spotřebič. 2. Vyjměte všechny zmrazené potraviny, zabalte je do několika vrstev novin a dejte je na chladné místo.
Problém Spotřebič nefunguje. Osvětlení nefunguje. Možná příčina Spotřebič je vypnutý. Řešení Zapněte spotřebič. Zástrčka není zasunutá správ- Zástrčku zasuňte správně do ně do zásuvky. zásuvky. Spotřebič je bez proudu. Zásuvka není pod proudem. Zasuňte do zásuvky zástrčku jiného elektrického spotřebiče. Obraťte se na kvalifikovaného elektrikáře. Osvětlení je v pohotovostním režimu. Zavřete a otevřete dveře. Vadná žárovka. Viz "Výměna žárovky". Není správně nastavená teplota.
Problém Možná příčina Řešení Teplota jídla je příliš vysoká. Nechte jídlo vychladnout na teplotu místnosti, a teprve pak ho vložte do spotřebiče. Vložili jste příliš velké množství potravin najednou. Dávejte do spotřebiče raději méně potravin. Ve spotřebiči neobíhá chladný vzduch. Vždy zkontrolujte, zda ve spotřebiči může dobře obíhat chladný vzduch. Výměna žárovky Pozor vytáhněte zástrčku ze zásuvky. 1. Uvolněte šroub z krytu žárovky. 2. Odstraňte kryt žárovky (viz obrázek). 3.
Instalace Pozor Přečtěte si pečlivě "Bezpečnostní informace" ještě před instalací k zajištění bezpečnosti a správného provozu spotřebiče. Umístění Spotřebič instalujte na místě, jehož okolní teplota odpovídá klimatické třídě uvedené na typovém štítku spotřebiče: Klimatická třída Okolní teplota typovém štítku odpovídají napětí v domácí síti. Spotřebič musí být podle zákona uzemněn. Zástrčka napájecího kabelu je k tomuto účelu vybavena příslušným kontaktem.
Požadavky na větrání Prostor za spotřebičem musí umožňovat dostatečné proudění vzduchu. Instalace spotřebiče 50 mm Pozor Zkontrolujte, zda můžete s napájecím kabelem volně pohybovat. min. 200 cm2 Postupujte takto: min. 200 cm2 x 2 x I 4mm 1 44mm I V případě potřeby odřízněte samolepicí těsnicí pásek a přilepte jej na spotřebič, jak je znázorněno na obrázku. Zasuňte spotřebič do výklenku. Pomalu jej posunujte ve směru šipek (1), dokud se horní kryt mezery nezastaví o kuchyňskou skříňku.
D C H E E Odstraňte správnou část krytu závěsu (E). Dbejte na to, abyste odstranili část označenou DX v případě pravého závěsu a část SX v případě levého závěsu. Ha G Hc B Připevněte kryty (C, D) k příchytkám a otvorům závěsu. Namontujte větrací mřížku (B). Připevněte kryty závěsu (E) k závěsu. ca. 50 mm Ha 90° Hb Hd Oddělte díly (Ha), Připojte spotřebič (Hb), (Hc) a (Hd). bočně k postranní stěně kuchyňské skříňky: 1. Uvolněte šrouby dílu (G) a jej až k postranní stěně skříňky. 2.
Hb Hb Malý čtvereček opět umístěte na vodicí lištu a připevněte ho přiloženými šrouby. Vyrovnejte dveře spotřebiče a dvířka kuchyňské skříňky seřízením dílu Hb. Hd Přitiskněte díl (Hd) na díl (Hb). Na závěr zkontrolujte následující: • Všechny šrouby jsou dotažené. • Magnetický těsnicí pásek je připevněný těsně ke skříňce. Důležité Při nízké okolní teplotě (např. v zimě) se může stát, že se těsnění zmenší. Těsnění se opět roztáhne při zvýšení okolní teploty.
Inhoud Veiligheidsinformatie _ _ _ _ _ _ _ _ _ _ _ _ _ _ _ _ Bediening _ _ _ _ _ _ _ _ _ _ _ _ _ _ _ _ _ _ _ _ _ Het eerste gebruik _ _ _ _ _ _ _ _ _ _ _ _ _ _ _ _ _ Dagelijks gebruik _ _ _ _ _ _ _ _ _ _ _ _ _ _ _ _ _ Nuttige aanwijzingen en tips _ _ _ _ _ _ _ _ _ _ _ _ 28 30 30 30 32 Onderhoud en reiniging _ _ _ _ _ _ _ _ _ _ _ _ _ _ Problemen oplossen _ _ _ _ _ _ _ _ _ _ _ _ _ _ _ _ Technische gegevens _ _ _ _ _ _ _ _ _ _ _ _ _ _ _ Montage _ _ _ _ _ _ _ _ _ _ _ _ _ _ _ _ _ _ _ _ _ _ Het milieu _ _ _ _ _
Waarschuwing! Alle elektrische onderdelen (netsnoer, stekker, compressor) mogen om gevaar te voorkomen uitsluitend worden vervangen door een erkende onderhoudsdienst of gekwalificeerd onderhoudspersoneel. 1. 2. Het netsnoer mag niet verlengd worden. Verzeker u ervan dat de stekker niet platgedrukt of beschadigd wordt door de achterkant van het apparaat. Een platgedrukte of beschadigde stekker kan oververhit raken en brand veroorzaken. 3. Verzeker u ervan dat u de stekker van het apparaat kunt bereiken. 4.
• Verzeker u ervan dat de stekker bereikbaar is nadat het apparaat geïnstalleerd is. • Sluit het apparaat alleen aan op een drinkwaterleiding. 14) Onderhoud • Alle elektrotechnische werkzaamheden die noodzakelijk zijn voor het uitvoeren van onderhoud aan het apparaat, dienen uitgevoerd te worden door een gekwalificeerd elektricien of competent persoon. • Dit product mag alleen worden onderhouden door een erkend onderhoudscentrum en er dient alleen gebruik te worden gemaakt van originele reserveonderdelen.
Belangrijk! In deze omstandigheden kan de temperatuur in de koelkast tot onder de 0°C dalen. Als dat gebeurt de thermostaatknop op een warmere stand instellen. Het bewaren van ingevroren voedsel Als u het apparaat voor het eerst of na een periode dat het niet gebruikt is inschakelt, het apparaat minstens 2 uur op een hoge instelling laten werken voordat u er producten in plaatst.
Nuttige aanwijzingen en tips Tips voor energiebesparing • De deur niet vaker openen of open laten staan dan strikt noodzakelijk. • Als de omgevingstemperatuur hoog is, de thermostaatknop op een lage temperatuur staat en het apparaat volledig gevuld is, kan de compressor continu aan staan waardoor er ijs op de verdamper ontstaat. Als dit gebeurt, zet u de thermostaatknop naar een warmere instelling om de koelkast automatisch te laten ontdooien en zo elektriciteitsverbruik te besparen.
Onderhoud en reiniging Let op! Voordat u welke onderhoudshandeling dan ook verricht, de stekker uit het stopcontact trekken. sel in de koelkast gaat druppelen. Gebruik daarvoor de speciale reiniger, die al in het afvoergaatje zit. Het koelcircuit van dit apparaat bevat koolwaterstoffen; onderhoud en herladen mag alleen uitgevoerd worden door bevoegde technici.
4. 5. 6. Nadat het ontdooien is voltooid, droogt u de binnenkast van de vriezer grondig en bewaart u de schraper voor later gebruik. Schakel het apparaat in. Plaats na twee of drie uur het eerder verwijderde voedsel terug in het diepvriesvak. Waarschuwing! Gebruik nooit scherpe metalen gereedschappen om vorst weg te schrapen van de verdamper, omdat u deze kunt beschadigen. Gebruik geen mechanisch apparaat of ander hulpmiddel dan aanbevolen door de fabrikant om het dooiproces te versnellen.
Probleem Mogelijke oorzaak Oplossing Er loopt water over de achterkant van de koelkast. Tijdens het automatische ontdooiproces ontdooit de rijp tegen de achterwand. Dit is normaal. Er loopt water in de koelkast. De waterafvoer is verstopt. Maak de waterafvoer schoon. Producten verhinderen het water om in Zorg ervoor dat de producten de achterde wateropvangbak te lopen. wand niet raken. Er loopt water over de vloer. De dooiwaterafvoer loopt niet in de verdamperbak boven de compressor.
Technische gegevens Afmetingen van de uitsparing Hoogte 1446 mm Breedte 560 mm Diepte 550 mm Tijdsduur 20 h Spanning 230-240 V Frequentie 50 Hz De technische gegevens staan op het typeplaatje aan de linker binnenkant in het apparaat en op het energielabel. Montage Let op! Lees voor uw eigen veiligheid en correcte werking van het apparaat eerst de "veiligheidsinformatie" aandachtig door, alvorens het apparaat te installeren.
• Maak de bovenste pen los en verwijder de afstandhouder. • Verwijder de bovenste pen en de bovenste deur. • Draai het middelste scharnier los. Ventilatievereisten De luchtstroom achter het apparaat moet voldoende zijn. • Verwijder de onderste deur. • Maak de onderste pen los. Op de tegenoverliggende kant: • Monteer de onderste pen. • Monteer de onderste deur. • Zet het middelste scharnier vast. • Monteer de bovenste deur. • Zet de afstandhouder en de bovenste pen vast.
x 2 x I 4mm 1 44mm I Knip indien nodig de zelfklevende afdichtstrip op maat en bevestig het op het apparaat zoals aangegeven op de afbeelding. 38 Plaats het apparaat in de nis. Duw het apparaat in de richting van de pijlen (1) totdat de metalen strip op de bovenkant van het apparaat tegen het keukenmeubel aankomt. Duw het apparaat in de richting van de pijlen (2) tegen de kast aan de andere kant van het scharnier. Stel het apparaat af in de Bevestig het apparaat met 4 nis. schroeven in de nis.
D C H E E Verwijder het juiste onderdeel van het afdekplaatje van het scharnier (E). Verwijder onderdeel DX als het scharnier rechts staat, of onderdeel SX als het scharnier links staat. Ha G Hc B Bevestig de afdekplaatjes (C, D) aan de uitsteeksels en de gaten van de scharnieren. Installeer het ventilatierooster (B). Bevestig de de afdekplaatjes (E) op het scharnier. ca. 50 mm Ha 90° Hb Hd Bevestig het apparaat tegen Maak de onderdelen (Ha), de zijkant van het keuken- (Hb), (Hc) en (Hd) los.
Hb Hb Hd Plaats het kleine vierkantje Druk onderdeel (Hd) op terug op de geleider en be- onderdeel (Hb). vestig het met de bijgeleverde schroeven. Lijn de keukenkastdeur en de deur van het apparaat uit met behulp van onderdeel Hb. Voer een eindcontrole uit en verzeker u ervan dat: • Alle schroeven zijn aangedraaid. • De magnetische afdichtstrip goed bevestigd is aan de kast. Belangrijk! Als de omgevingstemperatuur laag is (bijv. in de winter), wordt de omvang van het deurruber kleiner.
Contents Safety information _ _ _ _ _ _ _ _ _ _ _ _ _ _ _ _ _ Operation _ _ _ _ _ _ _ _ _ _ _ _ _ _ _ _ _ _ _ _ _ First use _ _ _ _ _ _ _ _ _ _ _ _ _ _ _ _ _ _ _ _ _ _ Daily use _ _ _ _ _ _ _ _ _ _ _ _ _ _ _ _ _ _ _ _ _ Helpful hints and tips _ _ _ _ _ _ _ _ _ _ _ _ _ _ _ 41 43 43 43 44 Care and cleaning _ _ _ _ _ _ _ _ _ _ _ _ _ _ _ _ _ What to do if… _ _ _ _ _ _ _ _ _ _ _ _ _ _ _ _ _ _ Technical data _ _ _ _ _ _ _ _ _ _ _ _ _ _ _ _ _ _ _ Installation _ _ _ _ _ _ _ _ _ _ _ _ _ _ _ _ _ _ _ _ Environmental
2. Make sure that the power plug is not squashed or damaged by the back of the appliance. A squashed or damaged power plug may overheat and cause a fire. 3. Make sure that you can come to the mains plug of the appliance. 4. Do not pull the mains cable. 5. If the power plug socket is loose, do not insert the power plug. There is a risk of electric shock or fire. 6. You must not operate the appliance without the lamp cover16) of interior lighting. • This appliance is heavy.
Environment Protection This appliance does not contain gasses which could damage the ozone layer, in either its refrigerant circuit or insulation materials. The appliance shall not be discarded together with the urban refuse and rubbish. The insulation foam contains flammable gases: the appliance shall be disposed according to the applicable regulations to obtain from your local authorities. Avoid damaging the cooling unit, especially at the rear near the heat exchanger.
Important! In the event of accidental defrosting, for example due to a power failure, if the power has been off for longer that the value shown in the technical characteristics chart under "rising time", the defrosted food must be consumed quickly or cooked immediately and then re-frozen (after cooling). Frozen Food Calendar Important! Do not use metallic instruments to remove the trays from the freezer.
Cooked foods, cold dishes, etc..: these should be covered and may be placed on any shelf. Fruit and vegetables: these should be thoroughly cleaned and placed in the special drawer(s) provided. Butter and cheese: these should be placed in special airtight containers or wrapped in aluminium foil or polythene bags to exclude as much air as possible. Milk bottles: these should have a cap and should be stored in the bottle rack on the door.
back of the appliance, over the motor compressor, where it evaporates. It is important to periodically clean the defrost water drain hole in the middle of the refrigerator compartment channel to prevent the water overflowing and dripping onto the food inside. Use the special cleaner provided, which you will find already inserted into the drain hole. Defrosting the freezer A certain amount of frost will always form on the freezer shelves and around the top compartment.
Important! There are some sounds during normal use (compressor, refrigerant circulation). Problem The appliance does not operate. The lamp does not operate. Possible cause The appliance is switched off. Solution Switch on the appliance. The mains plug is not connected to the Connect the mains plug to the mains mains socket correctly. socket correctly. The appliance has no power. There is no voltage in the mains socket. Connect a different electrical appliance to the mains socket.
Replacing the lamp Caution! Disconnect the plug from the mains socket. 1. 2. 3. Remove the screw from the lamp cover. Remove the lamp cover (refer to the illustration). Replace the used lamp with a new lamp of the same power and specifically designed for household appliances (the maximum power is shown on the lamp cover). Install the lamp cover. Tighten the screw to the lamp cover. Connect the plug to the mains socket. Open the door. Make sure that the light comes on. 4. 5. 6. 7. Closing the door 1.
The appliance must be earthed. The power supply cable plug is provided with a contact for this purpose. If the domestic power supply socket is not earthed, connect the appliance to a separate earth in compliance with current regulations, consulting a qualified electrician. The manufacturer declines all responsibility if the above safety precautions are not observed. • Loosen the upper pin and remove the spacer. • Remove the upper pin and the upper door. • Loosen the middle hinge.
x 2 I 4mm x 1 44mm I If necessary cut the adhesive sealing strip and then apply it to the appliance as shown in figure. Install the appliance in the niche. Push the appliance in the direction of the arrows (1) until the upper gap cover stops against the kitchen furniture. Push the appliance in the direction of the arrows (2) against the cupboard on the opposite side of the hinge. D C H E E Remove the correct part from the hinge cover (E).
ca. 50 mm Ha 90° 8 mm 8 mm 21 mm 90° Ha Hc ca. 50 mm 21 mm Install the part (Ha) on the inner side of the kitchen furniture. K Ha Hb Push the part (Hc) on the part (Ha). Open the appliance door and the kitchen furniture door at an angle of 90°. Insert the small square (Hb) into guide (Ha). Put together the appliance door and the furniture door and mark the holes. Remove the brackets and mark a distance of 8 mm from the outer edge of the door where the nail must be fitted (K).
Sisukord Ohutusinfo _ _ _ _ _ _ _ _ _ _ _ _ _ _ _ _ Käitus _ _ _ _ _ _ _ _ _ _ _ _ _ _ _ _ _ _ Esimene kasutamine _ _ _ _ _ _ _ _ _ _ _ Igapäevane kasutamine _ _ _ _ _ _ _ _ _ Vihjeid ja näpunäiteid _ _ _ _ _ _ _ _ _ _ 52 54 54 55 56 Puhastus ja hooldus _ _ _ _ _ _ _ _ _ _ _ Mida teha, kui...
Toitejuhtme kahjustamine võib põhjustada lühiühenduse, tulekahju ja/või elektrilöögi. Hoiatus Elektriliste komponentide (toitejuhe, pistik, kompressor) asendustööd tuleb ohu vältimiseks tellida kvalifitseeritud tehnikult või teenusepakkujalt. 1. Toitejuhtme pikendamine on keelatud. 2. Veenduge, et toitepistik ei ole seadme tagakülje poolt muljutud ega kahjustatud. Muljutud või kahjustatud toitepistik võib üle kuumeneda ja põhjustada tulekahju. 3. Tagage kiire juurdepääs pistikupesale. 4.
• Seade ei tohi asuda radiaatorite või pliitide lähedal. • Pärast seadme paigaldamist veenduge, et toitepistikule oleks olemas juurdepääs. • Ühendage ainult joogivee varustusega.24) Teenindus • Kõik masina hoolduseks vajalikud elektritööd peab teostama kvalifitseeritud elektrik või kompetentne isik. • Käesolev toode tuleb teenindusse viia volitatud teeninduskeskussesse ja kasutada tohib ainult originaal varuosi. tussüsteemis ega isolatsioonimaterjalides. Seadet ei tohi likvideerida koos muu olmeprügiga.
Igapäevane kasutamine Värske toidu sügavkülmutamine Sügavkülmuti vahe sobib värske toidu sügavkülmutamiseks ja külmutatud ning sügavkülmutatud toidu pikaajaliseks säilitamiseks. Värskete toiduainete külmutamiseks ei ole vajalik muuta seadeid. Ükskõik, millist külmutust soovite, keerake regulaator maksimaalse külmutuse asendisse. Tähtis Selles asendis langeb jahuti temperatuur alla 0°C. Kui juhtute termoregulaatorit seadma soojemale temperatuurile.
Ukse riiulite paigutamine Et võimaldada erineva suurusega toidupakkide säilitamist, saab ukse riiuleid asetada erinevatele kõrgustele. Tõmmake riiulit järkjärgult noole suunas, kuni riiul vabaneb, seejärel muutke asukohta. Vihjeid ja näpunäiteid Näpunäiteid energia säästmiseks • Ärge avage ust sageli ega jätke seda lahti kauemaks kui vältimatult vajalik.
• mähkige toit fooliumi või polüteeni ja veenduge, et pakendid oleksid õhukindlad; • ärge laske värskel külmutamata toidul puutuda vastu juba külmutatud toitu; nii väldite temperatuuri tõusu viimases; • lahjad toiduained säilivad paremini ja kauem kui rasvased; sool vähendab toidu säilivusaega; • jää, kui seda tarvitatakse vahetult pärast sügavkülmutusest võtmist, võib põhjustada nahal külmapõletust; • soovitatakse märkida külmutamise kuupäev igale pakendile, et saaksite säilitusaega jälgida.
Sügavkülmiku sulatamine Sügavkülmiku riiulitele ja ülemise vahe ümber koguneb alati teatud määral härmatist. Sulatage sügavkülmikut, kui jääkihi paksus on 3-5 mm. Tähtis Umbes 12 tundi enne sulatamist seadistage temperatuuriregulaator kõrgeimale seadele, et luua töö katkestamiseks piisav külmareserv. Jää eemaldamiseks toimige järgnevalt: 1. Lülitage seade välja. 2. Võtke külmikust välja toiduained, keerake need ajalehepaberisse ja ladustage jahedas kohas.
Probleem Seade ei tööta. Lamp ei tööta. Lamp ei tööta. Kompressor töötab pidevalt. Vesi voolab külmiku tagumisel plaadil. Võimalik põhjus Lahendus Seade on välja lülitatud. Lülitage seade sisse. Toitekaabel ei ole korralikult pistikusse ühendatud. Ühendage toitekaabel korralikult pistikusse. Seadmes puudub vool. Seinakontaktis ei ole voolu. Ühendage seinakontakti mõni teine elektriseade. Võtke ühendust kvalifitseeritud elektrikuga. Lamp on ooterežiimil. Pange uks kinni ja tehke uuesti lahti.
Probleem Võimalik põhjus Lahendus Toidu temperatuur on liiga kõrge. Laske toidul enne külmkappi panemist toatemperatuurini maha jahtuda. Palju toiduaineid säilitatakse samaaegselt. Säilitage samaaegselt vähem toiduaineid. Seadmes puudub külma õhu ringlus. Veenduge, et seadmes oleks külma õhu ringlus. Lambi vahetamine Ettevaatust Tõmmake pistik pistikupesast välja. 1. Eemaldage lambikatte kruvi. 2. Eemaldage lambikate (vt. Joonist). 3.
Paigaldamine Ettevaatust Lugege "Ohutusjuhendeid" hoolikalt enne seadme paigaldamist, et tagada turvalisus ja seadme õige töö. Paigutamine Paigaldage seade kohta, kus ümbritsev temperatuur vastaks seadme andmeplaadil osutatud klliimaklassile: Kliimaklass Ümbritsev temperatuur SN +10°C kuni + 32°C N +16°C kuni + 32°C ST +16°C kuni + 38°C T +16°C kuni + 43°C Elektriühendus ge ja sagedus vastaksid teie majapidamise omale. See seade peab olema maandatud. Toitejuhtmel on olemas ka vastav kontakt.
Nõuded ventilatsioonile Õhuvoog seadme taga peab olema küllaldane. 50 mm Seadme paigaldamine Ettevaatust Veenduge, et toitejuhet saab vabalt liigutada. min. 200 cm2 Toimige järgmiselt: min. 200 cm2 x 2 x I 4mm 1 44mm I Vajadusel lõigake sobivas pikkuses liimiga tihendiriba ja kinnitage see joonisel kujutatud viisil seadme külge. 62 Paigutage seade paigaldusnišši. Lükake seadet nooltega näidatud suunas (1), kuni ülaosa puutub vastu köögimööblit.
D C H E E Eemaldage hinge kattelt õige osa (E). Parempoolse hinge puhul eemaldage osa DX, vasakpoolse hinge puhul osa SX. Ha G Hc B Kinnitage katted (C, D) hoidikutele ja hingeavaustele. Paigaldage ventilatsioonivõre (B). Kinnitage hingedele hingekatted (E). ca. 50 mm Ha 90° Hb Hd Eemaldage osad Ühendage seade köögimööbli külgsei- (Ha), (Hb), (Hc) ja naseina külge järgmi- (Hd). selt: 1. Keerake osa (G) kruvid lahti ja lükake osa (G) köögimööbli külgseina vastu. 2.
Hb Hb Hd Asetage väike kandi- Vajutage osa (Hd) line detail uuesti koosale (Hb). hale ja kinnitage siis juuresolevate kruvide abil. Seadke köögimööbli uks ja seadme uks kohakuti osa Hb abil. Lõpuks kontrollige kõik üle, veendumaks, et: • Kõik kruvid on kinni keeratud. • Magnetkinnitusriba on tihedalt vastu kappi. Tihend paisub, kui ümbritsev temperatuur tõuseb. Tähtis Kui ümbritsev temperatuur on madal (näiteks talvel), siis tihendi suurus väheneb.
Sommaire Consignes de sécurité _ _ _ _ _ _ _ _ _ _ _ _ _ _ _ Fonctionnement _ _ _ _ _ _ _ _ _ _ _ _ _ _ _ _ _ _ Première utilisation _ _ _ _ _ _ _ _ _ _ _ _ _ _ _ _ Utilisation quotidienne _ _ _ _ _ _ _ _ _ _ _ _ _ _ _ Conseils utiles _ _ _ _ _ _ _ _ _ _ _ _ _ _ _ _ _ _ _ 65 67 67 68 69 Entretien et nettoyage _ _ _ _ _ _ _ _ _ _ _ _ _ _ _ En cas d'anomalie de fonctionnement _ _ _ _ _ _ _ _ Caractéristiques techniques _ _ _ _ _ _ _ _ _ _ _ _ Installation _ _ _ _ _ _ _ _ _ _ _ _ _ _ _ _ _ _ _ _ En matière d
Avertissement Les éventuelles réparations ou interventions sur votre appareil, ainsi que le remplacement du câble d'alimentation, ne doivent être effectuées que par un professionnel qualifié. 1. L'appareil ne doit pas être raccordé à l'aide d'un prolongateur, d'une prise multiple ou d'un raccordement multiple (risque d'incendie). 2. Assurez-vous que la prise n'est pas écrasée ou endommagée par l'arrière de l'appareil. Une prise de courant écrasée ou endommagée peut s'échauffer et causer un incendie. 3.
• Assurez-vous que la prise murale reste accessible après l'installation de l'appareil. • Branchez à l'alimentation en eau potable uniquement. 29) Maintenance • Les branchements électriques nécessaires à l'entretien de l'appareil doivent être réalisés par un électricien qualifié ou une personne compétente. • Cet appareil ne doit être entretenu et réparé que par un Service après-vente autorisé, exclusivement avec des pièces d'origine. préserver l'environnement.
Utilisation quotidienne Congélation d'aliments frais Le compartiment congélateur est idéal pour congeler des denrées fraîches et conserver les aliments surgelés ou congelés pendant longtemps. Pour congeler des aliments frais, il n'est pas nécessaire de modifier le réglage moyen. Toutefois, pour une congélation plus rapide, tournez le thermostat vers le haut pour obtenir plus de froid. Important Dans ce cas, la température du compartiment réfrigérateur peut chuter au-dessous de 0°C.
Emplacement des balconnets de la porte Selon la taille des emballages des aliments conservés, les balconnets de la porte peuvent être positionnés à différentes hauteurs. Tirez progressivement dans le sens des flèches pour les dégager, puis repositionnez-les selon les besoins. Conseils utiles Conseils pour l'économie d'énergie • N'ouvrez pas la porte trop souvent ou plus longtemps que nécessaire.
• enveloppez les aliments dans des feuilles d'aluminium ou de polyéthylène et assurez-vous que les emballages sont étanches ; • ne laissez pas des aliments frais, non congelés, toucher des aliments déjà congelés pour éviter une remontée en température de ces derniers.
Dégivrer le congélateur A La formation de givre à l'intérieur de l'appareil ne peut être évitée. Dégivrez le congélateur lorsque l'épaisseur de la couche de givre est comprise entre 3 et 5 mm. Important Mettez le thermostat sur la position maximum 12 heures avant d'effectuer le dégivrage pour assurer une réserve de froid. Retirez le givre comme indiqué ci-dessous : 1. Éteignez l'appareil. 2. Sortez le bac à glaçons et éventuellement les denrées congelées.
Anomalie L'appareil ne fonctionne pas. L'ampoule ne fonctionne pas. Cause possible Remède L'appareil est à l'arrêt. Mettez l'appareil en fonctionnement. La fiche n'est pas correctement branchée sur la prise de courant. Branchez correctement la fiche sur la prise de courant. Le courant n'arrive pas à l'appareil. La prise de courant n'est pas alimentée. Branchez un autre appareil électrique sur la prise de courant. Faites appel à un électricien qualifié. L'ampoule est en mode veille.
Anomalie Cause possible Remède Trop de produits ont été introduits simultanément. Introduisez moins de produits en même temps. L'air froid ne circule pas dans l'appareil. Assurez-vous que l'air froid circule dans l'appareil. Remplacement de l'ampoule Attention Débranchez l'appareil du secteur. 1. 2. 3. Retirez la vis du diffuseur. Retirez le diffuseur (voir l'illustration). Remplacez l'ampoule défectueuse par une ampoule neuve de puissance identique, spécifiquement conçue pour les ap- 4. 5. 6. 7.
Classe climatique la prise de courant murale n'est pas mise à la terre, branchez l'appareil sur une prise de terre conformément aux normes en vigueur, en demandant conseil à un électricien qualifié. Le fabricant décline toute responsabilité en cas d'incident suite au non-respect des consignes de sécurité sus-mentionnées. Cet appareil est conforme aux directives communautaires.
x 2 x I 4mm 1 44mm I Si nécessaire, coupez la bande isolante adhésive et appliquez-la sur l'appareil, comme illustré sur le schéma. Insérez l'appareil dans le meuble d'encastrement. Poussez l'appareil dans le sens indiqué par les flèches (1) jusqu'à ce que le cache de l'ouverture supérieure s'aligne par rapport au meuble de cuisine. Poussez l'appareil dans le sens indiqué par les flèches (2) contre l'armoire, dans le sens opposé aux charnières.
D C H E E Retirez la pièce du cache charnière (E). Veillez à retirer la partie DX, s'il s'agit de la charnière de droite, la partie SX dans le cas contraire. Ha G Hc B Fixez les caches (C, D) aux pattes et dans les trous des charnières. Installez la grille de ventilation (B). Fixez les caches (E) à la charnière. ca. 50 mm Ha 90° Hb Hd Détachez les pièces (Ha), Placez l'appareil contre la paroi latérale du meuble de (Hb), (Hc) et (Hd). cuisine 1.
Hb Hb Hd Placez à nouveau la petite Appuyez la pièce (Hd) sur équerre sur le guide et fila pièce (Hb). xez-la à l'aide des vis fournies. Alignez la porte du meuble de cuisine et la porte de l'appareil en ajustant la pièce Hb. Contrôlez une dernière fois pour vous assurer que : • Toutes les vis sont correctement serrées. • Le joint d'étanchéité magnétique adhère fortement au meuble. n'adhère pas parfaitement. Inversément, si la température ambiante augmente, la dimension du joint augmente également.
Inhalt Sicherheitshinweise _ _ _ _ _ _ _ _ _ _ _ _ _ _ _ _ Betrieb _ _ _ _ _ _ _ _ _ _ _ _ _ _ _ _ _ _ _ _ _ _ Erste Inbetriebnahme _ _ _ _ _ _ _ _ _ _ _ _ _ _ _ _ Täglicher Gebrauch _ _ _ _ _ _ _ _ _ _ _ _ _ _ _ _ Praktische Tipps und Hinweise _ _ _ _ _ _ _ _ _ _ _ 78 80 80 81 82 Reinigung und Pflege _ _ _ _ _ _ _ _ _ _ _ _ _ _ _ Was tun, wenn … _ _ _ _ _ _ _ _ _ _ _ _ _ _ _ _ _ Technische Daten _ _ _ _ _ _ _ _ _ _ _ _ _ _ _ _ _ Montage _ _ _ _ _ _ _ _ _ _ _ _ _ _ _ _ _ _ _ _ _ _ Hinweise zum Umweltschut
Warnung! Elektrische Bauteile (Netzkabel, Stecker, Kompressor) dürfen zur Vermeidung von Gefahren nur vom Kundendienst oder einer Fachkraft ausgewechselt werden. 1. 2. Das Netzkabel darf nicht verlängert werden. Vergewissern Sie sich, dass der Netzstecker nicht von der Geräterückseite gequetscht oder beschädigt wird. Ein gequetschter oder beschädigter Netzstecker überhitzt und kann einen Brand verursachen. 3. Vergewissern Sie sich, dass der Netzstecker des Geräts frei zugänglich ist. 4.
• Vergewissern Sie sich, dass der Netzstecker des Gerätes nach der Installation frei zugänglich ist. • Verbinden Sie das Gerät ausschließlich mit einer Trinkwasserzuleitung. 34) Kundendienst • Sollte die Wartung des Gerätes elektrische Arbeiten verlangen, so dürfen diese nur von einem qualifizierten Elektriker oder einem Elektro-Fachmann durchgeführt werden. • Wenden Sie sich für Reparaturen und Wartung nur an Fachkräfte der autorisierten Kundendienststellen und verlangen Sie stets Original-Ersatzteile.
Täglicher Gebrauch Einfrieren frischer Lebensmittel Das Gefrierfach eignet sich zum Einfrieren von frischen Lebensmitteln und zum Lagern von gefrorenen und tiefgefrorenen Lebensmitteln für einen längeren Zeitraum. Für das Einfrieren frischer Lebensmittel ist eine Änderung der mittleren Einstellung nicht erforderlich. Möchten Sie den Gefriervorgang beschleunigen, drehen Sie bitte den Temperaturregler auf eine höhere Einstellung, um die maximal mögliche Kühlung zu erreichen.
Positionierung der Türeinsätze Die Türeinsätze können in verschiedener Höhe positioniert werden; damit ermöglichen Sie das Lagern verschieden großer Lebensmittelpackungen. Ziehen Sie das Türabstellfach nach und nach in Pfeilrichtung, bis es sich herausheben lässt, dann setzen Sie es in die neue Position ein. Praktische Tipps und Hinweise Energiespartipps • Öffnen Sie die Tür nicht zu häufig, und lassen Sie diese nicht länger offen als unbedingt notwendig.
• teilen Sie die Lebensmittel in kleinere Portionen ein, damit diese schnell und vollständig gefrieren und Sie später nur die Menge auftauen müssen, die Sie gerade benötigen; • die einzufrierenden Lebensmittelportionen sollten stets luftdicht in Aluminiumfolie oder in lebensmittelechte Gefrierbeutel verpackt werden, um so wenig Luft wie möglich in der Verpackung zu haben; • achten Sie beim Hineinlegen von frischen, noch ungefrorenen Lebensmitteln darauf, dass diese keinen Kontakt mit Gefriergut bekommen, da
Abtauen des Gefrierschranks Auf den Ablagen des Gefrierschranks und im Innern des oberen Fachs bildet sich stets etwas Reif. Tauen Sie den Gefrierschrank ab, wenn die Reifschicht eine Stärke von etwa 3 bis 5 mm erreicht hat. Wichtig! Stellen Sie den Temperaturregler bitte 12 Stunden vor dem Abtauen auf eine kühlere Einstellung, damit eine ausreichende Kälte als Reserve für die Unterbrechung im Betrieb entstehen kann. Entfernen Sie den Reif wie nachstehend erläutert: 1. Schalten Sie das Gerät aus. 2.
Störung Das Gerät funktioniert nicht. Die Lampe funktioniert nicht. Die Lampe funktioniert nicht. Der Kompressor arbeitet ständig. Mögliche Ursache Abhilfe Das Gerät ist abgeschaltet. Gerät einschalten. Der Netzstecker steckt nicht richtig in der Steckdose. Stecken Sie den Netzstecker richtig in die Steckdose. Das Gerät bekommt keinen Strom. Es liegt keine Spannung an der Netzsteckdose an. Testen Sie bitte, ob ein anderes Gerät an dieser Steckdose funktioniert.
Störung Mögliche Ursache Es wurden zu viele Lebensmittel auf einmal eingelegt. Legen Sie weniger Lebensmittel auf einmal ein. Die Kaltluft kann nicht im Gerät zirkulieren. Stellen Sie sicher, dass die Kaltluft im Gerät zirkulieren kann. Lampe wechseln Vorsicht! Trennen Sie den Netzstecker von der Netzversorgung. 1. 2. 3. Abhilfe Lösen Sie die Schraube an der Lampenabdeckung. Nehmen Sie die Lampenabdeckung ab (siehe hierzu die Abbildung).
Klimaklasse Falls die Steckdose Ihres Hausanschlusses nicht geerdet sein sollte, lassen Sie das Gerät bitte gemäß den geltenden Vorschriften erden und fragen Sie dafür einen qualifizierten Elektriker. Der Hersteller übernimmt keinerlei Haftung für Schäden oder Verletzungen, die durch Missachtung der oben genannten Sicherheitshinweise entstehen. Das Gerät entspricht den EU- Richtlinien.
x 2 x I 4mm 1 44mm I Schneiden Sie bei Bedarf den Dichtungsstreifen zu und bringen Sie ihn, wie in der Abbildung gezeigt, am Gerät an. 88 Setzen Sie das Gerät in die Einbaunische. Schieben Sie das Gerät in Pfeilrichtung (1), bis die obere Lückenblende am Küchenmöbel anliegt. Schieben Sie das Gerät auf der den Scharnieren gegenüberliegenden Seite in Pfeilrichtung (2) so weit wie möglich gegen die Seitenwand des Küchenmöbels. Richten Sie das Gerät in Befestigen Sie das Gerät der Einbaunische aus.
D C H E E Entfernen Sie das entsprechende Teil aus der Scharnierabdeckung (E). Achten Sie darauf, im Falle eines rechten Scharniers Teil DX bzw. bei einem gegenüberliegenden Scharnier Teil SX zu entfernen. Ha G Hc B Setzen Sie die beiliegenden Abdeckkappen (C, D) in die Befestigungs- und Scharnierlöcher ein. Bauen Sie das Belüftungsgitter (B) ein. Stecken Sie die Scharnierabdeckungen (E) auf das Scharnier auf. ca.
Hb Hd Hb Setzen Sie das Führungsstück erneut auf die Führungsschiene und schrauben Sie es mit den mitgelieferten Schrauben fest. Richten Sie die Möbeltüre und die Gerätetür mittels des Führungsstücks (Hb) aus. Drücken Sie Abdeckung (Hd) auf das Führungsstück (Hb). Führen Sie eine Endkontrolle durch, um sicherzustellen, dass: • Alle Schrauben fest angezogen sind. • Der magnetische Dichtungsstreifen fest am Gerät anliegt.
222331658-A-102011 www.zanussi.