GB User manual Fridge-Freezer ZBB3244 2
Contents Safety information _ _ _ _ _ _ _ _ _ _ _ _ _ _ _ _ Operation _ _ _ _ _ _ _ _ _ _ _ _ _ _ _ _ _ _ _ _ _ First use _ _ _ _ _ _ _ _ _ _ _ _ _ _ _ _ _ _ _ _ _ Daily use _ _ _ _ _ _ _ _ _ _ _ _ _ _ _ _ _ _ _ _ _ Helpful hints and tips _ _ _ _ _ _ _ _ _ _ _ _ _ _ _ 2 4 4 4 5 Care and cleaning _ _ _ _ _ _ _ _ _ _ _ _ _ _ _ _ _ 6 What to do if… _ _ _ _ _ _ _ _ _ _ _ _ _ _ _ _ _ _ 7 Technical data _ _ _ _ _ _ _ _ _ _ _ _ _ _ _ _ _ _ 9 Installation _ _ _ _ _ _ _ _ _ _ _ _ _ _ _ _ _ _ _ _ 9 Environmental co
• It is dangerous to alter the specifications or modify this product in any way. Any damage to the cord may cause a short-circuit, fire and/or electric shock. • Ice lollies can cause frost burns if consumed straight from the appliance. Warning! Any electrical component (power cord, plug, compressor) must be replaced by a certified service agent or qualified service personnel. • Before maintenance, switch off the appliance and disconnect the mains plug from the mains socket.
Environment Protection This appliance does not contain gasses which could damage the ozone layer, in either its refrigerant circuit or insulation materials. The appliance shall not be discarded together with the urban refuse and rubbish. The insulation foam contains flammable gases: the appliance shall be disposed according to the applicable regulations to obtain from your local authorities. Avoid damaging the cooling unit, especially at the rear near the heat exchanger.
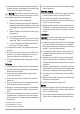
Important! In the event of accidental defrosting, for example due to a power failure, if the power has been off for longer that the value shown in the technical characteristics chart under "rising time", the defrosted food must be consumed quickly or cooked immediately and then re-frozen (after cooling). Freezing Calendar Important! Do not use metallic instruments to remove the trays from the freezer.
For safety, store in this way only one or two days at the most. Cooked foods, cold dishes, etc..: these should be covered and may be placed on any shelf. Fruit and vegetables: these should be thoroughly cleaned and placed in the special drawer(s) provided. Butter and cheese: these should be placed in special airtight containers or wrapped in aluminium foil or polythene bags to exclude as much air as possible. Milk bottles: these should have a cap and should be stored in the bottle rack on the door.
Defrosting of the refrigerator Frost is automatically eliminated from the evaporator of the refrigerator compartment every time the motor compressor stops, during normal use. The defrost water drains out through a trough into a special container at the back of the appliance, over the motor compressor, where it evaporates. It is important to periodically clean the defrost water drain hole in the middle of the refrigerator compartment channel to prevent the water overflowing and dripping onto the food inside.
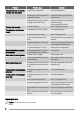
Problem The appliance does not operate. The lamp does not operate. Possible cause The appliance is switched off. Solution Switch on the appliance. The mains plug is not connected to the Connect the mains plug to the mains mains socket correctly. socket correctly. The appliance has no power. There is Connect a different electrical appliance no voltage in the mains socket. to the mains socket. Contact a qualified electrician. The lamp does not work. The lamp is defective. Refer to "Replacing the lamp".
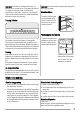
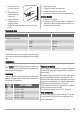
1. Remove the screw from the lamp cover. 2. Remove the lamp cover (refer to the illustration). 3. Replace the used lamp with a new lamp of the same power (the maximum power is shown on the lamp cover). 4. 5. 6. 7. Install the lamp cover. Tighten the screw to the lamp cover. Connect the plug to the mains socket. Open the door. Make sure that the light comes on. Closing the door 1. Clean the door gaskets. 2. If necessary, adjust the door. Refer to "Installation". 3.
• Loosen the upper pin and remove the spacer. • Remove the upper pin and the upper door. • Loosen the middle hinge. Ventilation requirements The airflow behind the appliance must be sufficient. On the opposite side: • Install the lower pin. • Install the lower door. • Tighten the middle hinge. • Install the upper door. • Tighten the spacer and tighten the upper pin. • Remove the lower door. • Loosen the lower pin. Installing the appliance 50 mm Caution! Make sure that the mains cable can move freely.
2 I 4mm 1 44mm I Install the appliance in the niche. Push the appliance in the direction of the arrows (1) until the upper gap cover stops against the kitchen furniture. Make sure that the distance between the appliance and the cupboard front-edge is 44 mm. Push the appliance in the direction of the arrows (2) against the cupboard on the opposite side of the hinge. Make sure that the clearance between the appliance and the cupboard is 4 mm.
8 mm 8 mm Ha Ha Hc K Ha Hb Push the part (Hc) on the part (Ha). Open the appliance door and the kitchen furniture door at an angle of 90°. Insert the small square (Hb) into guide (Ha). Put together the appliance door and the furniture door and mark the holes. Remove the brackets and mark a distance of 8 mm from the outer edge of the door where the nail must be fitted (K). Hb Place the small square on the guide again and fix it with the screws supplied.
www.zanussi.