EN User Manual Fridge Freezer ZBB28665SA
Contents Safety information Safety instructions Operation First use Daily use 2 3 4 7 7 Hints and tips Care and cleaning Troubleshooting Installation Technical information 9 10 11 14 18 Subject to change without notice. Safety information Before the installation and use of the appliance, carefully read the supplied instructions. The manufacturer is not responsible if an incorrect installation and use causes injuries and damages. Always keep the instructions with the appliance for future reference.
• • • • • • • Do not use mechanical devices or other means to accelerate the defrosting process, other than those recommended by the manufacturer. Do not damage the refrigerant circuit. Do not use electrical appliances inside the food storage compartments of the appliance, unless they are of the type recommended by the manufacturer. Do not use water spray and steam to clean the appliance. Clean the appliance with a moist soft cloth. Only use neutral detergents.
Use Care and cleaning WARNING! WARNING! Risk of injury, burns, electrical shock or fire. • • • • • • • • • • • • Risk of injury or damage to the appliance. Do not change the specification of this appliance. Do not put electrical appliances (e.g. ice cream makers) in the appliance unless they are stated applicable by the manufacturer. Be careful not to cause damage to the refrigerant circuit. It contains isobutane (R600a), a natural gas with a high level of environmental compatibility.
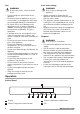
6 7 8 It is possible to change predefined sound of buttons to a loudly one by pressing together Mode and temperature colder button for some seconds. Change is reversible.
High temperature alarm An increase in the temperature in the freezer compartment (for example due to an earlier power failure) is indicated by flashing the alarm icon and freezer temperature indicators, and sounding of buzzer. Press any button. The buzzer switches off. The freezer temperature indicator shows the highest temperature reached for a few seconds, then displays the set temperature again. The alarm indicator continues to flash until the normal conditions are restored.
The DrinksChill indicator flashes. The Timer shows the set value (30 minutes) for a few seconds. 2. Press the Timer regulator to change the Timer set value from 1 to 90 minutes. 3. Press OK to confirm. TheDrinksChill indicator is shown. The Timer start to flash (min). At the end of the countdown the DrinksChill indicator flashes and an audible alarm sounds. Press OK to switch off the sound and terminate the function. To switch off the function repeat the procedure until the DrinksChill goes off.
Freezing fresh food The freezer compartment is suitable for freezing fresh food and storing frozen and deep-frozen food for a long time. This device activates by itself when needed, for example for a quick temperature recovering after door opening or when the ambient temperature is high. To freeze small amount of fresh foods it is not necessary to change the present setting.
Hints and tips Normal operating sounds • The following sounds are normal during operation: • • • • • A faint gurgling and bubbling sound from coils sound when refrigerant is pumped. A whirring and pulsating sound from the compressor when refrigerant is pumped. A sudden cracking noise from inside appliance caused by thermic dilatation (a natural and not dangerous physical phenomenon). A faint click noise from the temperature regulator when the compressor switches on or off.
• • be sure that frozen foodstuffs are transferred from the foodstore to the freezer in the shortest possible time; not open the door frequently or leave it open longer than absolutely necessary; • • once defrosted, food deteriorates rapidly and cannot be refrozen; do not exceed the storage period indicated by the food manufacturer. Care and cleaning WARNING! Refer to Safety chapters. General warnings CAUTION! Unplug the appliance before carrying out any maintenance operation.
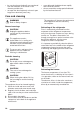
Periods of non-operation 4. Leave the door/doors open to prevent unpleasant smells. When the appliance is not in use for long periods, take the following precautions: WARNING! 1. Disconnect the appliance from electricity supply. 2. Remove all food. 3. Clean the appliance and all accessories. If the cabinet will be kept on, ask somebody to check it once in a while to prevent the food inside from spoiling in case of a power failure. Troubleshooting WARNING! Refer to Safety chapters. What to do if...
Problem Possible cause Solution A square symbol is shown inTemperature sensor problem. stead of numbers on the Temperature Display. Contact the nearest Authorised Service Centre (the cooling system will continue to keep food products cold, but temperature adjustment will not be possible). The lamp does not work. The lamp is in stand-by. Close and open the door. The lamp does not work. The lamp is defective. Contact the nearest Authorised Service Centre.
Problem Possible cause Solution Food products prevent that water flows into the water collector. Make sure that food products do not touch the rear plate. Water flows on the floor. The melting water outlet is not connected to the evaporative tray above the compressor. Attach the melting water outlet to the evaporative tray. Temperature cannot be set. The QuickFreeze or QuickChill function is switched on.
Closing the door 1. Clean the door gaskets. 2. If necessary, adjust the door. Refer to "Installation". 3. If necessary, replace the defective door gaskets. Contact the Authorised Service Centre.
the plug supplied, a 13 amp ASTA approved (BS 1362) fuse must be used. WARNING! A cut off plug inserted into a 13 amp socket is a serious safety (shock) hazard. Ensure that it is disposed of safely. Ventilation requirements The airflow behind the appliance must be sufficient. 4. Remove the lower door. 5. Loosen the lower pin. 5 cm min. 200cm2 min. 200cm2 Door reversibility WARNING! Before carrying out any operations, remove the plug from the power socket.
8. Remove the correct part from the hinge cover (E). Make sure to remove the part DX, in the case of right hinge, SX in opposite case. x x 2. Push the appliance in the direction of the arrows (1) until the upper gap cover stops against the kitchen furniture. 3. Push the appliance in the direction of the arrows (2) against the cupboard on the opposite side of the hinge. 9. Attach the covers (C, D) to the lugs and the hinge holes. C 2 D 1 E E B 4.
Ha Hb 8 mm K Ha Hc Hd a. Install the part (Ha) on the inner side of the kitchen furniture. ~50 mm 90o 16. Place the small square on the guide again and fix it with the screws supplied. 17. Align the kitchen furniture door and the appliance door by adjusting the part Hb. 21 mm 90o ~50 mm 21 mm b. Push the part (Hc) on the part (Ha). Ha Hb 18. Press the part (Hd) on the part (Hb). Hb Hc 14. Open the appliance door and the kitchen furniture door at an angle of 90°. a.
Technical information Technical data Dimensions of the recess Height mm 1780 Width mm 560 Depth mm 550 Rising time Hours 21 Voltage Volts 230 - 240 Frequency Hz 50 The technical information are situated in the rating plate, on the external or internal side of the appliance and in the energy label. ENVIRONMENT CONCERNS appliances marked with the symbol with the household waste. Return the product to your local recycling facility or contact your municipal office.
www.zanussi.
222371610-A-142015 www.zanussi.