NL EN FR DE ES Gebruiksaanwijzing User manual Notice d'utilisation Benutzerinformation Manual de instrucciones Koelkast Fridge Réfrigérateur Kühlschrank Frigorífico ZBA6317 2 15 27 40 53
Inhoud Veiligheidsinformatie _ _ _ _ _ _ _ _ _ _ _ _ _ _ _ Bediening _ _ _ _ _ _ _ _ _ _ _ _ _ _ _ _ _ _ _ _ Het eerste gebruik _ _ _ _ _ _ _ _ _ _ _ _ _ _ _ _ _ Dagelijks gebruik _ _ _ _ _ _ _ _ _ _ _ _ _ _ _ _ _ Nuttige aanwijzingen en tips _ _ _ _ _ _ _ _ _ _ _ _ 2 4 4 4 6 Onderhoud en reiniging _ _ _ _ _ _ _ _ _ _ _ _ _ _ 7 Problemen oplossen _ _ _ _ _ _ _ _ _ _ _ _ _ _ _ 8 Technische gegevens _ _ _ _ _ _ _ _ _ _ _ _ _ _ 10 Montage _ _ _ _ _ _ _ _ _ _ _ _ _ _ _ _ _ _ _ _ 10 Het milieu _ _ _ _ _ _ _ _
Waarschuwing! Alle elektrische onderdelen (netsnoer, stekker, compressor) mogen uitsluitend vervangen worden door een erkende onderhoudsdienst of gekwalificeerd onderhoudspersoneel. • Controleer de afvoer in de koelkast regelmatig op dooiwater. Reinig de afvoer, indien nodig. Als de afvoer verstopt is, zal er zich water onder in het apparaat verzamelen. 1. Het netsnoer mag niet verlengd worden. 2. Verzeker u ervan dat de stekker niet platgedrukt of beschadigd wordt door de achterkant van het apparaat.
Bescherming van het milieu Dit apparaat bevat geen gassen die de ozonlaag kunnen beschadigen, niet in het koelcircuit en evenmin in de isolatiematerialen. Het apparaat mag niet worden weggegooid bij het normale huishoudelijke afval. Het isolatieschuim bevat ontvlambare gassen: het appa- raat moet weggegooid worden conform de van toepassing zijnde regels die u bij de lokale overheidsinstanties kunt verkrijgen. Voorkom beschadiging aan de koeleenheid, vooral aan de achterkant bij de warmtewisselaar.
Belangrijk! In het geval van onbedoelde ontdooiing, bijvoorbeeld als de stroom langer is uitgevallen dan de duur die op de kaart met technische kenmerken onder "tijdsduur" is vermeld, moet het ontdooide voedsel snel geconsumeerd worden of onmiddellijk bereid worden en dan weer worden ingevroren (nadat het afgekoeld is).
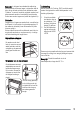
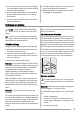
Uitneembare lade Fruit, groente en flessen kunnen geplaatst worden in de speciale onderste lade (zie diagram). Nuttige aanwijzingen en tips Tips voor energiebesparing • De deur niet vaker openen of open laten staan dan strikt noodzakelijk. • Als de omgevingstemperatuur hoog is, de thermostaatknop op een lage temperatuur staat en het apparaat volledig gevuld is, kan de compressor continu aan staan waardoor er ijs op de verdamper ontstaat.
• er zich van te verzekeren dat de commercieel ingevroren levensmiddelen op geschikte wijze door de detailhandelaar werden opgeslagen; • ervoor te zorgen dat de ingevroren levensmiddelen zo snel mogelijk van de winkel naar uw vriezer gebracht worden; • de deur niet vaker te openen of open te laten staan dan strikt noodzakelijk. • Als voedsel eenmaal ontdooid is, bederft het snel en kan het niet opnieuw worden ingevroren. • Bewaar het voedsel niet langer dan de door de fabrikant aangegeven bewaarperiode.
4. Na afloop van het ontdooien de binnenkant grondig droog maken en de dop terugzetten. 5. Schakel het apparaat in. 6. Zet de thermostaatknop op de maximale koude en laat het apparaat twee tot drie uur in deze instelling werken. 7. Zet het eerder verwijderde voedsel terug in het vriesvak. Belangrijk! Gebruik nooit scherpe metalen om de rijp van de verdamper te krabben, deze zou beschadigd kunnen raken.
Probleem Mogelijke oorzaak Oplossing De kamertemperatuur is te hoog. Verlaag de kamertemperatuur. Er loopt water over de achterkant van de koelkast. Tijdens het automatische ontdooipro- Dit is normaal. ces ontdooit de rijp tegen de achterwand. Er loopt water in de koelkast. De waterafvoer is verstopt. Maak de waterafvoer schoon. Producten verhinderen het water om in de wateropvangbak te lopen. Zorg ervoor dat de producten de achterwand niet raken. Er loopt water over de vloer.
Technische gegevens Afmetingen van de uitsparing Hoogte 1780 mm Breedte 560 mm Diepte 550 mm Tijdsduur 20 h De technische gegevens staan op het typeplaatje aan de linker binnenkant in het apparaat en op het energielabel. Montage Let op! Lees voor uw eigen veiligheid en correcte werking van het apparaat eerst de "veiligheidsinformatie" aandachtig door, alvorens het apparaat te installeren.
Omkeerbaarheid van de deur Op de tegenoverliggende zijde: • Monteer de onderste pen. • Monteer de deur. • Zet de afstandhouder en de bovenste pen vast. De deur van het apparaat gaat naar rechts open. Als u wilt dat de deur naar links open gaat, ga dan, voordat u het apparaat installeert, als volgt te werk: • Maak de bovenste pen los en verwijder de afstandhouder. • Verwijder de bovenste pen en de deur. Ventilatievereisten De luchtstroom achter het apparaat moet voldoende zijn. • Verwijder de deur.
13mm Ø 2,5 2 I 4mm 1 44mm I Boor gaten in het apparaat met een boor van Ø 2,5 mm (max. doordringdiepte 10 mm). Bevestig het vierkante montagestuk aan het apparaat. Installeer het apparaat in de nis. Duw het apparaat in de richting van de pijlen (1) totdat de afdekking van de opening tegen het keukenmeubel aankomt. Zorg ervoor dat de afstand tussen het apparaat en de voorste rand van de kast 44 mm is. Duw het apparaat in de richting van de pijlen (2) tegen de kast aan de andere kant van het scharnier.
50 mm Ha 90° 8 mm 21 mm Ha Hc 21 mm 50 mm Monteer onderdeel (Ha) aan de binnenkant van het keukenmeubel. Hb Duw onderdeel (Hc) op on- Zet de deur van het appaderdeel (Ha). raat en de deur van het keukenmeubel open onder een hoek van 90°. Plaats het kleine vierkantje (Hb) in de geleider (Ha). Zet de deur van het apparaat en de deur van het keukenmeubel tegen elkaar en markeer de gaten. Hb Plaats het kleine vierkantje op de geleider terug en bevestig het met de bijgeleverde schroeven.
Omkeerbaarheid van de deur van de vriezer 180˚ Het milieu Het symbool op het product of op de verpakking wijst erop dat dit product niet als huishoudafval mag worden behandeld, maar moet worden afgegeven bij een verzamelpunt waar elektrische en elektronische apparatuur wordt gerecycled. Als u ervoor zorgt dat dit product op de juiste manier wordt verwijderd, voorkomt 14 u mogelijke negatieve gevolgen voor mens en milieu die zich zouden kunnen voordoen in geval van verkeerde afvalverwerking.
Contents Safety information _ _ _ _ _ _ _ _ _ _ _ _ _ _ _ _ Operation _ _ _ _ _ _ _ _ _ _ _ _ _ _ _ _ _ _ _ _ First use _ _ _ _ _ _ _ _ _ _ _ _ _ _ _ _ _ _ _ _ Daily use _ _ _ _ _ _ _ _ _ _ _ _ _ _ _ _ _ _ _ _ Helpful hints and tips _ _ _ _ _ _ _ _ _ _ _ _ _ _ 15 17 17 17 18 Care and cleaning _ _ _ _ _ _ _ _ _ _ _ _ _ _ _ _ What to do if… _ _ _ _ _ _ _ _ _ _ _ _ _ _ _ _ _ Technical data _ _ _ _ _ _ _ _ _ _ _ _ _ _ _ _ _ _ Installation _ _ _ _ _ _ _ _ _ _ _ _ _ _ _ _ _ _ _ Environmental concerns _ _ _ _ _
squashed or damaged power plug may overheat and cause a fire. 3. Make sure that you can come to the mains plug of the appliance. 4. Do not pull the mains cable. 5. If the power plug socket is loose, do not insert the power plug. There is a risk of electric shock or fire. 6. You must not operate the appliance without the lamp cover5) of interior lighting. • This appliance is heavy. Care should be taken when moving it.
Operation Switching on Insert the plug into the wall socket. Turn the Temperature regulator clockwise to a medium setting. A medium setting is generally the most suitable. Temperature regulation However, the exact setting should be chosen keeping in mind that the temperature inside the appliance depends on: • room temperature • how often the door is opened • the quantity of food stored • the location of the appliance. The temperature is automatically regulated.
Movable shelves Air cooling The Dynamic Air Cooling (DAC) fan let food cool quickly and a more uniform temperature in the compartment. The walls of the refrigerator are equipped with a series of runners so that the shelves can be positioned as desired. Positioning the door shelves 1. You can switch on the fan by pressing the switch (1). The green light (2) comes on. 2. Adjust the Temperature regulator to the FAN position.
• do cover or wrap the food, particularly if it has a strong flavour • position food so that air can circulate freely around it Hints for refrigeration Useful hints: Meat (all types) : wrap in polythene bags and place on the glass shelf above the vegetable drawer. For safety, store in this way only one or two days at the most. Cooked foods, cold dishes, etc..: these should be covered and may be placed on any shelf.
er. This operation will improve the performance of the appliance and save electricity consumption. Important! Defrost the freezer when the frost layer reaches a thickness of about 3-5 mm. Important! Take care of not to damage the cooling system. To remove the frost, do these steps: 1. Switch off the appliance. 2. Remove any stored food, wrap it in several layers of newspaper and put it in a cool place. 3. Leave the door open. 4.
Problem Possible cause The mains plug is not connected to the mains socket correctly. Solution Connect the mains plug to the mains socket correctly. The appliance has no power. There is Connect a different electrical appliance no voltage in the mains socket. to the mains socket. Contact a qualified electrician. The lamp does not work. The compressor operates continually. Water flows on the rear plate of the refrigerator. The lamp is in stand-by. Close and open the door. The lamp is defective.
1. Remove the screw from the lamp cover. 2. Remove the lamp cover (refer to the illustration). 3. Replace the used lamp with a new lamp of the same power and specifically designed for household appliances (the maximum power is shown on the lamp cover). 4. 5. 6. 7. Install the lamp cover. Tighten the screw to the lamp cover. Connect the plug to the mains socket. Open the door. Make sure that the light comes on. Closing the door 1. Clean the door gaskets. 2. If necessary, adjust the door.
Door reversibility On the opposite side: • Install the lower pin. • Install the door. • Tighten the spacer and tighten the upper pin. The door of the appliance opens to the right. If you want to open the door to the left, do these steps before you install the appliance: • Loosen the upper pin and remove the spacer. • Remove the upper pin and the door. Ventilation requirements The airflow behind the appliance must be sufficient. • Remove the door. • Loosen the lower pin.
13mm Ø 2,5 2 I 4mm 1 44mm I Drill the unit using a Ø 2.5 mm drill (10 mm max. penetration). Fix the square fitting to the appliance. Install the appliance in the niche. Push the appliance in the direction of the arrows (1) until the upper gap cover stops against the kitchen furniture. Make sure that the distance between the appliance and the cupboard front-edge is 44 mm. Push the appliance in the direction of the arrows (2) against the cupboard on the opposite side of the hinge.
50 mm Ha 90° 8 mm 21 mm Ha Hc 21 mm 50 mm Install the part (Ha) on the inner side of the kitchen furniture. Hb Push the part (Hc) on the part (Ha). Open the appliance door and the kitchen furniture door at an angle of 90°. Insert the small square (Hb) into guide (Ha). Put together the appliance door and the furniture door and mark the holes. Hb Place the small square on the guide again and fix it with the screws supplied.
Reversibility of the freezer door 180˚ Environmental concerns The symbol on the product or on its packaging indicates that this product may not be treated as household waste. Instead it should be taken to the appropriate collection point for the recycling of electrical and electronic equipment.
Sommaire Consignes de sécurité _ _ _ _ _ _ _ _ _ _ _ _ _ _ Fonctionnement _ _ _ _ _ _ _ _ _ _ _ _ _ _ _ _ _ Première utilisation _ _ _ _ _ _ _ _ _ _ _ _ _ _ _ Utilisation quotidienne _ _ _ _ _ _ _ _ _ _ _ _ _ _ Conseils utiles _ _ _ _ _ _ _ _ _ _ _ _ _ _ _ _ _ 27 29 29 29 31 Entretien et nettoyage _ _ _ _ _ _ _ _ _ _ _ _ _ _ En cas d'anomalie de fonctionnement _ _ _ _ _ _ _ Caractéristiques techniques _ _ _ _ _ _ _ _ _ _ _ Installation _ _ _ _ _ _ _ _ _ _ _ _ _ _ _ _ _ _ _ En matière de sauvegarde de l'en
Avertissement Les composants électriques (cordon d'alimentation, prise, compresseur) doivent être remplacés par un technicien d’entretien agréé ou par un électricien spécialisé. 1. L'appareil ne doit pas être raccordé à l'aide d'un prolongateur, d'une prise multiple ou d'un raccordement multiple (risque d'incendie). 2. Assurez-vous que la prise n'est pas écrasée ou endommagée par l'arrière de l'appareil. Une prise de courant endommagée peut surchauffer et provoquer un incendie. 3.
Protection de l'environnement Le système frigorifique et l'isolation de votre appareil ne contiennent pas de C.F.C. contribuant ainsi à préserver l'environnement. L'appareil ne doit pas être mis au rebut avec les ordures ménagères et les déchets urbains. La mousse d'isolation contient des gaz inflam- mables : l'appareil sera mis au rebut conformément aux règlements applicables disponibles auprès des autorités locales.
Important En cas de dégivrage accidentel, dû par exemple à une panne de courant, si la panne doit se prolonger plus longtemps qu'il n'est indiqué à la rubrique "temps d'augmentation" dans la section Caractéristiques techniques, consommez les aliments décongelés le plus rapidement possible ou recongelezles après les avoir cuits (une fois refroidis).
Bac amovible Les fruits, les légumes et les bouteilles doivent être placés dans le bac inférieur spécial fourni avec l'appareil (voir le diagramme). Conseils utiles Conseils pour l'économie d'énergie • N'ouvrez pas la porte trop souvent ou plus longtemps que nécessaire.
tie du compartiment congélateur, peut provoquer des brûlures. • L'identification des emballages est importante : indiquez la date de congélation du produit, et respectez la durée de conservation indiquée par le fabricant.
2. Sortez les denrées congelées, enveloppez celles-ci dans plusieurs feuilles de papier journal et conservez-les dans un endroit frais. 3. Laissez la porte ouverte. 4. Le dégivrage terminé, épongez et séchez bien l'intérieur, et remettez le bouchon. 5. Mettez l'appareil en fonctionnement. 6. Réglez le thermostat pour obtenir plus de froid et faites fonctionner l'appareil pendant deux ou trois heures en utilisant ce réglage. 7. Replacez les produits surgelés ou congelés dans le compartiment.
Anomalie Cause possible Remède La température du produit est trop éle- Laissez le produit revenir à températuvée. re ambiante avant de le ranger dans l'appareil. La température ambiante est trop éle- Réduisez la température ambiante. vée. De l'eau s'écoule sur la plaque Pendant le dégivrage automatique, le arrière du compartiment réfrigé- givre fond sur la plaque arrière. rateur. Ce phénomène est normal. De l'eau s'écoule dans le compartiment réfrigérateur.
Caractéristiques techniques Dimensions de la niche d'encastrement Hauteur 1780 mm Largeur 560 mm Profondeur 550 mm Temps de remontée en température 20 h Les caractéristiques techniques figurent sur la plaque signalétique située sur le côté gauche à l'intérieur de l'appareil et sur l'étiquette d'énergie. Installation Attention Pour votre sécurité et le bon fonctionnement de l'appareil, veuillez lire attentivement les "Consignes de sécurité" avant d'installer l'appareil.
Réversibilité de la porte Le sens d'ouverture de la porte est orienté vers la droite. Si vous souhaitez modifier le sens d'ouverture de la porte (vers la gauche), effectuez les opérations suivantes avant d'installer définitivement l'appareil : • Desserrez la goupille • Enlevez la porte. supérieure et retirez • Desserrez la goupille inl'entretoise. férieure. • Retirez la goupille supérieure.
13mm Ø 2,5 2 I 4mm 1 44mm I Percez un trou d'un diamère de 2,5 mm (10 mm max. de profondeur) dans l'appareil. Fixez l'attache de l'équerre à l'appareil. Insérez l'appareil dans le meuble d'encastrement. Poussez l'appareil dans le sens indiqué par les flèches (1) jusqu'à ce que le cache de l'ouverture supérieure s'aligne par rapport au meuble de cuisine. Vérifiez que la distance entre l'appareil et le rebord avant du placard est de 44 mm.
50 mm Ha 90° 8 mm 21 mm Ha Hc 21 mm 50 mm Installez la pièce (Ha) sur la face intérieure du meuble de cuisine. Hb Poussez la pièce (Hc) sur la pièce (Ha). Ouvrez la porte de l'appareil et celle du meuble à 90° environ. Introduisez la petite équerre (Hb) dans le guide (Ha). Tenez ensemble la porte de l'appareil et celle du meuble et marquez la position des trous. Hb Placez à nouveau la petite équerre sur le guide et fixez-la à l'aide des vis fournies.
Réversibilité de la porte du congélateur 180˚ En matière de sauvegarde de l'environnement Le symbole sur le produit ou son emballage indique que ce produit ne peut être traité comme déchet ménager. Il doit être remis au point de collecte dédié à cet effet (collecte et recyclage du matériel électrique et électronique).
Inhalt Sicherheitshinweise _ _ _ _ _ _ _ _ _ _ _ _ _ _ _ Betrieb _ _ _ _ _ _ _ _ _ _ _ _ _ _ _ _ _ _ _ _ _ Erste Inbetriebnahme _ _ _ _ _ _ _ _ _ _ _ _ _ _ Täglicher Gebrauch _ _ _ _ _ _ _ _ _ _ _ _ _ _ _ Praktische Tipps und Hinweise _ _ _ _ _ _ _ _ _ _ 40 42 42 42 44 Reinigung und Pflege _ _ _ _ _ _ _ _ _ _ _ _ _ _ Was tun, wenn … _ _ _ _ _ _ _ _ _ _ _ _ _ _ _ _ Technische Daten _ _ _ _ _ _ _ _ _ _ _ _ _ _ _ _ Montage _ _ _ _ _ _ _ _ _ _ _ _ _ _ _ _ _ _ _ _ Hinweise zum Umweltschutz _ _ _ _ _ _ _ _ _ _
Warnung! Elektrische Bauteile (Netzkabel, Stecker, Kompressor) dürfen nur vom Kundendienst oder einer Fachkraft ausgewechselt werden. 1. Das Netzkabel darf nicht verlängert werden. 2. Vergewissern Sie sich, dass der Netzstecker nicht von der Geräterückseite gequetscht oder beschädigt wird. Ein gequetschter oder beschädigter Netzstecker überhitzt und kann einen Brand verursachen. 3. Vergewissern Sie sich, dass der Netzstecker des Gerätes frei zugänglich ist. 4. Ziehen Sie nicht am Netzkabel. 5.
Umweltschutz Das Gerät enthält im Kältekreis oder in dem Isoliermaterial keine ozonschädigenden Gase. Das Gerät darf nicht wie normaler Hausmüll entsorgt werden. Die Isolierung enthält entzündliche Gase: das Gerät muss ge- mäß den geltenden Vorschriften entsorgt werden; sie erhalten diese bei Ihrer Gemeindeverwaltung. Nicht das Kälteaggregat beschädigen, insbesondere nicht in der Nähe des Wärmetauschers.
Lagerung gefrorener Produkte Lassen Sie das Gerät vor der ersten Inbetriebnahme oder nach einer Zeit, in der das Gerät nicht benutzt wurde, mindestens zwei Stunden lang auf den höheren Einstellungen laufen, bevor Sie Lebensmittel in das Gefrierfach hinein legen.
Herausnehmbare Schublade Obst, Gemüse und Flaschen sollten in die speziell dafür vorgesehene untere Schublade gelegt werden (siehe Abbildung). Praktische Tipps und Hinweise Energiespartipps • Öffnen Sie die Tür nicht zu häufig, und lassen Sie diese nicht länger offen als unbedingt notwendig.
• weniger fetthaltige Lebensmittel lassen sich besser lagern als fetthaltigere; Salz verkürzt die Lagerzeit von Lebensmitteln im Gefrierfach; • werden Gefrierwürfel direkt nach der Entnahme aus dem Gefrierfach verwendet, können Sie zu Frostbrand auf der Haut führen; • Es empfiehlt sich, das Einfrierdatum auf jeder einzelnen Packung zu notieren, um einen genauen Überblick über die Lagerzeit zu haben.
Wichtig! Tauen Sie den Gefrierschrank ab, wenn die Reifschicht eine Stärke von etwa 3 bis 5 mm erreicht hat. Entfernen Sie den Reif wie nachstehend erläutert: 1. Schalten Sie das Gerät aus. 2. Nehmen Sie das gesamte Gefriergut heraus, verpacken Sie es in mehrere Schichten Zeitungspapier und lagern Sie es an einem kühlen Ort. 3. Lassen Sie die Tür offen. 4. Ist das Geräteinnere vollständig abgetaut, trocken Sie die nassen Oberflächen gründlich ab und setzen Sie den Stopfen wieder ein. 5.
Störung Der Kompressor arbeitet ständig. Mögliche Ursache Abhilfe Die Temperatur ist nicht richtig einge- Stellen Sie eine höhere Temperatur ein. stellt. Die Tür ist nicht richtig geschlossen. Siehe hierzu „Schließen der Tür“. Die Tür wurde zu häufig geöffnet. Lassen Sie die Tür nicht länger als erforderlich offen. Die Temperatur der einzufrierenden Lebensmittel ist zu hoch. Lassen Sie Lebensmittel auf Raumtemperatur abkühlen, bevor Sie sie in das Gerät legen. Die Raumtemperatur ist zu hoch.
3. Ersetzen Sie die alte Lampe durch eine Lampe der gleichen Leistung (die maximal erlaubte Leistung steht auf der Lampenabdeckung), die speziell für Haushaltsgeräte vorgesehen ist. 4. Bringen Sie die Lampenabdeckung an. 5. Ziehen Sie die Schraube an der Lampenabdeckung fest. 6. Stecken Sie den Netzstecker in die Steckdose. 7. Öffnen Sie die Tür. Prüfen Sie, dass die Lampe brennt. Schließen Sie die Tür 1. Reinigen Sie die Türdichtungen. 2. Stellen Sie die Tür nach Bedarf ein. Siehe hierzu "Montage". 3.
Wechsel des Türanschlags Die Tür des Geräts öffnet sich nach rechts. Wenn Sie möchten, dass sich die Tür nach links öffnet, gehen Sie vor dem Einbau des Geräts bitte nach den folgenden Anweisungen vor: • Lösen Sie den oberen Scharnierstift und entfernen Sie das Distanzstück. • Entfernen Sie den oberen Scharnierstift und nehmen Sie die Tür vom Gerät ab Anforderungen an die Belüftung Die Luftzirkulation hinter dem Gerät muss ausreichend groß sein. 50 mm • Entfernen Sie die Tür.
13mm Ø 2,5 2 I 4mm 1 44mm I Bohren Sie mit einem 2,5mm-Bohrer Löcher in den Sockel (höchstens 10 mm tief). Montieren Sie den eckigen Befestigungswinkel am Gerät. Installieren Sie das Gerät in der Einbaunische. Schieben Sie das Gerät in Pfeilrichtung (1), bis die obere Lückenblende am Küchenmöbel anliegt. Vergewissern Sie sich, dass der Abstand zwischen dem Gerät und der Schrankvorderkante 44 mm beträgt.
50 mm Ha 90° 8 mm 21 mm Ha Hc 21 mm 50 mm Montieren Sie die FühDrücken Sie die Abderungsschiene (Ha) an der ckung (Hc) auf die FühInnenseite der Tür des Kü- rungsschiene (Ha). chenmöbels. Hb Öffnen Sie die Gerätetür und die Möbeltüre in einem Winkel von 90°. Setzen Sie das Führungsstück (Hb) in die Führungsschiene (Ha) ein. Bringen Sie die Gerätetür und die Küchenmöbeltür zusammen und markieren Sie die Bohrungen.
Wechsel des Gefrierfach-Türanschlags 180˚ Hinweise zum Umweltschutz Das Symbol auf dem Produkt oder seiner Verpackung weist darauf hin, dass dieses Produkt nicht als normaler Haushaltsabfall zu behandeln ist, sondern an einem Sammelpunkt für das Recycling von elektrischen und elektronischen Geräten abgegeben werden muss. Durch Ihren Beitrag zum korrekten 52 Entsorgen dieses Produkts schützen Sie die Umwelt und die Gesundheit Ihrer Mitmenschen.
Índice de materias Información sobre seguridad _ _ _ _ _ _ _ _ _ _ _ Funcionamiento _ _ _ _ _ _ _ _ _ _ _ _ _ _ _ _ _ Primer uso _ _ _ _ _ _ _ _ _ _ _ _ _ _ _ _ _ _ _ Uso diario _ _ _ _ _ _ _ _ _ _ _ _ _ _ _ _ _ _ _ _ Consejos útiles _ _ _ _ _ _ _ _ _ _ _ _ _ _ _ _ _ 53 55 55 55 57 Mantenimiento y limpieza _ _ _ _ _ _ _ _ _ _ _ _ Qué hacer si… _ _ _ _ _ _ _ _ _ _ _ _ _ _ _ _ _ Datos técnicos _ _ _ _ _ _ _ _ _ _ _ _ _ _ _ _ _ _ Instalación _ _ _ _ _ _ _ _ _ _ _ _ _ _ _ _ _ _ _ Aspectos medioambientales _ _
2. Compruebe que la parte posterior del aparato no aplaste ni dañe el enchufe. Un enchufe aplastado o dañado puede recalentarse y provocar un incendio. 3. Cerciórese de que tiene acceso al enchufe del aparato. 4. No tire del cable de alimentación. 5. Si la toma de corriente está floja, no inserte el enchufe. Existe riesgo de descarga eléctrica o incendio. 6. No debe utilizar el aparato sin la tapa de la bombilla. 17) para la iluminación interior. • Este aparato es pesado.
Protección del medio ambiente Este aparato no contiene gases perjudiciales para la capa de ozono, ni en el circuito de refrigerante ni en los materiales aislantes. El aparato no se debe desechar junto con los residuos urbanos. La espuma ais- lante contiene gases inflamables: el aparato se debe desechar de acuerdo con la normativa vigente, que puede solicitar a las autoridades locales. No dañe la unidad de refrigeración, en especial la parte trasera, cerca del intercambiador de calor.
Importante En caso de producirse una descongelación accidental, por ejemplo, por un corte del suministro eléctrico, si la interrupción ha sido más prolongada que el valor indicado en la tabla de características técnicas bajo "tiempo de elevación", los alimentos descongelados deben consumirse cuanto antes o cocinarlos de inmediato y volverlos a congelar (después de que se hayan enfriado).
Cajón extraíble En el cajón especial inferior proporcionado se deben colocar la fruta, la verdura y las botellas (consulte el diagrama). Consejos útiles Consejos para ahorrar energía • No abra la puerta con frecuencia ni la deje abierta más tiempo del estrictamente necesario.
• es recomendable etiquetar cada paquete con la fecha de congelación para controlar el tiempo que permanecen almacenados.
4. Cuando finalice la descongelación, seque bien el interior y vuelva a colocar el tapón. 5. Encienda el aparato. 6. Ajuste el regulador de temperatura para obtener el máximo frío y haga funcionar el aparato durante dos o tres horas con dicho ajuste. 7. Vuelva a introducir los alimentos que retiró previamente. Importante No utilice herramientas metálicas afiladas para raspar la escarcha del evaporador, ya que podría dañarlo.
Problema Causa probable Solución La temperatura ambiente es demasia- Reduzca la temperatura ambiente. do alta. El agua fluye por la placa poste- Durante el proceso de descongelarior del frigorífico. ción automática, el hielo se descongela en la placa posterior. Esto es normal. El agua fluye al interior del frigorífico. La salida de agua está obstruida. Limpie la salida de agua. Los productos impiden que el agua fluya al colector de agua.
Datos técnicos Medidas de la cavidad Altura 1780 mm Anchura 560 mm Fondo 550 mm Tiempo de elevación 20 h La información técnica se encuentra en la placa de datos técnicos en el lado interior izquierdo del aparato y en la etiqueta de energía. Instalación Precaución Lea atentamente la "Información sobre seguridad" para garantizar su propia seguridad y el correcto funcionamiento del electrodoméstico antes de instalar el electrodoméstico.
Cambio del sentido de apertura de la puerta En el lado opuesto: • Instale el pasador inferior. • Instale la puerta. • Apriete el espaciador y el pasador superior. La puerta del aparato se abre hacia la derecha. Si desea abrir la puerta hacia la izquierda, siga estas instrucciones antes de instalar el aparato: • Afloje el pasador supe- • Retire la puerta. rior y extraiga el separa- • Afloje el pasador infedor. rior. • Retire el pasador superior y la puerta.
13mm Ø 2,5 2 I 4mm 1 44mm I Taladre la unidad con una broca de Ø 2,5 mm (10 mm de penetración máxima). Aplique el cuadrado de fijación al aparato. Instale el aparato en el hueco. Empuje el aparato en el sentido de las flechas (1) hasta que la cubierta de separación superior haga tope contra el mueble de cocina. Asegúrese de que haya una distancia de 44 mm entre el aparato y el borde delantero del mueble.
50 mm Ha 90° 8 mm 21 mm Ha Hc 21 mm 50 mm Instale la pieza (Ha) en el Empuje la pieza (Hc) conlado interno del mueble de tra la pieza (Ha). cocina. Hb Abra la puerta del aparato y la del mueble de cocina en un ángulo de 90°. Introduzca el cuadrado pequeño (Hb) en la guía (Ha). Coloque juntas las puertas del aparato y del mueble de cocina y marque los orificios. Hb Vuelva a colocar el cuadrado pequeño en la guía y fíjelo con los tornillos suministrados.
Posibilidad de invertir la puerta del congelador 180˚ Aspectos medioambientales El símbolo que aparece en el aparato o en su embalaje, indica que este producto no se puede tratar como un residuo normal del hogar. Se deberá entregar, sin coste para el poseedor, bien al distribuidor, en el acto de la compra de un nuevo producto similar al que se deshecha, bien a un punto municipal de recolección selectiva de equipos eléctricos y electrónicos para su reciclaje.
222332336-00-062010 www.zanussi.