EN User manual Refrigerator ZBA32050SA
Contents Safety instructions _ _ _ _ _ _ _ _ _ _ _ _ _ _ Control panel _ _ _ _ _ _ _ _ _ _ _ _ _ _ _ _ _ First use _ _ _ _ _ _ _ _ _ _ _ _ _ _ _ _ _ _ _ _ Daily use _ _ _ _ _ _ _ _ _ _ _ _ _ _ _ _ _ _ _ _ Helpful hints and tips _ _ _ _ _ _ _ _ _ _ _ _ _ 2 4 5 5 5 Care and Cleaning _ _ _ _ _ _ _ _ _ _ _ _ _ _ 6 What to do if… _ _ _ _ _ _ _ _ _ _ _ _ _ _ _ _ 6 Installation _ _ _ _ _ _ _ _ _ _ _ _ _ _ _ _ _ _ _ 8 Noises _ _ _ _ _ _ _ _ _ _ _ _ _ _ _ _ _ _ _ _ 14 Technical data _ _ _ _ _ _ _ _ _ _ _ _ _ _ _ _
If the refrigerant circuit should become damaged: – avoid open flames and sources of ignition – thoroughly ventilate the room in which the appliance is situated • It is dangerous to alter the specifications or modify this product in any way. Any damage to the cord may cause a short-circuit, fire and/or electric shock. Warning! Any electrical component (power cord, plug, compressor) must be replaced by a certified service agent or qualified service personnel to avoid hazard. 1. 2.
• This product must be serviced by an authorized Service Centre, and only genuine spare parts must be used. Environment Protection This appliance does not contain gasses which could damage the ozone layer, in either its refrigerant circuit or insulation materials. The appliance shall not be discarded together with the urban refuse and rubbish. The insulation foam contains flammable gases: the appliance shall be disposed according to the applicable regulations to obtain from your local authorities.
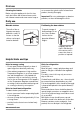
First use Cleaning the interior Before using the appliance for the first time, wash the interior and all internal accessories with lukewarm water and some neutral soap so as to remove the typical smell of a brand-new product, then dry thoroughly. Important! Do not use detergents or abrasive powders, as these will damage the finish. Daily use Movable shelves Positioning the door shelves The walls of the refrigerator are equipped with a series of runners so that the shelves can be positioned as desired.
Care and Cleaning Caution! Unplug the appliance before carrying out any maintenance operation. This appliance contains hydrocarbons in its cooling unit; maintenance and recharging must therefore only be carried out by authorized technicians. Periodic cleaning The equipment has to be cleaned regularly: • clean the inside and accessories with lukewarm water and some neutral soap. • regularly check the door seals and wipe clean to ensure they are clean and free from debris. • rinse and dry thoroughly.
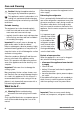
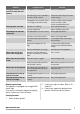
Problem The appliance does not operate. The lamp does not operate. The lamp does not work. The compressor operates continually. Possible cause Solution The appliance is switched off. Switch on the appliance. The mains plug is not connected to the mains socket correctly. Connect the mains plug to the mains socket correctly. The appliance has no power. There is no voltage in the mains socket. Connect a different electrical appliance to the mains socket. Contact a qualified electrician.
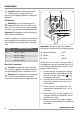
Installation Caution! Read the "Safety Information" carefully for your safety and correct operation of the appliance before installing the appliance. A B Positioning Warning! If you are discarding an old appliance that has a lock or catch on the door, you must ensure that it is made unusable to prevent young children being trapped inside. C D Important! The appliance shall have the plug accessible after installation.
6. Switch on the appliance. The appliance is supplied with a 13 amp plug fitted B. In the event of having to change the fuse in the plug supplied, a 13 amp ASTA approved (BS 1362) fuse must be used. Door reversibility The door of the appliance opens to the right. If you want to open the door to the left, follow these steps before you install the appliance: Warning! A cut off plug inserted into a 13 amp socket is a serious safety (shock) hazard. Ensure that it is disposed of safely. 1. 2. 3. 4.
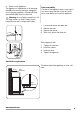
Installing the appliance Do the following steps: Caution! Make sure that the mains cable can move freely. If necessary cut the adhesive sealing strip and then apply it to the appliance as shown in figure. x x Drill the appliance using a Ø 2.5 mm drill (10 mm max. penetration). Fix the square fitting to the appliance. 13 mm 1 Ø 2.5 mm 2 3 2 1 10 Install the appliance in the niche. Push the appliance in the direction of the arrow (1) until the upper gap cover stops against the kitchen furniture.
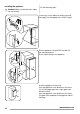
Adjust the appliance in the niche. Make sure that the distance between the appliance and the cupboard front-edge is 44 mm. The lower hinge cover (in the accessories bag) makes sure that the distance between the appliance and the kitchen furniture is correct. Make sure that the clearance between the appliance and the cupboard is 4 mm. Open the door. Put the lower hinge cover in position. 4mm 44mm Attach the appliance to the niche with 4 screws. I I Remove the correct part from the hinge cover (E).
Attach the covers (C, D) to the lugs and the hinge holes. Install the vent grille (B). Attach the hinge covers (E) to the hinge. C D E E B Disconnect the parts (Ha), (Hb), (Hc) and (Hd). Install the part (Ha) on the inner side of the kitchen furniture. ~50 mm 90o 90o 90o ~50 mm 21 mm 12 www.zanussi.
Push the part (Hc) on the part (Ha). Ha Hc Open the appliance door and the kitchen furniture door at an angle of 90°. Insert the small square (Hb) into guide (Ha). Put together the appliance door and the furniture door and mark the holes. Remove the small squares and drill holes with ø 2 mm at 8 mm from the outer edge of the door. Place the small square on the guide again and fix it with the screws supplied. 8 mm Ha Hb www.zanussi.
Align the kitchen furniture door and the appliance door by adjusting the part (Hb). Hb Press the part (Hd) on the part (Hb). Hb Hd Do a final check to make sure that: • All screws are tightened. • The sealing strip is attached tightly to the cabinet. • The door opens and closes correctly. Noises There are some sounds during normal running (compressor, refrigerant circulation). 14 www.zanussi.
SSS RRR ! HISSS! OK U BL SSSRRR! HISSS! BLUBB! www.zanussi.
Technical data Dimension of the recess Height 1780 mm Width 560 mm Depth 550 mm Voltage 230-240 V Frequency 50 Hz The technical information are situated in the rating plate on the internal left side of the appliance and in the energy label. 16 www.zanussi.
www.zanussi.
www.zanussi.
www.zanussi.
222365861-A-102013 www.zanussi.