
Operation Manual


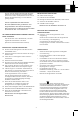


13*
21
16*
15
17*
18
19
30
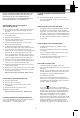
22
23
24
25
26
27
28
29
9
10
12*
3
5
6
4
2
1
7
8
20
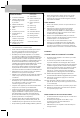
A
B
C
31 32
33
11*
1
English
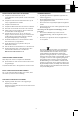
IMPO RTANT SAFEGUARD S
● Re ad th is instruction b ook le t care fully.
● Be fore using th e appliance , ch e ck th at th e m ains pow e r
voltage corre sponds to th e voltage sh ow n on th e rating plate .
● D o not s w itch th e appliance on if it appe ars to be faulty
in any w ay or it h as a dam age d cord or plug. D o not try
to re pair th e appliance by yours e lf.
● Alw ays re m ove th e plug from th e pow e r sock e t w h e n
th e appliance is not in use and be fore carrying out any
cle aning or m ainte nance ope rations .
● Ne ve r le ave th e appliance unatte nde d w h e n it is
sw itch e d on. Ke e p th e appliance out of re ach of
ch ildre n.
● Th is appliance is for dom e s tic us e only. Us e as
de s crib e d in th is instruction b ook le t.
● D o not pull th e appliance by th e cord.
D o not unplug b y pulling on th e cord.
● D o not us e appliance on w e t surface s or to vacuum
liq uids , m ud, ash and b urning cigare tte butts .
D o not vacuum up any h igh ly flam m able or e xplosive
subs tance s or gase s .
● D o not unplug th e vacuum cle ane r w ith w e t h ands.
● D o not ope rate th e vacuum cle ane r too clos e to h e ate rs
and radiators , stove s e tc.
● Be fore you s tart us ing th e vacuum cle ane r, ple as e
re m ove large or sh arp obje cts from th e floor to pre ve nt
dam age to th e dus t containe r and h ose .
INSTRUCTIO NS FO R USE
● Be fore placing into ope ration m ak e ce rtain th at th e
filte rs are in th e prope r pos ition.
A Unw ind a sufficie nt le ngth of cable and ins e rt th e plug
into th e pow e r s ock e t. A YELLO W m ark on th e pow e r
cable s h ow s th e ide al cable le ngth . D o not e xte nd th e
cable be yond th e RED m ark .
B Pre s s th e O N/O FF button to s w itch th e appliance on.
O n initial start up full pow e r is re ach e d afte r
approxim ate ly 1-2 se conds .
C To re w ind th e pow e r cable , pre s s th e re w ind button w ith
foot, and guide th e cable w ith h and to e ns ure th at it
doe s not w h ip caus ing dam age .
Sound le ve l: 82,5 db (A)
MAINTENANCE
REMO VING TH E CO NTENTS O F TH E D UST
CO NTAINER
● Ne ve r ope rate th e cle ane r w ith out th e dus t containe r
installe d.
● Your cle ane r is fitte d w ith an e le ctronic filte r indicator.
Th e dus t containe r m ust be e m ptie d if th e w indow of th e
e le ctronic filte r indicator is illum inate d w h e n th e cle ane r
is ope rating at m axim um pow e r and th e nozzle is
rais e d from th e floor.
● Ple ase note : It is norm al for th e re d ligh t of th e
indicator to flick e r on and off during us e . If th e dust
containe r is e m ptie d and th e indicator is s till active , it
m e ans th at th e cartridge filte r is clogge d. In th is cas e ,
follow th e instructions of ch apte r 'Re placing or cle aning
th e cartridge filte r'.
22 Re m ove th e dust containe r by pus h ing th e ope n buttons
on th e tw o s ide s of th e dus t containe r h andle .
23 Re m ove th e conte nts of th e dus t containe r by push ing
th e orange - coloure d ope ning button.
24,25 If ne ce s s ary, th e prote ctor m e s h also can be re m ove d
(24) in orde r to sh ak e th e dirt from its s urface (25).
26 Close th e dust containe r lid until it click s .
22 Inse rt th e dus t containe r back into th e cle ane r by
pre s sing it dow n until it click s
REPLACING TH E FILTERS
Filte rs sh ould be re place d at le ast tw ice a ye ar or w h e n
th e y be com e vis ib ly soile d.
Alw ays ope rate th e cle ane r w ith filte rs installe d to avoid
re duce d s uction.
D isconne ct from e le ctrical outle t be fore ch anging th e filte rs .
Me nalux brande d filte rs are strongly re com m e nde d
by Z anussi. Th ose h igh q uality filte rs w ill e nsure a
long life tim e of your Z anussi vacuum cle ane r. For
m ore inform ation about Me nalux products , ple ase
visit our w e bsite : w w w .m e nalux.com .
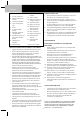
D ESCRIPTIO N O F PARTS
1. Suction inle t
2. Ele ctronic filte r
indicator
3. O n/off sw itch
4. Cable re w ind button
5. W h e e l
6. D us t containe r
7. D us t containe r h andle
8. D us t containe r ope n
button
9 . Carrying h andle
10. H ose
11. Te le s copic tub e *
12. Me tal tube s (x2) *
13. D ual purpos e floor
nozzle *
14. Floor nozzle *
15. Cre vice nozzle
16. U ph ols te ry nozzle *
17. Turbo nozzle *
18. Cartridge filte r
19 . Prote ctor m e s h
20. Ve rtical park ing
21. H orizontal park ing
* D e pe nding on th e m ode l
Z anus s i supply a range of cle ane rs w ith diffe re nt acce s sorie s , all of w h ich are cove re d in th is m anual. Ple as e re fe r to your
spe cific m ode l and its acce s sorie s .
14*
* D e pe nding on th e m ode l
* Nur be s tim m te Mode lle
* Alle e n be paalde m ode lle n
* Suivant le s m odèle s
* Solo pe r alcuni m ode lli
* Sólo algunos m ode los
* Ape nas para alguns m ode los
* Yalnýzca be lirli m ode lle rde
* Μ όνο ορισµέ να µοντέ λα.
* Только для отдельных м од елей
* В залежності від м од елі
* Sam o odre đe ni m ode li
* Pouze u něk te rých m ode lů
* Само за някои м одели
* Tylk o nie k tóre m ode le
* D isponibil num ai pe ntru une le m ode le
* Le n nie k toré m ode ly
* Sam o ne k ate ri m ode li
* Sam o ne k ate ri m ode li
* Ainult te atud m ude lid
* Tik ai note ik tie m m ode ļie m
* Tink a tik k ai k urie m s m ode liam s
* Csak e gye s típus ok e s e tén