User Manual GETTING STARTED? EASY.
SAFETY INFORMATION Before the installation and use of the appliance, carefully read the supplied instructions. The manufacturer is not responsible for any injuries or damages that are the result of incorrect installation or usage. Always keep the instructions in a safe and accessible location for future reference.
• • • • • • • • • NEVER try to extinguish a fire with water, but switch off the appliance and then cover flame e.g. with a lid or a fire blanket. CAUTION: The cooking process has to be supervised. A short term cooking process has to be supervised continuously. WARNING: Danger of fire: Do not store items on the cooking surfaces. Metallic objects such as knives, forks, spoons and lids should not be placed on the hob surface since they can get hot. Do not use a steam cleaner to clean the appliance.
• • • Do not install the appliance adjacent to a door or under a window. This prevents hot cookware falling from the appliance when the door or the window is opened. If the appliance is installed above drawers make sure that the space, between the bottom of the appliance and the upper drawer, is sufficient for air circulation. The bottom of the appliance can get hot. Make sure to install a non-combustible separation panel under the appliance to prevent access to the bottom.
• • Used oil, that can contain food remnants, can cause fire at a lower temperature than oil used for the first time. Do not put flammable products or items that are wet with flammable products in, near or on the appliance. • CARE AND CLEANING WARNING! Do not remove the buttons, knobs or gaskets from the control panel. Water may get inside the appliance and cause damage. WARNING! Risk of damage to the appliance. • • • • • • • • • • • • • • Do not keep hot cookware on the control panel.
813 Current Editions and the ETCI Rules for Electrical Installations. Provision for ventilation Detailed recommendations are contained in the following British Standards Codes Of Practice: B.S. 6172/B.S. 5440, Par. 2 and B.S. 6891 Current Editions. The hob should not be installed in a bed sitting room with a volume of less than 20 m³. If it is installed in a room of volume less than 5 m³ an air vent of effective area of 100 cm² is required.
4. Assemble the parts, follow the same procedure backwards. 5. Replace the rating plate (it is near the gas supply pipe) with the one for the new type of gas supply. You can find this plate in the package supplied with the appliance. If the supply gas pressure is changeable or different from the necessary pressure, you must fit an applicable pressure adjuster on the gas supply pipe. 6. Reassemble the gasket and the knob. ADJUSTMENT OF MINIMUM LEVEL To adjust the minimum level of the burners: 1.
The hob has a terminal block which is marked as follows: • L — Live terminal • N — Neutral terminal • or E — Earth terminal Before carrying out the connection, make sure: 1. The limiter valve and the electrical system can take the appliance load (see the rating plate) 2. The supply system is equipped with an efficient earth connection in compliance with the current standards and regulations 3. The outlet or omnipolar switch used for connection is easily accessible with the appliance installed.
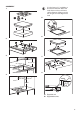
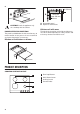
ASSEMBLY 1. If a furniture unit is installed at a distance of 400 mm above the hob, there must be a minimum safety distance of 50 mm to the left or right from the edge of the hob. 5. 6. 2. 3. 7. min. 600 mm min. 100 mm min. 650 mm min. 55 mm 30 mm 480+02 mm 560+02 mm 8. 4. A 400 mm 50 mm B A. Supplied seal B.
9. A B min 30 mm min 5 mm (max 150 mm) 60 mm CAUTION! Install the appliance only on a worktop with flat surface. POSSIBILITIES FOR INSERTION The panel installed below the hob must be easy to remove and let an easy access in case a technical assistance intervention is necessary. A. Removable panel B. Space for connections Kitchen unit with oven The electrical connection of the hob and the oven must be installed separately for safety reasons and to let easy remove oven from the unit.
CONTROL KNOB Symbol Symbol Description Description minimum gas supply no gas supply / off position ignition position / maximum gas supply DAILY USE WARNING! Refer to Safety chapters. C. Ignition candle D. Thermocouple IGNITION OF THE BURNER BURNER OVERVIEW Always light the burner before you put on the cookware. $ % & ' $ % & WARNING! Be very careful when you use open fire in the kitchen environment. The manufacturer declines any responsibility in case of the flame misuse. 1.
CAUTION! In the absence of electricity you can ignite the burner without electrical device; in this case approach the burner with a flame, turn the control knob counter-clockwise to maximum gas supply position and push it down. Keep the control knob pushed for equal or less than 10 seconds to let the thermocouple warm up. If the burner accidentally goes out, turn the control knob to the off position and try to light the burner again after minimum 1 minute. The hob is supplied with the progressive valves.
CARE AND CLEANING WARNING! Refer to Safety chapters. GENERAL INFORMATION • Clean the hob after each use. • Always use cookware with a clean base. • Scratches or dark stains on the surface have no effect on how the hob operates. • Use a special cleaner suitable for the surface of the hob. Stainless steel • Wash stainless steel parts with water, and then dry them with a soft cloth.
TROUBLESHOOTING WARNING! Refer to Safety chapters. WHAT TO DO IF... Problem There is no spark when you try to activate the spark generator. Possible cause The hob is not connected to an electrical supply or it is connected incorrectly. Check if the hob is correctly connected to the electrical supply. The fuse is blown. Make sure that the fuse is the cause of the malfunction. If the fuse is blown again and again, contact a qualified electrician. Burner cap and crown are placed incorrectly.
LABELS SUPPLIED WITH THE ACCESSORIES BAG Stick the adhesive labels as indicated below: A B MOD. MOD. PROD.NO. PROD.NO. SER.NO SER.NO DATA DATA C 0049 MOD. PROD.NO. SER.NO. TYPE IP20 03 IT MADE IN ITALY A. Stick it on Guarantee Card and send this part (if applicable). B. Stick it on Guarantee Card and keep this part (if applicable). C. Stick it on instruction booklet.
OTHER TECHNICAL DATA TOTAL POWER: Gas original: G20 (2H) 20 mbar 9 kW Gas replacement: G30 (3+) 28-30 mbar 629 g/h G31 (3+) 37 mbar 618 g/h Electric supply: 220-240 V ~ 50-60 Hz 3 core flexible cable with non rewireable plug fitted with a 3 amp cartridge fuse Appliance category: II2H3+ Gas connection: R 1/2" Appliance class: 3 GAS BURNERS FOR NATURAL GAS G20 20 mbar BURNER NORMAL POWER kW MINIMUM POWER kW INJECTOR MARK Multi Crown 4,0 1,4 146 Semi-rapid 2,0 0,45 96 Auxiliary 1,0
Energy efficiency per gas burner (EE gas burner) Left rear - Semi-rapid 54.5% Right rear - Semi-rapid 58.1% Left front - Multi Crown 59.7% Right front - Auxiliary not applicable Energy efficiency for the gas hob (EE gas hob) 57.4% EN 30-2-1: Domestic cooking appliances burning gas - Part 2-1 : Rational use of energy - General ENERGY SAVING • Before use, make sure that the burners and pan supports are assembled correctly. • Use cookware with diameters applicable to the size of burners.
867356386-C-262019 WWW.ZANUSSI.