
User manual


6
Reinigung der Innenteile
Bevor Sie das GerŠt in Betrieb nehmen, beseitigen
Sie den typischen ÇNeugeruchÈ am besten durch
Auswaschen der Innenteile mit lauwarmem Wasser
und einem neutralen Reinigungsmittel SorgfŠltig
nachtrocknen.
GEBRAUCH
Bedienungsblende
0
1
2
3
3
2
1
0
5
4
4
5
6
B
A
CDE F G H I
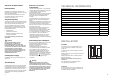
6
A.Temperaturregler(Thermostat)Gefrierabteil
B. Schnellgefrierschalter
C. Schnellgefrierkontrollampe
D. Alarm-Lampe
E. Betreibskontollampe(Gefrierabteil)
F. DAC Schalter
G. DAC Lampe
H.Betriebskontrollampe (KŸhlabteil)
I. Temperaturregler (Thermostat) KŸhlabteil
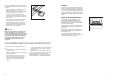
Gebrauch des KŸhlabteils
Temperaturregulierung
Bei der Wahl (I) der richtigen KŸlhltemperatur mu§
berŸcksichtigt werden, da§ die Innentemperatur
immer in AbhŠngigkeit von der vorhandenen
Raumtemperatur, von der HŠufigkeit des TŸršffnens,
von der Lebensmittelmenge und von der
Luftzirkulation um das GerŠt einzustellen ist.
Die Reglereinstellung verlŠuft im Uhrzeigersinn
immer von einer niedrigen zu einer hšheren
Markierung und regelt die Temperatur von einem
warmen bis zum kŠltesten Bereich. D.h. niedrigste
Markierung = wŠrmste Innentemperatur, hšchste
Markierung = kŠlteste Innentemperatur.
Die mittlere Einstellung ist meistens die geeignetste.
Den Stillstand des GerŠtes erhŠlt man durch Drehen
des Thermostatknopfes auf das Symbol ÇOÈ.
Wichtig
Hšchste KŠlteeinstellung bei hoher Raumtemperatur
und erheblicher Lebensmittelmenge kann den
fortdauernden KŸhlschrank-Betrieb verursachen,
dabei kann sich eine Reifschicht an der hinteren
Innenwand bilden. In diesem Falle den
Thermostatknopf auf wŠrmere Temperaturen stellen,
damit das automatische Abtauen
gewŠhrleistet
werden kann, mit folglichem geringerem
Stromverbrauch.
Luftzirkulation
Im GerŠt befindet sich ein Ventilator (DAC) , der
durch DrŸcken des Schalter (F) eingeschaltet wird.
Die nebende Kontrollampe (G) leuchtet auf.
Der Einsatz des Ventilators wird empfohlen, wenn
die Raumtemperatur hšher ist als 25 ¡C, wobei der
Drehknopf auf den Bereich, der durch das
entsprechende Symbol angezeit wird, einzustellen
ist.
Bis zu einer Raumtemperatur von 25 ¡C ist dies bei
jeder beliebigen Position des Drehknopfes mšglich.
Bitte keine Reinigungs- bzw. Scheuermittel
verwenden, die das GerŠt beschŠdigen
kšnnten.
67
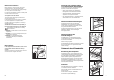
Reversing the doors
Before any operation always remove the plug from
the socket.
Before reversing the door make sure that the
following tools are available:
1 cross-slotted screwdriver
1 slotted screwdriver
1 10 mm wrench
The accessory bag containing:
door fastener
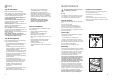
In order to reverse the door proceed as follows:
1. Remove the aeration grid (D) snapped into the
door;
2. Remove the lower hinge (E) by removing the
three screws fastening them;
3. Remove the lower door by sliding it out of the
middle hinge (I). Remove the hole cap for the
hinge pin and mount it on the other side;
4. Remove the lower middle hinge (I), remove the
pin and mount it on the other side;
5. Remove the screw hole cover caps (L) on the
plate on the other side and mount them where
the hinge has just been removed;
6. Mount the hinge on the other side;
7. Mount the lower door;
8. Remove the pin of the lower hinge and mount it
on the other side;
9. Mount the lower hinge (E) on the other side,
remove hole cap (F) from the aeration grid (D) by
pressing it in the direction indicated by the arrow
and mount it on the other side;
10.Mount the aeration grid (D) again by snapping it
into place;
11.Remove the three screws of the upper middle
hinge (M);
12.Remove the upper door by sliding it off the upper
pin (A); remove the door hole cap for the hinge
pin and mount it on the other side:
13.Unscrew the upper pin (A) and mount it on the
other side;
14.Remove the three caps (N) inserted in the late for
the hinge screws and mount them on the
opposite side;
15.Remove the washer (P) from the upper middle
hinge, remove the pin and mount it on the other
side by fitting the washer on the pin and
positioning the whole group on the other side;
16.Mount the door again. Leave the door open and
fasten the upper middle hinge with the two
screws in the inner holes.
D736
A
3P004
N
P
M
L I
F
D
PR18
F
F
F
E
E
D737