
User manual


5
INHALT
Warnungen und wichtige Hinweise 2
Hinweise zur Verpackungsentsorgung 3
Wandbefestigung 4
Gebrauch 6
Bedienungsblende 6
Reinigung der Innenteile 6
Gebrauch des KŸhlabteils - Temperaturregelung 6
Luftzirkulation 6
Hinweise zum richtigen KŸhlen 7
Hšhenverstellbare Abstellregale 7
Hšhenverstellung der TŸrablage 7
Gebrauch des ÇKlimaabteilsÈ 7
Gebrauch des Gefrierteils - Inbetriebnahme 8
Temperaturregelung 8
Schnellgefriervorgang 8
Alarmlampe 8
Einfrieren von frischen Lebensmitteln 8
Aufbewahrung der TiefkŸhlkost 8
Auftauen 9
Halterung fŸr EiswŸrfelbehŠlter 9
Tips 10
Tips fŸr das KŸhlen 10
Tips fŸr das Einfrieren 10
Tips fŸr TiefkŸhlkost 10
Wartung 11
RegelmŠ§ige Reinigung 11
Stillstandzeiten 11
Innenbeleuchtung 11
Abtauen 12
Stšrungen 12
Technische Daten 13
Installation 13
Aufstellung 13
Elektrischer Anschlu§ 14
Hintere AbstandsstŸcke 14
TŸranschlagwechsel 15
Garantiebedingungen 17
68
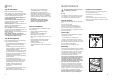
17.Close the door and tighten the third screw in the
hole.
18.Unscrew the handles. Mount them again on the
opposite side after having punctured the caps
with a punch. Cover the holes left free with the
caps supplied in the bag.
Warning:
After having reversed the opening direction of
the doors check that all the screws are properly
tightened and that the magnetic seal adheres to
the cabinet. If the ambient temperature is cold
(i.e. in Winter), the gasket may not fit perfectly to
the cabinet. In that case, wait for the natural
fitting of the gasket or accelerate this process by
heating up the part involved with a normal
hairdrier.