
User manual


3
CONTENTS
Warnings 2
Use 4
Cleaning the interior 4
Operation 4
Temperature regulation 4
Freezing fresh food 4
Storage of frozen food 4
Thawing 5
Ice-cube production 5
Fresh food refrigeration 5
Ambient switch 6
Movable shelves 6
Positioning the door shelves 6
Hints 7
Hints for refrigeration 7
Hints for freezing 7
Hints for storage of frozen food 7
Maintenance 8
Periodic cleaning 8
Periods of no operation 8
Interior light 8
Defrosting 8
Customer service and spare parts 9
Installation 10
Location 10
Rear spacers 10
Electrical connection 10
Door reversibility 11
• Do not place carbonated or fizzy drinks in the
freezer as it creates pressure on the container,
which may cause it to explode, resulting in
damage to the appliance. Do not use a
mechanical device or any artificial means to
speed up the thawing process other than those
recommended by the manufacturer. Never use
metal objects for cleaning your appliance as it
may get damaged.
Installation
• During normal operation, the condenser and
compressor at the back of the appliance heat up
considerably. For safety reasons, minimum
ventilation must be as shown in the instructions.
Attention: keep ventilation openings clear of
obstruction.
• Care must be taken to ensure that the appliance
does not stand on the electrical supply cable.
Important: if the supply cord is damaged, it must
be replaced by a special cord or assembly availa-
ble from the manufacturer or its service agent.
• If the appliance is transported horizontally, it is
possible that the oil contained in the compressor
flows in the refrigerant circuit. It is advisable to
wait at least two hours before connecting the
appliance to allow the oil to flow back in the
compressor.
• There are working parts in this product which
heat up. Always ensure that there is adequate
ventilation as a failure to do this will result in
component failure and possible food loss. See
installation instructions.
• Parts which heat up should not be exposed.
Wherever possible the back of the product should
be against a wall.
Environment Protection
This appliance does not contain gasses which
could damage the ozone layer, in either its
refrigerant circuit or insulation materials. The
appliance shall not be discarded together with
the urban refuse and rubbish. Avoid damaging
the cooling unit, especially at the rear near the
heat exchanger. Information on your local
disposal sites may be obtained from municipal
authorities. The materials used on this appliance
marked by the symbol are recyclable.
10
Electrical connection
Before plugging in, ensure that the voltage and
frequency shown on the serial number plate
correspond to your domestic power supply. Voltage
can vary by ±6% of the rated voltage.
For operation with different voltages, a suitably sized
auto-transformer must be used.
The appliance must be earthed.
The power supply cable plug is provided with a
contact for this purpose.
If the domestic power supply socket is not earthed,
connect the appliance to a separate earth in
compliance with current regulations, consulting a
specialist technician.
The Manufacturer declines all responsibility if
the above safety precautions are not observed.
This appliance complies with the following
E.E.C. Directives:
- 87/308 EEC of 2/6/87 relative to radio interference
suppression.
- 73/23 EEC of 19.2.73 (Low Voltage Directive) and
subsequent modifications;
- 89/336 EEC of 3.5.89 (Electromagnetic
Compatibility Directive) and subsequent
modifications.
INSTALLATION
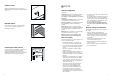
Location
The appliance should be installed well away from
sources of heat such as radiators, boilers, direct
sunlight etc.
For safety reasons, minimum ventilation must be as
shown in Fig.
Appliance positioned under overhanging kitchen wall
units (see Fig. A).
Appliance positioned without overhanging kitchen
wall units (see Fig. B).
Attention: keep ventilation openings clear of
obstruction.
Two adjustable feet at the cabinet base allow
accurate levelling of the appliance.
NP008
100 mm15 mm
15 mm
A
B
Attention
It must be possible to disconnect the appliance from
the mains power supply; the plug must therefore be
easily accessible after installation.
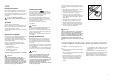
Rear spacers
In the bag with the documentation, there are two
spacers which must be fitted as shown in the figure.
Slacken the screws and insert the spacer under the
screw head, then re-tighten the screws.
D594