Portable CCD Data Collector Z-2130 User’s Manual ( Version 1.1) ZEBEX INDUSTRIES INC. WWW.ZEBEX.
ZEBEX INDUSTRIES INC. Revision History Changes to the original manual are listed below: Version Date Description of Version 1.0 April. 07, 2011 Initial release 1.1 January. 15, 2013 Added USB connection section Data Collector Series User’s Manual Version 1.
Important Notice No warranty of any kind is made in regard to this material, including, but not limited to, implied warranties of merchantability or fitness for a particular purpose. We are not liable for any errors contained herein or incidental or consequential damages in connection with furnishing, performance or use of this material.
Table of Contents IMPORTANT NOTICE................................................................................................. I INTRODUCTION....................................................................................................... 1 Features ........................................................................................................... 1 PC SYSTEM REQUIREMENT ........................................................................................ 1 PACKAGE CONTENTS............
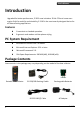
USER’S MANUAL Introduction Upgraded for better performance, Z-2130 now includes a 32-bit CPU and a new scan engine. Built for mobility and durability, Z-2130 is the most smartly designed device for all data collecting applications. Features Convenient on-handed operation. Ergonomic and modern cellular phone styling. PC System Requirement Windows XP Service Pack 2 or above. Microsoft Internet Explorer 5.01 or later. Microsoft Framework 2.0.
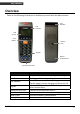
USER’S MANUAL Overview Refer to the following illustrations to familiarize yourself with the data collector.
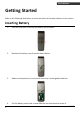
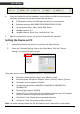
USER’S MANUAL Getting Started Refer to the following illustrations to learn the basics of the data collector in this section. Inserting Battery 3 1. Slide the lock lever to unlock the battery lock as shown. 2. Remove the battery cover from the data collector. 3. Make sure the polarity is correct and insert the 3 rechargeable batteries. 4. Put the battery cover back on and slide the lock lever back to secure it.
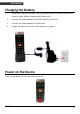
USER’S MANUAL Charging the Battery 1. Place the Z-2130 on the cradle. LED on the data collector indicates the status of battery charge: Red for charging and Green for full. 2. Connect the power adapter to the DB-9 (female) connector. 3. Connect the power adapter to a wall outlet. 4. Charge the batteries until the LED indicator turns green. Power on the Device Press the PW button to turn the power on or off.
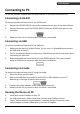
USER’S MANUAL Connecting to PC To use the software supplied with the data collector, it must be connected to a PC. Connecting via RS-232 To connect the data collector to a PC via RS-232 port: 1. Connect the RS-232 DB9 (F) cable to the communication port of the data collector. 2. Connect the other end of the RS-232 DB9 (F) cable to a RS-232 serial port on the computer. 3. Make sure the unit is turned on after the cable is connected.
USER’S MANUAL 4. Select the options from the dropdown menu. When you define communication protocols, you must set the same value with the device. 5. COM options: Select the COM port the device is connected to. Baudrate options: 4800,9600,19200,38400,57600,115200. Parity options: Even, Mark, None, Odd, Space. DataBits options: 8,7. StopBits options: None, One, OnePointFive, Two. After the parameters are set, the device is automatically detected. Setting the Device on PC 1.
USER’S MANUAL Using the Data Collector Refer to the following section to learn how to use the data collector. Scan and Keying in Data (via keypad) There are 26 keys on the data collector. You can use the PW button to power on or off and the rest for data input or for function control. Scanning the Barcode Data 7 1. In the Run Task menu, press and hold the orange SCAN button. A light beam will be activated and shoot out from the window at the lower front end of the data collector.
USER’S MANUAL Keying in Data via keypad Inputting Numerical Data To input numerical data, press the corresponding keys. To save the input data, press Enter after the data is input. To delete the data, press CLR. Inputting an alphabetical character To input an alphabetical character, first find the appropriate key. The following table displays the numerical keys and their corresponding alphabetical characters.
USER’S MANUAL Program Instructions Working with Menus Press M2 at the main screen after power on to go to the System Menu. Press the left or right arrow buttons to move the cursor to the desired option. Press M1 to go to the previous screen. Press M2 or Enter or the number button corresponding to the option to select the option. System Menu Menu Description Menu Run Task Task Utility Setup Upload 9 Description Select this option to start recording data.
USER’S MANUAL Run Task Select “1. Run Task” from the “System Menu” to open Run Task menu. The following screen appears: In the Run Task menu you can: Press the SCAN key to read barcode data. Key in data manually using keypad. Press F3 to insert a blank in between digits or texts you entered by keypad. Press F4 to delete the character or number you entered by keypad.
USER’S MANUAL Press F6 to view the Help menu. You can also use the following functions: -Press F1 to view last 10 records. -Press F2 to view next 10 records. -Press F3 to inert records. -Press F4 to delete records. -Press F5 to jump to records. Task Utility Select “2.Task Utility” from the “System Menu” to open Task Utility menu. The following screen appears: Status 1. Select “System Menu>2.Task Utility>1.Statu” to view file status. 2. Number of records will display on the screen. Format 1.
USER’S MANUAL 5. Set the field length by entering the minimum and maximum field length from 1 to 32. Press Enter to confirm. 6. Set the Prompt by entering a message. 16 maximum characters are allowed. Press Enter to confirm. 7. Enter Field Editing to prompt how many kinds of character you can use, and what they are.
USER’S MANUAL Delete Data 1. Select “System Menu>2.Task Utility>3.Delete Data” to delete all the stored data. 2. Press M2 to select Y or N to delete Freetask and press Enter to confirm. Delete Task 1. Select “System Menu>2.Task Utility>4.Delete Task” to delete all the stored Tasks. 2. Press M2 to select Y or N to delete Task and press Enter to confirm. Select 3 to delete all the stored data. Select 4 to delete all the stored Tasks. Setup Select “3.
USER’S MANUAL Beep Volume 1. Select “System Menu>3.Setup>>1.Basic Setup>2.Beep Volume” to enter the setup. 2. Press the left or right arrow buttons to change the volume to Loud, Medium, Low, or Quiet. Press Enter to confirm. Auto Power Off 1. Select “System Menu>3.Setup>>1.Basic Setup>3.Auto Power Off” to enter the setup. 2. Press the left or right arrow buttons to change the time. Press Enter to confirm. System Setup Select “System Menu>3.Setup>2.System Setup” to open System Setup menu.
USER’S MANUAL On Line Upload 1. Select “System Menu>3.Setup>2.System Setup>1.Communication>2.On Line Upload” to turn this function on or off. Use the left or right arrow buttons to change the value and press Enter to confirm. This function allows the input data to be sent out via the RS-232 port immediately and when the Free Task is executed, it allows the data to be sent out via the communication port at the moment the data occurs and is stored up in each field. 2.
USER’S MANUAL Password 1. Select “System Menu>3.Setup>2.System Setup>3.ID/PW/DateMode>2.Password” to enter the setup to set your password. 2. Enter the password if a password had already been set and press Enter. 3. Enter the new password and press Enter. 4. Enter the new password again to reconfirm and press Enter. Date Mode 1. Select “System Menu>3.Setup>2.System Setup>3.ID/PW/DateMode>3.Date Mode” to enter the setup. 2.
USER’S MANUAL Code 39 1. To turn this symbology on or off, use the left or right arrow buttons to change the value and press Enter to confirm. 2. When Code 39 is set to “ON”, pressing M2 will lead to more options: Code 39 ST/SP: Send, No Send. Code 39 CKD: Send, No Send. Italian Pharmac: On, Off. Pharmac. Add 'A': No Add, Add or No Add. Select the appropriate parameters and press Enter to setup the next symbology.
USER’S MANUAL Code 128 1. 2. To turn this symbology on or off, use the left or right arrow buttons to change the value and press Enter to confirm. When Code 128 is set to “ON”, pressing M2 will lead to more options: Enable EAN 128: On, Off. Code 128 Length: Enter length 1 to 64 for the Min/Max length. Select the appropriate parameters and press Enter to setup the next symbology.
USER’S MANUAL EAN-8 digits To set the digits, press the left or right arrow buttons to change the value to 7 or 8 and press Enter to setup the next symbology. IATA Code To turn this symbology on or off, use the left or right arrow buttons to change the value and press Enter to setup the next symbology.
USER’S MANUAL Upload Select “4. Upload” from the “System Menu” to open the Upload menu. The following screen appears: Upload Data 1. Select “System Menu>4.Upload>1.Upload Data” to enter the upload data screen. 2. The name of the file is displayed on the screen. Press M2 to select Y or N for data upload. Press Enter to confirm. 3. If there is another file to be uploaded, its name will then be displayed on the screen. Repeat the above procedure to choose and confirm. 4.
USER’S MANUAL Upload Device 1. Select “System Menu>4.Upload>3.Upload Device” to enter the setup screen. 2. Use the left or right arrow buttons to select the device for uploading: RS-232 or USB. 3. Make sure the device is connected to the PC and press Enter to begin uploading.