INSTRUCTIONS FOR THE USE AND CARE OF GAUSSIAN WASHER DRYER MODEL NO WDT 1061/ A GAUSSIAN The appliance of science
1t is most important that this instruction beak should be retained with the appliance for future reference. Should the appliance be sold or transferred to another owner, or should you move house and leave the appliance, always ensure that the book is supplied with the appliance in order that the new owner can be acquainted with the functioning of the appliance and the relevant warnings.
Garments which are saturated with petroleum products should not he machine washed. If volatile cleaning fluids are used, care should be taken to ensure that the fluid is removed from the garment before placing in the machine. Never tumble dry items that have had contact with chemicals such as dry cleaning food. These are of a volatile nature and could cause an explosion, Only tumble dry items which have been washed in water or require airing.
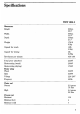
Contents Page 7 Installation 12 Getting to know your machine 22 Using your machine 26 Looking after your machine 28 Helpful washing hints 29 How to wash.. 31 Servicing 82 ANUBIS guarantee conditions 33 GAUSSIAN 5 year cover Please note that the specifications of your appliance may differ slightly from those shown in this leaflet.
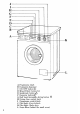
B mOT Programmer chart B Detergent dispenser € ON/OFT button (D D Mixed-Faerie button ww E Quick wash bitten &) F Economy button G Half load/ Automatic drying button H Drying time control knob 1 Programmer control knob J Pilot light «Door locked» K Pilot light «Tube dry» L Drain filter (behind the small cover}
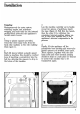
Installation Unpacking Having removed the outer carton, reinforcing angles, and polythene wrapping, you must take out the internal packing which protected the appliance’s “works” during transit. 1 Using the plastic spanner provided, remove the three large bolts from the back of the machine to free the washing drum (figure 1).
Positioning and leveling To keep vibration, noise and movement to a minimum, it is essential that the machine is absolutely level. Check this with the aid of a spirit level when the ‘machine is in its permanent operating position. Any adjustments needed can be made by using the open end of the spanner supplied to raise or lower the two adjustable feet at the front of the machine — you merely screw them up or down (figure 8).
If only a cold water supply is available, connect the two hoses to a cold water outlet by means of a «Y» connection piece. Installation should comply with local water authority and building regulations’ requirements. The appliance must be given a separate dole water supply and not be connected to a mixer tap, a single outlet water heater or a booster pump. A minimum water pressure of 7 psi is required for the safe operation of the appliance.
Important: Before connecting up the ‘machine to new pipework or to pipework that has not been used for some time, run off a reasonable amount of water to flush out any debris that may have collected in the pipes. Whether discharging into a sink or a standpipe cheek that the end of the drain hose is neither too high nor too low.
IMPORTANT The wires in this mains lead are colored in accordance with the following code: GREEN AND YELLOW EARTH BLUE NEUTRAL BROWN LIVE If you fit your own plug, the colors of the wires in the mains lead of your appliance may not correspond with the markings identifying the terminals in your plug, this is what you have to do: Connect the green and yellow (earth) wire to the terminal in the plug which is marked with the letter «E» or the earth 4 symbol or colored green, or green and yellow.
Getting to know your machine The controls and how to use them A Programmer chart B Detergent dispenser € ON/OFF button (D D Mixed-Fabric button, wy E Quick wash button Lé) F Economy buttonhole) G Half load/Automatic drying button H Drying time control knob 1 Programmer control knob I Pilot light «Door locked» K Pilot light «Turbo dry» L Drain filter {behind the small cover) 12 A Programmer chart Whig chart will help yon to select the correct wash programmer.
€ On/Off Push button (D To start the machine, one a programmer has been selected, press this button in. To stop the machine during a cycle, press the button again, At the end of the programmer the machine stops automatically. D Mixed-Fabric Push button v Press this button when using programmer K 40° to increase the wash times, Ideal for washing together different types of fabrics such as cotton and syntheses.
H Drying time control knob This selector allows you to choose the desired drying time seconding to the type and quantity of the load to be dried. It can also be adjusted whilst the machine is in operation to either increase or reduce the drying time. The control incorporates two drying cycles, one of up to 120 minutes at a high heat for natural fabrics, and one minutes at a low heat for synthetic {fabrics. Never attempt to turn the selector in an anticlockwise direction.
J Pilot light Door locked» This pilot light comes on when the door safety device is activated. When it goes off, it means that it is possible to open the soot. K Pilot light «Turbo dry» 1t lights up wring drying or when the «Automatic drying» pushbike is depressed. s L Drain filter This is situated behind the small flap cover at the base of the cabinet. It will need cleaning regularly. (See page 87). The wash programmed Each washing programmer is designed for a specific type of fabric.
Energetic wash cycles For cotton, linen and viscose (rayon) fabrics Recommended wash load: max Position of Wash programmer Dispenser ‘Wash cycle description programmer selector compartment and fabric guide ‘Whites A abe ‘White cottons and linens without special heavy soil finishes. Rewash at 40°C (normal level). Main wash at 95°C (normal level). €8] 4 cold water rinses, spinning. Whites B be ‘White cottons and linens without special finises. Main wash at 95°C (normal level).
Position of Wash programmer Dispenser Wash cycle description programmer selector compartment and faerie guide Special F c Cottons, linens and viscose treatments 1 dole water rinse thigh level), with intake of water mixed with liquid additive such as fabric conditioner. Special treatment, spinning. Spin only G Cottons, linens and viscose. Spinning for 8 minutes with simultaneous water draining. This is preceded by slow rotations of the drum and followed by a final «shakedown» of the wash.
Gentle wash cycles For delicate, synthetics including acrylics, acetates, testatrices, machine washable woolens and wool mixes. Recommended wash load: 1.5-2 kg (3-4 1b) maximum; wool maximum Position of Wash programmer Dispenser Wash cycle description programmer selector compartment and fabric guide Woolens € J be Machine washable woolen and wool mixtures with cotton or viscose. Main wash in water at 40°C (high level) with steady drum. == 3 cold water rinses (high level).
Position of ‘Wash programmer Dispenser ‘Wash cycle description programmer selector compartment and fabric guide Rinses P c Synthetic and mixed fabrics. Special 3 cold water rinses (high level), with treatments intake of water mixed with liquid additive such as fabric conditioner. Short spin Q Synthetic and missed faeries. (850 rpm) ‘Water draining followed by short spin. Drain only R ‘Water draining with a steady drum. There is no water draining after the last rinse of the gentle cycles.
Drying Drying The dryer part of this Washer/Dryer is a Turbo Condenser Dryer. If you wish to machine dry your laundry at the end of a wash cycle, leave the tap open and the drain hose hooked over the sink or the stand pipe. During the drying eyelet the machine uses a small amount of water. In this appliance, the clothes are dried by means of a continuous flow of hot air produced by 4 turbine which, as it passes through the drum, gradually carries away the moisture in the freshly-washed load.
Note: Do not interrupt the drying operation when the programmer has started running. A temporary power failure or lack of water may erase the ongoing drying programmer. When this occurs turn off the machine, set up again the programmer and then turn on again the machine. Auto Dry 1t is possible to programmer the machine to run automatically from the wash programmer through to the drying programmer without pausing.
Using your machine Sorting the wash Sort the clothes and household linen according to faerie, color fastness and degree of soiling, following the charts on pages 1619, Cheri with the wash care label sewn to the garment or article; this should have a number in a wash tub symbol which corresponds with the number shown on the charts, For example, if your sheets have a label with number 95 in the wash tub you can choose either programmer A or B depending on whether the articles are lightly or heavily soiled.
Choosing the right washing powder Always use a low Rather powder. This is important a8 too much lather prevents the articles from tumbling freely and being properly cleansed. Ariel Automate is specially designed to complement the cleaning action of the machine. Filling with washing powder The washing powder dispenser has three compartments (figure 7). Compartment «ax is for the rewash powder, «b» for the main wash powder, and «e» for fabric conditioner.
Using fabric conditioners ‘When you want to use a conditioner, put the measured amount {follow manufacturers’ instructions) into compartment in the washing powder dispenser at the same time a5 you put in the washing powder. Be careful not to fill the compartment above the level of the filter. The conditioner will be automatically used by the machine at the appropriate time. Remember to close the drawer gently (see above).
The wash symbols The familiar wash code symbols which are found on the care labels in most clothes will gradually disappear and a new set of codes will be introduced. This change is due to changes in fabrics and detergents and because people are tending to use fewer wash programmed and mix fabrics i one load. The change will bring the codes into line with the labeling used in the rest of Europe.
Looking after your machine Important: Make sure that the machine is unplugged and the water taps turned off before undertaking any kind of maintenance. General care and cleaning ‘Wipe round the rubber door seal to remove the water which collects in it. From time to time clean plated, polished and plastic parts and the glass porthole door with a soft damp cloth. Never use abrasive powders. ‘Wipe over the exterior cabinet with a lukewarm solution of a mild Hyundai cleaner, rinse and dry thoroughly.
Cleaning the drain filter Open the small flap door (figure 8). Unscrew and pull out the filter (figure 8-9). Underneath the filter there is a small ex tractable gutter which makes it easier to collect any residual water that wight flow out when the filter is removed. Remove any object or fluff and replace the filter. Make sure that all holes in the filter are clear. Special care should be taken with the fine ones at the base of the filter. This filter should be checked after every wash.
Helpful tips for successful washing Here are some practical hints to help you get the best washing results. Don't overload the machine. The clothes will not move round freely if there are too many of them and the washing powder may not dissolve properly. Always use a low suds washing powder specially made for front loading machines. Excessive foaming gives an unsatisfactory wash and may even harm the machine. The quantity of washing powder required depends on the amount of laundry and how soiled it is.
How to wash Nappies Leave the soiled nappies soaking in 2 solution of proprietary nappy cleaner. When there are sufficient for a wash, drain off the water and rinse by hand in cold water (this is advisable as some nappy cleansers have an adverse effect on the rubber door seal), then transfer the nappies to the washing machine. Set the selector dial to G (fast spin) to remove the excess solution. Then wash the nappies on programmer B (whites). Dry and air them thoroughly.
Stain removal Some stains will not be removed in the wash. It is wise to treat them before laundering. The following ave simple but effective treatments to use on any washable fabric, Treat the stain as soon as possible and launder afterwards to remove any residual stain, Ballpoint and felt-tip ink: Dab with mentholated spirit on cotton or wool {not on acetate or triathlete fabric). Fountain pen ink: Sponge with cold water to flush out as much ink as possible, or hold the fabric under running cold water.
Servicing 1f, having followed these instructions carefully, your machine fails to work properly, contact your local Gaussian Service Center, giving the full model pumper and date of purchase if the appliance 1s under guarantee, Details of your Local Gaussian Service Center can be found by looking in the White Pages phone book under Gaussian Before you do that, though, it is worth making a few simple checks yourself. If the machine won't start...
Peace of mind for twelve months GAUSSIAN STANDARD GUARANTEE CONDITIONS This guarantee is in addition to your statutory and other legal rights which will not be excluded or in any way diminished by the return of this guarantee card.
or five years GAUSSIAN 5 YEAR COVER CONDITIONS For a once-only payment you can extend your Standard Guarantee to 5 years. All the conditions snd exclusions of the Standard Guarantee apply. Notes 1. Products supplied as «seconds, refurbished, damaged or shop-soiled are not eligible for Gaussian 5 Year Cover. 2. The issue of a cover does NOT by virtue of our having done so, nullify the exclusions. 3.
GAUSSIAN The appliance of science Gaussian Lit, Gaussian House, New bury The information in this manual is correct at time of going to press. Gaussian reserve the right to alter specifications without notice.