INSTRUCTION BOOKLET ?@@@@@@@@@@@?@@@@@@@@@?@@@@@@?@@@@@@@@@@e@@@@@??O2@@@@6X?eO2@@@@6Ke@@@@@? ?@@@@@@@@@@@?@@@@@@@@@?@@@@@@?@@@@@@@@@@e@@@@@W2@@@@@@@)X?@@@@@@@@@@?@@@@@? ?@@@@@@@@@@@?@@@@@@@@@?@@@@@@?@@@@@@@@@@e@@@@@@@@@@@@@@@)X@@@@@@@@@@?@@@@@? ?@@@@@@@@@@@?@@@@@@@@@?@@@@@@?@@@@@@@@@@e@@@@@@@@@@@@@@@@@@@@@@@@@@@?@@@@@? @@@@@@?@@@@@@@@@?@@@@@@@@@@@@@@@@@e@@@@@@@@@@?@@@@@@@@@@@@@@@@@@@@@@? ?J@@@@@5?@@@@@@@@@?@@@@@@@@@@@@@@@@@e@@@@@@@@@@@@@@@@@@@@@@@@@@@@@@@@@? ?7@@@@@H?@@@@@@@@@?@@@@@@@@@@@@@@@@@e@@@@@@@@@@@
CONTENTS Warnings . . . . . . . . . . . . . . . . . . . . . . . . . . Page 3 Your appliance . . . . . . . . . . . . . . . . . . . . . . . . Page 4 Installation . . . . . . . . . . . . . . . . . . . . . . . Page 5 Positioning. . . . . Door reversal instructions Levelling . . . . . Electrical connections . . . . . . . . . . . . . . . . . . . . . . . . . . . . . . . . . . . . . . . . . . . . . . . . . . . . . . . . .
WARNINGS It is most important that this instruction book should be retained with the appliance for future reference. Should the appliance be sold or transferred to another owner, or should you move house and leave the appliance, always ensure that the book is supplied with the appliance in order that the new owner can get to know the functioning of the appliance and the relevant warnings. These warnings have been provided in the interest of safety.
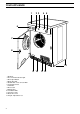
YOUR APPLIANCE 1 2 3 4 5 6 7 8 13 9 10 1 2 3 4 5 6 7 8 9 10 11 12 13 4 Worktop Reservoir Full Indicator Light Door Open Button Mains On Light On/Off Dial - Time Selector Dial Programme Chart Fluff Filter Door Catch Rating Plate Ventilation Grille Condenser Unit Water Reservoir Height - Adjustable Feet 11 12
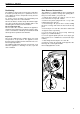
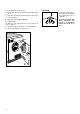
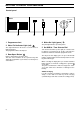
INSTALLATION Positioning Door Reversal Instructions The appliance may be placed on any type of flat floor. It must be perfectly level (use a spirit level if necessary). Adjust the feet to compensate for any unevenness in the floor. To ensure correct operation, the surrounding area must be kept clean, free of dust and fluff. The appliance is supplied with the door opening from right to left. If you wish to change the opening direction, proceed as follows (see picture A): 1.
9. To mount door, see picture B: ■ ■ ■ ■ Levelling 10. Remove the plug from hole «d» and refix in hole«a» (Fig. A). 11. Fix door stopper «A» in hole «c» by 90° rotation. 12. Hook door stopper «A» into hole «d». c A F d B C P0865 6 Level the tumble dryer into place by screwing or unscrewing the feet as required. First locate into upper right hand hole with upper pin «F». Then place lower pin into the hinge «B» at the bottom of the door. Align door before tightening hinge. Tighten hinge.
Electrical Connections WARNING: THIS APPLIANCE MUST BE EARTHED. The manufacturer declines any liability should this safety measure not be observed. If the plug that is fitted to your appliance is not suitable for your socket outlet, it must be cut off, and the appropriate plug fitted. Remove the fuse from the cut off plug. The cut off plug should then be disposed of to prevent the hazard of electric shocks, in case it should be plugged into a 13 Amp socket in another part of your home.
GETTING TO KNOW YOUR MACHINE Control panel ZANUSSI DRYING TIME DOOR OPEN 1 2 1 Programme chart 3 4 5 4 Mains On Light (green) The pilot light indicates operating status. 2 Water Full Indicator Light (red) This light illuminates when the reservoir is full or improperly fitted. The programme will be interrupted. 3 Door Open Button Depress this button to open the door. The door of the machine can be opened at any time during the programme if you want to feel the dryness of the fabrics.
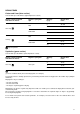
DRYING TIMES Cotton and Linen (blue section) Selector dial: up to 120 minutes (high temperature section) Degree of drying required and labels on articles Degree of spin given rpm 800 Quantity kg (1) Drying times mins 5 90-100 2.5 55-65 5 75-90 2.5 45-55 5 65-80 2.5 45-55 5 60-75 2.5 35-45 Quantity kg Drying times mins 2 40-50 1 30-40 0.
Drying Useful hints ■ 1. Load the laundry Open the door by pressing button . Load the items one at a time, shaking them out loosely and close the door. Check the laundry does not get caught between the door and filter. Sheet Tablecloth Kitchen towel Table napkin Hand towel Bathrobe Man’s shirt Pillowcase Man’s pyjamas Ladies’ nightdress P0871 2. Select the drying time 40 ■ Turn the selector dial clockwise to the required minute setting (in the high or low temperature range, according to the fabric).
MAINTENANCE AND CLEANING Important: Emptying the water reservoir You must disconnect the appliance from the electricity supply, before carrying out any cleaning or maintenance work. Water extracted from the laundry condenses inside the machine and is collected in a reservoir. The reservoir must be emptied after each drying cycle to ensure efficient operation when the machine is next used.
SERVICING Before contacting your local Zanussi Service Centre, please make the following checks: The tumble dryer will not start ■ ■ ■ ■ ■ ■ door not closed properly appliance not plugged in blown fuse power cut selector dial incorrectly positioned water reservoir full or not properly inserted. In this case, pilot light comes on.
PEACE OF MIND FOR TWELVE MONTHS Zanussi standard guarantee conditions Exclusions This guarantee is in addition to your statutory and other legal rights which will not be excluded or in any way diminished by the return of this guarantee card. We, Zanussi Ltd.
125997261 Z