25994475.
125994475.qxp 2005-07-21 13:20 Page 2 Dear customer, Please read these operating instructions carefully and pay particular attention to the safety notes indicated in the first pages. We recommend that you keep this instruction booklet for future reference and pass it on to any future owners. Transport damages After unpacking the machine please check it is not damaged. If in doubt, do not start it but contact your local Service Centre.
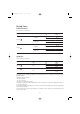
125994475.qxp 2005-07-21 13:20 Page 3 Important safety information ............4 Maintenance and Cleaning................13 External cleaning ................................................13 Disposal ............................................................5 Tips for environmental protection Cleaning the door................................................13 Cleaning the filters ..............................................13 5 Something not working? ....................
125994475.qxp 2005-07-21 13:20 Page 4 Important safety information These warnings have been provided in the interest of safety. You MUST read them carefully before installing or using the appliance. prevent fire risks, do not use the appliance if the fluff filters are damaged or without filters. Installation • Any electrical work required to install this appliance should be carried out by a qualified electrician or competent person. • Do not allow fluff to accumulate around the dryer.
125994475.qxp 2005-07-21 13:20 Page 5 • • Packaging materials The materials marked with the symbol recyclable. are Old appliance The symbol on the product or on its packaging indicates that this product may not be treated as household waste. Instead it shall be handed over to the applicable collection point for the recycling of electrical and electronic equipment.
125994475.
125994475.qxp 2005-07-21 13:20 Page 7 The feet must never be removed. Warning! Do not restrict the floor clearance through deeppile carpets, strips of wood or similar. This might cause heat build-up which would interfere with the operation of the appliance. Unpacking Slide out the polythene bag with the polystyrene stuffing before using the appliance. Pull off adhesivestrips from inside machine on top of drum..
125994475.qxp 2005-07-21 13:20 Page 8 Once connected to the dryer, run the vent hose to the desired outlet point, ensuring that the run’s overall length is less than 2 m, and that it contains no more than two bends. As to the outlet itself, if you have decided on a fixed wall/window grille, a good local builder’s merchant should be able to supply you with the necessary fittings and installation advice. Electrical connection This machine is designed to operate on a 220-230 V, single-phase, 50 Hz supply.
125994475.qxp 2005-07-21 13:20 Page 9 The control panel DUAL TEMPERATURE kg 5 kg 2,5 800 / 900 1000 / 1200 800 / 900 1000 / 1200 80' - 100' 40' - 55' 75' - 95' 35' - 50' 95' - 115' 60' - 75' 90' - 110' 55' - 70' TD 4212 650 kg 2,5 kg 1 50' - 60' 30' - 35' A U T O R E V E R S E 1 2 3 4 5 1 Programme Chart 5 Drying Time Selector Dial This will help you to select the correct time for drying.
125994475.qxp 2005-07-21 13:21 Page 10 Drying Times Cotton and Linen Selector dial: up to 150 minutes Degree of drying required Quantity kg Drying times mins 800/900 5 2.5 095-115 060-75 1000/1200 5 2.5 090-110 055-70 800/900 5 2.5 080-100 040-55 1000/1200 5 2.5 075-95 035-50 Quantity kg Drying times mins 2.5 50-60 1 30-35 0.5 25-30 2.
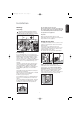
2005-07-21 13:21 Page 11 4. Start the machine Operating sequence Depress Start-button Before starting up for the first time it is advisable lo load a few moist cloths into the dryer and to let it run for about 20 minutes. This ensures that no dust and dirt is left in the drum. , the mains-on light comes on and the machine starts operating. 1. Load the laundry Open the door. Load the items one at a time, shaking them out loosely and close the door.
5994475.qxp 2005-07-21 13:21 Page 12 • Avoid drying dark clothes with light coloured fluffy items such as towels as they could attract the fluff. Useful hints • Try to load to the maximum capacity of the machine as small loads are uneconomical. For information, here is a list of the average weights of some common laundry items. Sheet • Easy-care items, too, e.g. shirts, should be briefly pre-spun before drying (depending on crease resistance approx.
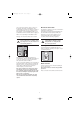
125994475.qxp 2005-07-21 13:21 Page 13 You must disconnect the appliance from the electricity supply, before you can carry out any cleaning or maintenance work. If necessary the filters can be cleaned under running water using a brush. In this case remove the filter in the door opening as per picture (it can be positioned with the tooth facing to the left or to the right).
125994475.qxp 2005-07-21 13:21 Page 14 Something not working? Before contacting your local Zanussi Service Centre, please make the following checks: Problem Possible cause • The door is open. • The dryer does not work: • The plug is not fitted into the wall socket. • There is no electricity supply from the wall socket. • The selector dial is not set correctly. • The start button has not been depressed. • The filters are clogged. • The dryer does not dry properly: • Insufficient drying time.