For THE USER Safety information 3 ~Warnings and guidance The parts and controls of your dryer 4/5 Instructions for use 9 Before you use the dryer...
& Before installing or using the tumble dryer, read the instruction booklet carefully, including its hints and warnings. Doing so will help ensure that your dryer will function properly and to best advantage. Anyone using the dryer should be thoroughly familiar with its instructions for use and the safety aspects. Save these instructions and make sure they remain with the dryer if it is moved or sold, so that everyone using it through ies life can be properly informed on machine use and safety.
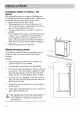
1. Dour LATCH (push the knob to the right t0 open} 2. SPACE FOR PROGRAMMER CHART (Sc if-adhesive label) Choose the language you require and attach the chart to a suitable place on the dryer. 3. CONTROL PANEL WITH INDICATOR LIGHTS * LIGHTS Ay A Indicates the dryer is running &) B = Indicates that the water rank is full ¢ ON/OFF TIMER KNOB C = Turn this knob in a clockwise direction to start the dryer and set both the drying time and the drying temperature.
ADJUSTABLE FEET If the dryer is not being wall mounted the feet need to be adjusted so that the dryer is level. AR puts These should not be obstructed FILTERS (The fluff filter is behind the coarse filter.) Should be cleaned before or after cache load. The fluff filter is behind the coarse filter and can be removed for cleaning, CONDENSER This is built into the door and needs to be cleaned at regular intervals.
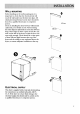
CHOOSING WHERE TO INSTALL THE DRYER You can install this dryer in a number of different ways. We will show you the most suitable of these. Whichever way you install it, here are some points to bear in mind: * Always censure that the dryer is level. ¢ The temperature in the room should not exceed +35°C when the dryer is operating. If it does, open a door or window while the dryer is ot ¢ The area around the dryer should be as dust free as possible.
WALL MOUNTING Before deciding on the wall mounting site, it is important to check that the electrical lead will reach the wall socket once the dryer is in place. All electrical work performed on the dryer should be done by a qualified electrician or competent person. If you are installing the dryer between wall mounted clapboards, you should use the wall mounting kit.
Electrical CONNECTION WARNING: THIS APPLIANCE MUST BE EARTHED. The manufacturer declines any ability should this safety measure not be observed. 1f the plug that is fitted to your appliance is not suitable for your socket outlet, it must be cut off and the appropriate plug fitted. Remove the fuse from the cut off plug.
BEFORE YOU USE THE DRYER FOR THE FIRST TIME Dampen some clean pikes of unwanted cloth and dry them for about 15 minutes the very first time, to make sure that there is no dust or dirt in the dryer. 1. Check that the dryer is connected to the electrical supply. 2. Open the door by pushing the knob to the right (A). 3. Check that the lint filter (B) is clean and that the coarse filter (C) is lowered and has snapped into place. 4. Check that the water tank (D) is empty and pushed correctly into place. 5.
WHICH PROGRAM SHOULD | USE? TIMED DRYING This program chart is designed to help you dry your laundry correctly. The knob has two different sections, each with its own drying temperature and time scale: is used to represent cotton. Here you can set the dryer for up to 120 minutes, because @ ¢ cotton and thick non-synthetic fabrics need longer to dry. is used to represent synthetic fabrics and delicate terns. Because these are more sensitive @ &8 than cotton, they need a lower drying temperature.
SORTING Always sort loads for drying according to the type of textile {check the care labels) and how much you want to dry them. Load items loosely into the drum. Do up zip fasteners and tie loose ribbons, tapes or fabric belts. Close any tapes or fasteners on duvet covers and pillow cases to prevent smaller items from getting trapped inside. SPINNING (EXTRACTION) Loads should be well spun.
THE FILTERS For your tumble dryer to function properly, the filters need to be cleaned before or after every load dried. To clean them: 1. Open the door. 2. Open the coarse filter upwards (Fig. A). 3. Brush the fluff off the fluff filter (Fig. B), which is under the coarse filter. Sometimes you may need to remove the fluff filter to clean it on both sides. Make sure that you put the fluff filter back correctly after cleaning, before closing the coarse filer.
EMPTYING THE WATER TANK A warning light on the control panel will come on when it is time to empty the water tank. If it is operating when this happens, the dryer will stop automatically until the tank is emptied. It is a good idea to get into the habit of emptying the tank either before or after cache load. To empty the tank: 1. Open the door. B [ 2. Pull out the tank (Fig. A). 3. Open the tank lid and pour the water out (Fig. B). 4. Close the lid and push the tank back into place.
TYPE OF FAULT POSSIBLE CAUSE ACTION ¢ The dryer will not start. * The door is not closed properly. ¢ The dryer has no power supply. * The program/timer knob is in the 0 position. » The water tank is foll. * Close the door firmly. © Check that the dryer is plugged in and switched on. Check fuses and /or circuit breakers. * Turn the knob to the dme required. * Empty the tank and re-start the dryer. ® The load is not drying prior is taking too long to ¢ The time set was not long enough.
Height 686 mm Overall Width 605 mm Depth 420 mm (with door closed) Depth 900 mm (with door opened 90°) Weight (net) 32kg Capacity 3.0 kg (cotton) Electrical supply 240V, 50 Hz Fuse 10A Motor 170W Power rating 2020W CONSUMPTION ACCORDING TO THE IEC 1121 INTERNATIONAL STANDARD Energy 2.7 kWh/3 kg cotton Drying time 100 min. incl.
Zaniness! GUARANTEE CONDITIONS This guarantee is in addition to your statutory and other legal rights which will not be excluded or in any way diminished by the return of this guarantee card. We, Gaussian Ltd.