1t is most important that this instruction book should be retained with the appliance for future reference, Should the appliance be sold ar transferred to another yawner, or should you move house and leave the appliance, always ensure that the busk is supplied with the appliance in order that the new owner can get 10 know the functioning of the appliance and the relevant warnings.
CONTENTS Specifications General Features Installation Electrical Connections Getting To Know Your Machine The Drying Times Using Your Machine Maintenance and Cleaning What Happens If Something Goes Wrong? Servicing Service Agent Directory Peace Of Mind For Twelve Months Or Five Years Page Page Page Page Page Page Page Page Page Page Page Page Page 3
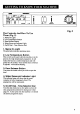
213 Worktop Mains On Light Low Temperature Button Door Release Button Water Reservoir Indicator Lamp On/Off Dial Time Selector Dial Programmer Cheri Fluff Filter Door Catch Rating Plate Ventilator Grille Air Condenser Water Reservoir Container Height-adjustable feet
This tumble dryer can be positioned without the need for any special type of installation as the operation of ihe condenser unit means that there is fa steam 10 vent. You will, however, need to ensure that there is a continuous air supply and the hot air which is discharged through the venting sits at the base of the machine must not be restricted, Otis recommended that, for your convenience, the: making is positioned close 10 your washing machine.
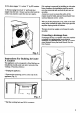
10, Fix door stopper “A" in hole ‘C” by %0° rotation, 11. Remove plug from hole and hook door stopper into the bole. Ensure you have the hook the some ct way round 1o catch the door as it opens. Fig.2 Instructions For Building In Under A Counter “The appliance can be integrated in fetid kitchens or installed as 2 build-under unit after removal of the worktop. Proceed as follows: * Unplug the appliance. * Unscrew the mounting screws at the rear of the appliance (Fig. 3).
THE ELECTRIC WARNING THIS APPLIANCE MUST BE EARTHED. AL CONN “The manufacturer declines any Liability should this safety measure not e observed. 1f the plug that is fitted 10 your appliance is nol suitable for your socket outed, it must be cut off and the appropriate plug fitted. “The ent off fug should be disposed of 1o prevent.
won The Controls And How To Use Them (Fig. 5) 1. Mains On Light 2, Low Temperature Button 3. Door Release Button 4. Water Reservoir Indicator Light 5. On/Off fiat Time Selector Dial 1. Mains On Light “The pilot Eight indicates operating status. 2. Low Temperature Button This switch ¢an be used when the machine is in the process of a high temperature programmer. It will reduce the heat to a cooler temperature and will greatly dry the clothes. Your tumble dryer continues 1w operate with reduced heating. 3.
THE DRYING PROGRAMMED Time Controlled Programmed The programmer guide is designed 1o help you. This dryer has two drying times of up to 120 and 80 monies, giving 2 high or low heat temperature. according to the fabric type, This can be extended O™ wheat the original programmer is complied, by re-seining the control knob for a further period of The door of the machine can be opened at any time during the programmer if you want to fee! the dryness of the fabrics.
R MACHINE Sorting The Load The maximums load you can dry in your womble dryer is 4.5kg (101b) of cotton, linen and other strong fabrics, 1.75kg (41b) of synthetics and 2.25kg {816} of absorbent fabrics such as wellington. 1f you are using a washing machine, all you have 1o do is transform the clothes, afire the spin.cycle trim. the washing machine to the tumble dryer. Sort the Laundry according o fabric.
IMPORTANT Make sure halt dhe making is plugged before undertaking any kind of maintenance. Cleaning The Fluff Filter “The fluff filter should be cleaned after every drying process. A considerable paramount of fluff accumulates bui this is not due 1o extra wear caused by the drying process. During drying on a washing tine duff attached 1o the surface of the clothes is blown away by the wind and is therefore not noticeable, see Fig, 6. To empty, grasp the rough from underneath and slowly remove the container.
Wipe the outside of the condenser and remove any fluff. Clean the condenser with a brush or a hand shower attachment (Fig 10), Fig. 10 Lean the. barber seals of door opening and air. condenser with a damp cloth immediately afire every drying operation.
PENS 1 It the machine is not working... Is the machine properly plugged in? Is the fuse okay? Ts the door closed properly? 1s the programmer properly sot? 1s the Water Reservoir Romaines empty of properly inserted? (if NOT, the *Water Reservoir’ indicator tamp tights up). The machine does not dry satisfactorily...
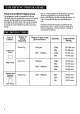
Post-| Awn Post-code Service | Post-| Town Post-toed Services code Huber Force | code Huber Farce Letter Key Letter Key Number W Number A Aberdeen 5 1 DG Dumpsites 17,3642 " A Castaways #10 2 oG 1314 5 A Recon Bam 15,1315 4 DH Brougham 9 31 oA 10,2022 5 DL Standing 117 37 BA 815 s DN Don caster » B8 Blackburn Bradford +23 8 DN Don caster 89,1521, 29-40 Bournemouth 8 SUB POSTCODE DIVISION & 1820 © DN Gainsborough B Bury o8 b South 211,212 218 « BN Brighton 16,4115, 7 BN Gainsborough BN 027 12 North 213,214 o
[ A0 I Gaussian Standard Guarantee Conditions “This guarantee is in addition 10 your statutory and other Regal rights which will not be excluded or in any way diminished by the return of this guarantee card.
OR FIVE Y i Gaussian 5 Year Cover Conditions For a once-only payment you can extend your Standard Guarantee, all the conditions and exclusions of which apply. 1. The issue of a cover docs NOT by virtue of our having done so, nullify the exclusions. 2. The engineer will need 1o check the details of your Cover Certificate and will make a charge for his services if it is not presented 10 him at the time of his call, 3.
The appliance of science Gaussian Ltd., Gaussian House, New bury The information in this manual s cor reel at time of going to press Suasion reserve the right to alter specifications without notice.