Cooker ZCE560 ZCV561 ZCV563
Contents Safety instructions _ _ _ _ _ _ _ _ _ _ _ _ _ _ _ _ _ 2 Cooking tables _ _ _ _ _ _ _ _ _ _ _ _ _ _ _ _ _ _ _ _ 13 Description of the appliance _ _ _ _ _ _ _ _ _ _ _ _ _ _ _ 4 Care and cleaning _ _ _ _ _ _ _ _ _ _ _ _ _ _ _ _ _ _ 15 Before first use _ _ _ _ _ _ _ _ _ _ _ _ _ _ _ _ _ _ _ _ _ 5 What to do if...
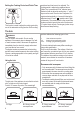
• Take great care when heating fats and oils, as they will ignite if they become too hot. • Never place plastic or any other material, which may melt in or on the oven. • Always support the grill pan when it is in the withdrawn or partially withdrawn position. • Always use oven gloves to remove and place food in the oven. • Ensure cooking utensils are large enough to contain foods to prevent spillage and boil over.
Description of the appliance Product description 6 1 7 8 2 3 4 99 5 8 10 1 Hob 2 Control Panel 3 Top Oven/Grill Door 4 Top Oven/Grill Door Handle 5 Main Oven Door 6 Tubular heating element 7 Grill Pan 8 Shelf 9 Fan Cover 10 Levelling Feet 11 Ceramic Hob 12 Hot Hob Indicator 11 12 Controls and their functions ZCE560DW, ZCV561DW/DX 1 1 Grill 2 Main Oven 3 Back Left 4 2 3 4 Front Left 5 Front Right 6 Back Right 4 5 6
ZCV563DDW/DX/DN 1 1 2 3 4 2 3 Timer Top Oven/Grill Main Oven Black Left 4 5 6 7 5 Front Left 5 Front Right 6 Back Right Before first use Rating plate • This is situated on the lower front frame of the appliance and can be seen upon opening the door. Alternatively the rating plate may also be found on the back or top of some models (where applicable). • The appliance must be protected by a suitably rated fuse or circuit breaker. • The rating of the appliance is given on the rating plate.
• To prevent discolouration, regularly wipe away condensation and foodstuff from surfaces. • For your safety wall coverings at the rear of the appliance should be securely fixed to the wall. Cookware • Baking trays, dishes etc., should not be placed directly against the grid covering the fan at the back of the oven. • Do not use baking trays larger than 30cm x 35cm (12” x 14”) as they will restrict the circulation of heat and may affect performance.
IMPORTANT! The increase and decrease control buttons operate slowly at first and then more rapidly. They should be pressed separately. Press the “mode“ ( ) key until “dur” indicator lamp starts to flash. Adjust the desired cooking period by using “+” or “-” keys. Press the “mode”( starts to light. ) key until “ “ indicator lamp To set the countdown This function can be used as time set up and alarm when wished.
Setting the Cooking Period and Finish Time This function is used to adjust the cooking period by use of the automatic cooking function. Both cooking period and end time have to be adjusted. The cooking period is adjusted as explained above. “Mode” key is pressed until “End” indicator lamp flashes in order to adjust the ending time. “+” and “-” keys must be used.
IMPORTANT! Only for ceramic hob models: Occasionally the heated areas may be seen to switch on and off when higher heat settings are used. This is due to a safety device, which prevents the glass from overheating. • Some switching on and off when cooking at high temperatures, e.g. deep fat frying is quite normal, causes no damage to the hob and little delay in cooking times. • Excessive switching may however be caused by the use of an unsuitable saucepan or a saucepan which is smaller than the heated area.
At the end of grilling, as in all other cooking processes; turn the top oven switch off. Take the grill pan out by using an oven glove and put the pan onto a safe place. Keep children away from the hot oven during and after grilling, until it has cooled completely.
The top oven (ZCV563DW/DX/DN) Using the Top Oven towards you until the shelf stop is reached. Tilt shelf up at the front to that the stops clear the side supports. Lift shelf clear. To insert a shelf, reverse the above steps. Hints and tips The switch for the top oven allows you to select the oven functions. The symbols and their functions are briefly explained in the following lines. The detailed information for their usage will also be explained in the following pages.
The main oven The fan oven is particularly suitable for cooking larger quantities of food. The advantages of fan oven cooking are: are briefly explained in the following lines. The detailed information for their usage will also be explained in the following pages. Preheating Defrost function The fan oven quickly reaches its temperature, so it is not usually necessary to preheat the oven. Without preheating however, you may need to add an extra 5 – 10 minutes on the recommended cooking times.
Defrost Set the defrost function by turning the knob to the right. This main oven function defrosts most foods faster than more conventional methods. It is particularly suitable for delicate frozen foods which are to be served cold e.g. cream filled gateaux, cakes covered with icings or frostings cheesecakes, biscuits, scones, etc. Turn the main oven temperature control to the required setting.
FOOD FAN OVEN TOP OVEN COOKING TEMP °C POS APPROX COOK TIME (h) COOKING TEMP °C Biscuits 180 - 190 2 180 - 190 0:15 - 0:25 Bread 200 - 220 1 200 - 220 0:25 - 0:35 Bread rolls/buns 200 - 220 1 200 - 220 0:15 - 0:30 Small / Queen Cakes 160 - 170 1 170 - 180 0:20 - 0:30 Sponges 160 - 170 1 170 - 180 0:25 - 0:35 Victoria Sandwich 160 - 170 1 160 - 170 0:25 - 0:35 Madeira Cake 140 - 150 1 140 - 150 1:15 - 1:45 Rich Fruit Cake 140 - 150 1 140 - 150 2:15 - 2:45 Christ
Shelf positions are counted from the bottom of the oven. Main oven shelf positions are not critical but ensure that they are evenly spaced when more than one is used. Roasting chart Meat Temperature Cooking time Beef/ Beef boned 160 - 180 °C 0:20 - 0:35 minutes per ½kg (1lb) and 0:20 - 0:35 minutes over. Mutton/Lamb 160 - 180 °C 0:25 - 0:35 minutes per ½kg (1lb) and 0:25 - 0:35 minutes over. Pork/Veal/Ham 160 - 180 °C 0:30 - 0:40 minutes per ½kg (1lb) and 0:30 - 0:40 minutes over.
• Cleaners that contain bleach should not be used as they may dull the surface finishes. Harsh abrasives and scourers should also be avoided. Multi-surface anti-bacterial cleaning products should not be used on the ceramic hob or on the surrounding trims. Cleaning the outside of the appliance ! WARNING! Before cleaning always allow the appliance to cool down before switching off at the electricity supply. • Do not use abrasive cleaning materials e.g.
To remove burnt on foodstuff • We strongly recommend the use of a Ceramic Hob Scraper (incorporating a single edge razor blade) to remove spillage on the hob, in particular sugar solutions, which if not removed can cause permanent damage. • Make sure the ceramic glass is cool. • Use a ceramic hob scraper with care at an angle of 30° to remove as much foodstuff as possible. • Use hob cleaner or cream cleaner to finish off as directed above.
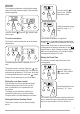
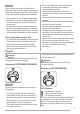
Cleaning between the outer and inner door glass ! WARNING! Rough handling, especially around the edges of the front panel, can cause the glass to break. A Removal of inner Glasses (if applicable ) After Cleaning: • Push the glass towards under the location bracket “A”. • Place the glass under location bracket “B”. 2 1 4 3 B Before cleaning the oven door glasses, you must pull out the inner glass as shown: • Push the glass towards direction 1 and release from the location bracket .
Problem Possible solution The grill, ovens and timer do not work. • Check that the appliance has been wired in to the appliance supply and is switched on at the wall. • Check that the main appliance fuse is working. • If you have checked the above: Allow the appliance to cool for a couple of hours. The appliance should now be working normally. The grill and top oven work but the main oven does not. • Check that the time of day has been set on the clock. The timer does not work.
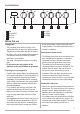
• The cable should be routed away from potentially hot areas. Connection diagrams as given below: N operating it. This adjustment can be made by turning the levelling feet clockwise or anti-clockwise, if required. It is possible to raise the product up to maximum of 35 mm via the levelling feet. If it becomes necessary to move the appliance after the levelling feet have been adjusted, it is advisable to lift and not drag.
Ceramic Hob Rating 145 mm 1200 W 180 mm 1800 W 180 mm(dual zone) 1700 W 180 mm 1800 W Solid Hob Rating 145 mm hotplate 1000 W 145 mm rapid hotplate 1500 W 180 mm hotplate 1500 W 180 mm rapid hotplate 2000 W Environmental Information The symbol on the product or on its packaging indicates that this product may not be treated as household waste. Instead it should be taken to the appropriate collection point for the recycling of electrical and electronic equipment.
your local Service Force Centre by telephoning 08445 616 616 Your telephone call will be automatically routed to the Service Force Centre covering your postcode area. For the address of your local Service Force Centre and further information about Service Force, please visit the website at www.serviceforce.co.uk Before calling out an engineer, please ensure you have read the details under the heading "What to do if..." When you contact the Service Force Centre you will need to give the following details: 1.
Albania +35 5 4 261 450 Rr. Pjeter Bogdani Nr. 7 Tirane Belgique/België/Belgien +32 2 363 04 44 Bergensesteenweg 719, 1502 Lembeek Èeská republika +420 2 61 12 61 12 Budìjovická 3, Praha 4, 140 21 Danmark +45 70 11 74 00 Sjællandsgade 2, 7000 Fredericia Deutschland +49 180 32 26 622 Muggenhofer Str. 135, 90429 Nürnberg Eesti +37 2 66 50 030 Pärnu mnt. 153, 11624 Tallinn España +34 902 11 63 88 Carretera M-300, Km. 29,900 Alcalá de Henares Madrid France www.electrolux.
Slovensko +421 2 43 33 43 22 Suomi www.electrolux.fi Sverige +46 (0)771 76 76 76 Electrolux Service, S:t Göransgatan 143, S-105 45 Stockholm Türkiye +90 21 22 93 10 25 Tarlabaþý caddesi no : 35 Taksim Ýstanbul Ðîññèÿ +7 495 937 7837 129090 Ìîñêâà, Îëèìïèéñêèé ïðîñïåêò, 16, ÁÖ "Îëèìïèê" Óêðà¿íà +380 44 586 20 60 04074 Êè¿â, âóë.Àâòîçàâîäñüêà, 2à, ÁÖ "Àëêîí" 24 Electrolux Slovakia s.r.o.
www.zanussi.com 52027845-11.2009/R000 To buy accessories, consumables and spare parts at our online shop please visit: www.zanussi.co.