EN User manual Washer/Dryer Stand with Drawer PDST HEC 2
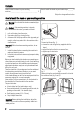
Contents How to install the stand on your washing machine _ _ _ _ _ _ _ _ _ _ _ _ _ _ _ _ _ _ _ _ _ 2 How to install the stand on your tumble dryer _ _ _ _ 4 Subject to change without notice How to install the stand on your washing machine Warning! Do not install the stand on a washer/dryer column. Caution! If the washing machine is already connected to the mains, proceed as follows: 1. pull out the plug from the mains; 2. stop water supply by closing the tap; 3.
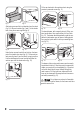
If the side is as shown in fig. 2, you must pick the rear brackets as in fig. 4. If, the side is as shown in fig. 3, you must pick the rear brackets as in fig. 5. fig. 11 fig. 6 fig. 7 fig. 12 Slide the stand under the washing machine so that its front adjusting feet match the stands front brackets (fig. 11) and the rear bracket is positioned against the machines back (fig. 12). Screw the rear bracket onto the machines back using one of the supplied screws (fig. 13).
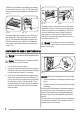
The stand is now installed; check whether your washing machines back feet rest on it (fig. 16). Otherwise undo them using the key supplied with your washing machine (fig. 17). fig. 20 fig. 18 fig. 19 The stands drawer, with a capacity of up to 20 kg, contains two dividers; they may be taken out if you wish (fig. 18). The drawer was designed with a special compartment inside where you can place a folding plastic box, supplied, quite useful to store your washing laundry (fig. 19). fig.
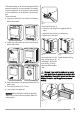
In the stands drawer you will find an envelope with all the necessary material for a correct assembly. Have ready a Phillips screwdriver to fit rear brackets to the stand and an Torx screwdriver to fit rear brackets to the machines back. The pack includes: • 2 grey short rubber feet to be used for the following tumble dryer models: fig. 2 Proceed as follows (fig. 2): • loosen the nuts using the key supplied with the stand; • adjust the feet to allow for an uneven floor; • tighten up all check nuts.
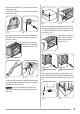
Fit the rear brackets to the machines back using the previously removed screws (fig. 11). DX fig. 7 fig. 8 After having removed the front brackets from the stand (fig. 5), fit the rear brackets (fig. 6 and 7) to the stands back, using the screws supplied (fig. 8). fig. 9 fig. 12 fig. 13 The stands drawer, with a capacity of up to 20 kg, contains two dividers; they may be taken out if you wish (fig. 12).
www.zanussi.