It is most important that this instruction hook should be retained with the appliance for future reference. Should the appliance be sold or transferred to another owner, or should you move house and leave the appliance, always ensure that the book is supplied with the appliance in order that t+ new owner can be acquainted with the functioning of the appliance and the relevant warnings. Warnings — Built-in ovens THESE WARNINGS ARE PROVIDED IN THE INTEREST OF SAFETY.
Contents Building-in Connecting to electricity Use and care Using the upper oven Using the lower oven Using the grill (leaning ‘What happens if something goes wrong page 3 page 5 page 8 page 11 page 12 page 13 page 15 Important: The installation of the oven and connecting it to electricity must always be done by competent installers to standards and regulations currently in force.
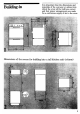
o It is important that the dimensions and Bml m materials of the surround or cabinet into which the oven will be built are correct and that proper arrangements are made for & continuous supply of air to the oven.
Important: To ensure an efficient ventilation, it is necessary to leave the openings provided at the bottom of the vane free. Securing the oven to the cabinet Fit the appliance into the cabinet recess: Open the oven doors and secure the oven body to the kitchen cabinet by means of six wood screws correctly fitting the holes provided for the purpose on the perimeter frame {fig. 4).
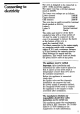
Connecting to city The oven is designed to be connected to 240V 50Hz electricity supplies. The upper oven has a circular element rated at 2500W. The lower oven ratings are as follows: Lower element 1000W Upper element. 1000W Grill element 2000W The oven has an easily accessible terminal block marked as follows: Letter L Live terminal Letter N Neutral terminal & Earth The cable used must be of the three conductor type with a cross section of 2.5 many.
Use and care The FM is a built-in appliance congesting of two ovens. The upper oven is evenly heated throughout. A fan in the back wall distributes heated air round the food during cooking so that 6 everything cooks in the same time regardless of where it is placed in the oven or how much is being cooked. Foods of different types, provided they require the same cooking temperature, ean be cooked together and there is no possibility of any flavors or, smells being transmitted from one food to another.
a programmer b ON/OFF indicator light (yellow} ¢ upper oven light d lower oven light ¢ grill control knob h f lower oven control knob & upper oven control knob .
Using the upper oven As soon as the oven is switched to any setting between 50°C and 250°C the fan starts up and runs motile the oven control is switched off again. Food should be put into the oven before switching on, even when cooking manually the speed of heating up is so fast that there is no need to preheat. The oven shelves can be fully filled but & space of at least one free shelf runner should be left between loaded shelves. All type and materials of cooking utensils may be used.
Cooking manually ‘When cooking without using the time control function, knob 2 on the programmer must be muted until the «open hand» symbol on dial 6 is in line with the pointer at its left (see fig. 6). Arrange the food in the oven, shut the door and turn the oven control (see fig. 5) o the required temperature setting. ‘When the control reaches 4p the indicator light will come on, also the internal oven light. This setting is NOT a cooking position but is intended for gentle thawing of frozen food.
To set the digital clock Pull out knob 1 and turn it either way uni the correct time shows on the clock, then release the knob. The clock will now run continuously. To use the minute minder This is a simple timer and cannot be used at the same time as the automatic function. It can be set to ring at any time up to 60 minutes by tuning knob 1 clockwise until the required time is in line against the pointer of dial 3.
Using the lower oven Preheat the oven, arrange the food in the oven, shut the door and turn the oven control {see fig. 7) to the required ‘temperature setting. When the control reaches #» the indicator light will come on, also the internal oven light which will remain on during the whole cooking time. Positions from 50°C to MAX are cooking positions and give a full range of temperatures.
Using the grill The grill is located in the lower oven. As with the ovens, the grill control can be set to a number of different heats {fig. 8). At MAX the element stays on continuously to give the highest degree of heat. Foods to be grilled are placed on the ‘wire grid in the grill pan which can be curved either upwards or downwards to give the required distance from the element.
After every meat roasting wipe down the catalytic oven panels using a damp cloth, a8 soon as they have cooled down. This removes the powdery remains of fat splashes. After use wipe the Test of the appliance over with a cloth wrung out in ha quid detergent. Do not use abrasive scourers or steel wool on any stainless steel, painted or enameled surfaces. Always wait until the oven is cool before cleaning this is particularly important where the glass oven door is concerned.
Cleaning the lower oven The oven interior is made of a strong vitreous enamel and therefore can be cleaned with any recognized oven cleaner. Important: Please take care to follow the cleaner manufacturer’s instructions precisely. Care must be taken to ensure that the oven cleaner does not come into contact with the aluminum and painted surfaces of the appliance.
‘What happens if something goes wrong Important: If the ovens do not come on when cooking manually, first check that the fault is with both ovens ~ it may be that if it is the upper one only that is affected there is & simple answer — the programmer should be set so that the open hand» symbol on dial 6 of the programmer {see fig. 6) is in line with the pointer.
ZANINESS APPLIANCE GUARANTEE GAUSSIAN STANDARD GUARANTEE CONDITIONS This guarantee is in addition to your statutory and other legal right which will not be deluded or in any way diminished by the return of the guarantee card.