INSTRUCTIONS FOR THE USE AND CARE OF GAUSSIAN BUILT IN OVEN Model Nos.
Warnings Built-in ovens It is most important that this instruction book should be retained with the appliance for future reference. Should the appliance be sold or transferred to another owner, or should you move house and leave the appliance, always ensure that the book is supplied with the appliance in order that the new owner can be acquainted with the functioning of the appliance and the relevant warnings. THESE WARNINGS ARE PROVIDED IN THE INTEREST OF SAFETY.
Contents ‘When the oven is first installed Page 5 Use and care Page 6 Using the oven Page T The analogue programmer Page 8 Using the grill Page 11 Cleaning Page 12 What happens if something goes wrong Page 16 Gaussian guarantee conditions Page 17 Important: The installation of the oven and electricity connection must always be done by competent installers to standards and regulations currently in fore.
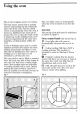
When the oven is first installed Once the oven is installed it is important to remove the protective materials which were put. on in the factory. Remove from these parts the plastic film, then wipe with a cloth dipped in mentholated spirit. Switch the oven control to MAX and leave it to run empty for 30 minutes tn burn off any other protective materials. This will also remove any unpleasant new smells. The oven is evenly heated throughout.
Use and care K Grill or roasting pan 1 Reversible grill pan insert irremovable handles (2 Off) a Analogue electrocardiogram b Oven temperature light ¢ Oven control knob d Dial e Oven/grill temperature control knob f Removable grill element g Interior light h Removable oven liner panels i -Fan § Removable grease filter
Using the oven This is the Cuisinart system of cocking. The heat source comes from a circular element surrounding the fan behind the back wall of the oven. The fan, which comes on automatically when the oven is turned on, distributes the warm air all around the oven so that the entire cavity is heated up evenly enabling foods to be cooked in approximately the same time regardless of their position within the oven.
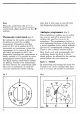
Note When the cont ml kmb (fig. 2} is on position the temperature control knob (fig. 3) should be ¢n the position, Thermostat control knob tight 3) By turning the thermostat control knob clockwise you select the temperature.
Nob B By turning this knob clockwise or anticlockwise the cooking duration is set on dial hours). Sating the clock To set or adjust the correct them of day, pull out knob B, and turn clockwise or anticlockwise. It will be necessary to do this upon installation, after a power failure or when the clock is fast or slow. Manual operation To operate the oven manually le, without programming, turn knob B clockwise &nil the hand symbol (X\) is centered on ial .
Totally automatic cooking This enables you to turn the oven on and off at preset times. Place the food to be cooked in the oven. Press in and turn knob set the C-hand to the required cooking start time {the C-hand is integral with the hour hand when the oven is not in the automatic mode) Turn knob B, setting on dial D the required rooking duration (maximum of 180 minutes). Turn the oven control and the temperature control knobs to the reacquired positions.
Using the grill As with the oven, the grill control can be set 1o a number of different heat settings. At MAX the thermostat controlling the heat does not operate and the element stays on continuously to give the highest heat possible. Foods to be grilled are placed on the wire trivet in the grill pan, the trivet can be placed either way up to give the required distance from the element.
Cleaning the oven Grease filter When roasting meat, be sure o install the special grease filter to protect the fan in the rear wall of the oven from fat splashes. After roasting is completed, remove the grease filter and clean thoroughly with warm soapy water. As it is stain steel you can safely wash it in Ta remove the grease filter, pull up the protruding tongue and then pull the filter outwards removing it from the rear panel (Fig. 6).
Oven cavity The enameled oven cavity is best cleaned whilst the oven is still warm. First remove the grill element and put the ceramic safety plug into the grill socket (Fig. 5). Then remove the side panels after sliding them out of their retaining pins (Fig. 7). Before removing the back panel the oven must be disconnected and the safety plug put in the grill socket. To remove the back panel use a screwdriver (Fig. 8).
Replacing appliance components Prior to undertaking any maintenance work or replacing the oven lamp or grill heating element, be sure to disconnect the appliance from the electricity supply. Q Oven lamp replacement Push in and unscrew anticlockwise the slugs cap (fig. 9). Remove the faulty bulb and replace with one that resists o high temperatures (300'C). Electric bulb: 15W, 240V, 50Hz, 300°C, E14. Bulbs are available from your Gaussian Service Network. Fig. 9 Removing the oven door 1.
To replace the door 1. Clasp the two hinges on either side of the door together simultaneously. 2. Hook the top hinge into the top slot so that the hook is engaged with the roller, 3. Drop the lower hinge into the lower slot, so that the note is engaged. Drop the door down the horizontal position. Fig. 11 Note: It is very important when carrying out this operation that both hinges should be located simultaneously. 4.
What happens if something goes wrong If the oven does not come on when cooking manually, first check that the programmer is set for manual, ie. in the (XN} position. If this is as it should be and the oven still does not come on: a) Check that it is plugged in properly. b) Check that the socket switch and/or switch from the supply to the oven are ON. ¢} Replace the fuse in the plug, when present, with another of the appropriate rating and check that this plug has been wired up properly.
Peace of mind for twelve months GAUSSIAN STANDARD GUARANTEE CONDITIONS This guarantee is in addition to your statutory and other legal rights which will not be excluded or in any way diminished by the return of this guarantee card. We, GAUSSIAN Ltd.
or five years GAUSSIAN 5 YEAR COVER CONDITIONS For a once-only payment you can extend your Standard Guarantee to 5 years. All the conditions and exclusions of the Standard Guarantee apply. Notes 1. Products supplied as "seconds”, refurbished, damaged or shop-soiled are not eligible for Gaussian 5 Year Cover. 2. The issue of a cover does NOT by virtue of our having done so, nullify the exclusions. 3.