Contents Building in Page 3 Electrical connection Page 5 Using the upper oven Page 8 The digital programmer Page 9 Using the lower oven Page 12 Using the grill Page 13 Maintenance and cleaning Page 14 What happens if something goes wrong Page 18 in fore.
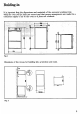
Building-in Tt is {important that the dimensions and materials of the surround or cabinet into which the oven will be built are correct and that proper arrangements are made for a continuous supply of air to the oven so it does not overheat, 28 19 19, Fig. 1 Dimensions of the recess for building into a kitchen unit {mm). Ts 2\ “‘”g Fig.
Important To ensure en efficient ventilation, it is necessary to leave the vents provided at the bottom of the oven clear. Securing the oven to the cabinet Fit the appliance into the cabinet recess. Open the oven door and secure the oven to the kitchen cabinet with six wood screws which fit exactly the holes provided in the oven frame (fig. 8). Cooling fan . The cooling fan is designed to cool the Fig. 3 oven housing and the components of the oven itself.
Electrical connection The oven is designed to be connected to 240V 50 Hz electricity supply. The upper oven has a heating element rated at 2500W.
When the oven is first installed Nee the oven is installed it is important to remove the protective materials which were put on in the factory. Remove from these parts the plastic film, then wipe with a cloth dripped in mentholated spirit. Then switch the oven control to MAX and leave it to run empty for 30 minutes to burn off any other protective materials, This will also remove any unpleasant new smells, This appliance consists of two ovens.
Digital electrocardiogram On/off pilot light Lower oven control knob Lower oven/grill temperature control knob Lower oven temperature light Upper oven temperature light Upper oven control knob Removable oven liner panels Fan Removable grease filter ‘Upper oven Lower oven m Removable shelf runners Grill or roasting pan o Reversible grill pan insert p Removable handles (2 Off)
Using the upper oven This is the Cuisinart system of cooking. The heat source comes from a circular element surrounding the fan behind the back wall of the oven. The fan, which comes on automatically when the oven is turned on, distributes the warm air all around the oven so that the entire cavity is heated up evenly enabling foods to be cooked in the same time regardless of their position within the oven.
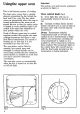
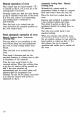
Operation of the digital clock/ programmer (fig. 6) This programmer enables you to switch the oven on and off at per-set times without the need for you to be in attendance. A sound signal indicates the end of a programmed cooking cycle. The time of day is also shown. Most foods cook well automatically, but preference should be given to those which will not be affected by the waiting period before the oven comes on.
Manual operation of oven T First ensure that the hand symbol { &) is centered on dial not, do so by turning knob 2 clockwise. Secondly, make sure that the time shown on dial 5 coincides with that of the clock. If it does not, correct it by depressing and turning knob 3 clockwise or anticlockwise. Place the food to be cooked into the oven and select the required position on the oven control knob.
Totally Automatic Cooking This enables you to turn the oven on and off at per-set times. Place the food to be cooked into the oven. Turn knob 2 clockwise, setting on dial 4 the required cooking duration (maximum 210 minutes). Depress and turn knob 3 clockwise or anticlockwise to set on dial 5 the required cooking start time, Turn the oven control knob to the required setting.
Using the lower Owen When using a traditional oven, it is necessary to per-heat the oven first. All cooking must be done with the door closed. Heating elements ave positioned at the top and bottom of the oven, therefore the greatest hat at any one time is in the center of the oven cavity.
Using the grill The grill is located in the lower oven. As with the oven, the grill control can be set 1o a number of different temperatures. At MAX the element stays on continuously to give the highest degree of heat. Foods to be grilled are placed on the wire trivet in the grill pan, the trivet can be placed either way up to give the required distance from the element. For foods which require slow grilling, the grill pan should be set on the lower positions.
Maintenance and cleaning Important The electricity supply must be switched off before undertaking any maintenance operation. Grease filter upper oven) This filter protects the fan from fat splashes; it should always be cleaned after roasting has taken place. As it is stainless steel you can safely wash it in a dishwasher, Install the grease filter only when roasting fat meats. Removing the grease filter (fig.
Removing the oven panels (upper oven) From time to time you will need to remove the liner panels from the oven for thorough cleaning. Slide out the bottom drip tray. Unscrew the ring nuts securing the side runners (fig, 11) and remove them. Slide the panels (fig. 12) forward and pull away from the cavity wall 1t is possible to remove the back panel, before doing this ensure that the oven is disconnected from the electricity supply. Using a screwdriver remove the four resews (fig.
Cleaning the lower oven The oven interior is made of a strong virtuous enamel and therefore can be cleaned with any normal oven cleaner. Remove, by pulling out, the grill element and put the safety plug into the grill socket {fig. 14). Remove the side runners as described. Important Please take care to follow the oven cleaner manufacturer’s instructions precisely.
40076 Fig 15/ 40077 Fig. 15/ A008 Fig. 15/C Removing the oven door (fig. 154, B, ) the oven door so that it is in the horizontal position. 2. With the aid of a coin move the two retaining discs a.quarter turn clockwise, 50 that the two raised bars are to the left hand side of the hinges, 3. Raise the door halfway, 4. At this stage the two hinges on either side of the door must be clasped together simultaneously, The door can then be removed by pulling out and downwards, maintaining the angle.
What happens if something goes wrong If the oven does not come on when cooking manually, first check that the programmer is set for manual, ie. in the { ¥ ) position. If this is as it should be and the oven still does not come on: &) Check that it is plugged in properly. b} Check that the socket switch and/or switch from the supply to the oven are ON. ¢) Replace the fuse in the plug, when present, with another of the appropriate rating and check that this plug has been wired up properly.
GAUSSIAN GUARANTEE CONDITIONS This guarantee is in addition to your statutory and other legal rights which will not be excluded or in any way diminished by the return of the enclosed card.